
How to Connect Xero MCP to Codex
Connect the official Xero MCP server to Codex with a Xero Custom Connection, Client ID, Client Secret, matching scopes, and a read-only Demo Company test.
On this page +
This guide shows how to connect the official Xero MCP server to Codex and confirm that Codex can read data from the authorised Xero organisation.
Before starting, complete the Xero Custom Connection setup and keep the current Client ID and Client Secret available. Use the Xero Demo Company for the first test so the connection can be verified without changing real accounting data.
Don’t have a Xero Custom Connection yet? Follow our local Xero MCP setup guide to create one, authorise the Demo Company, and obtain your Client ID and Client Secret. The same connection works in Claude Desktop and ChatGPT if Codex is not the only client you need.
What You Need
Finish the Xero-side setup before opening Codex:
- Codex installed
- Node.js and npm installed
- A Xero Custom Connection
- An authorised Xero Demo Company or eligible organisation
- The current Xero Client ID
- The current Xero Client Secret
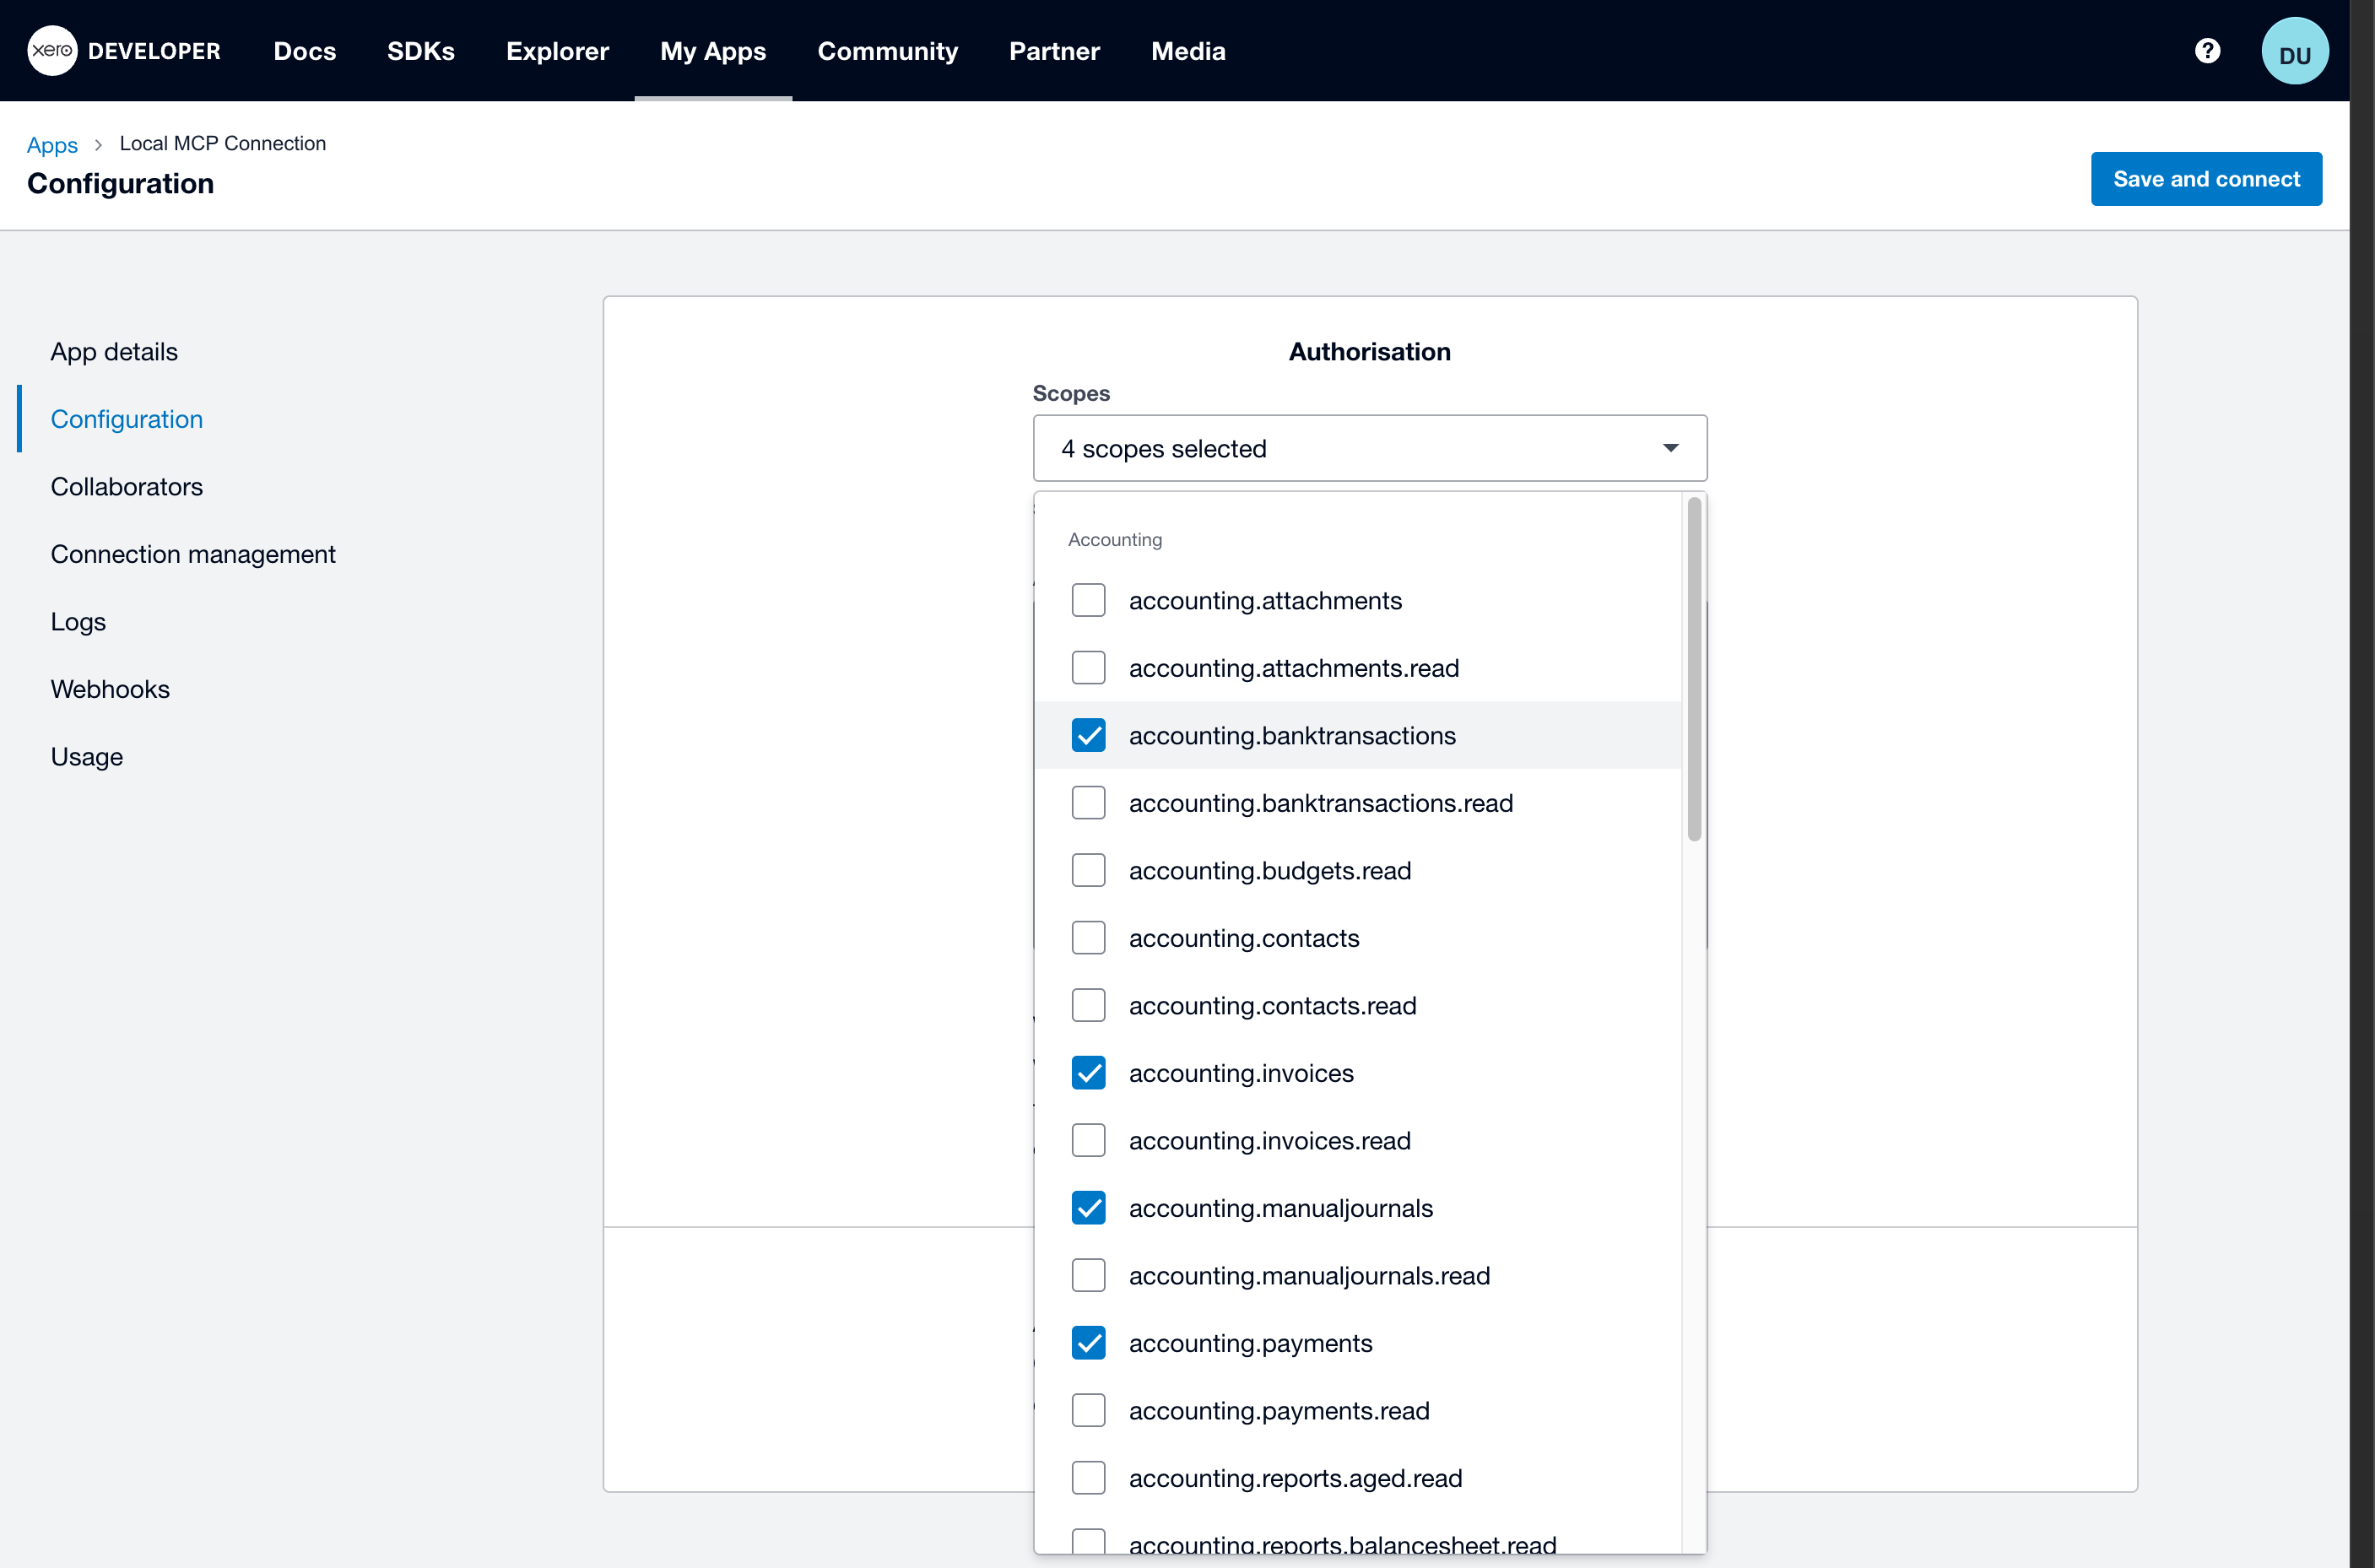
- The Xero scopes required by the tools you want to use
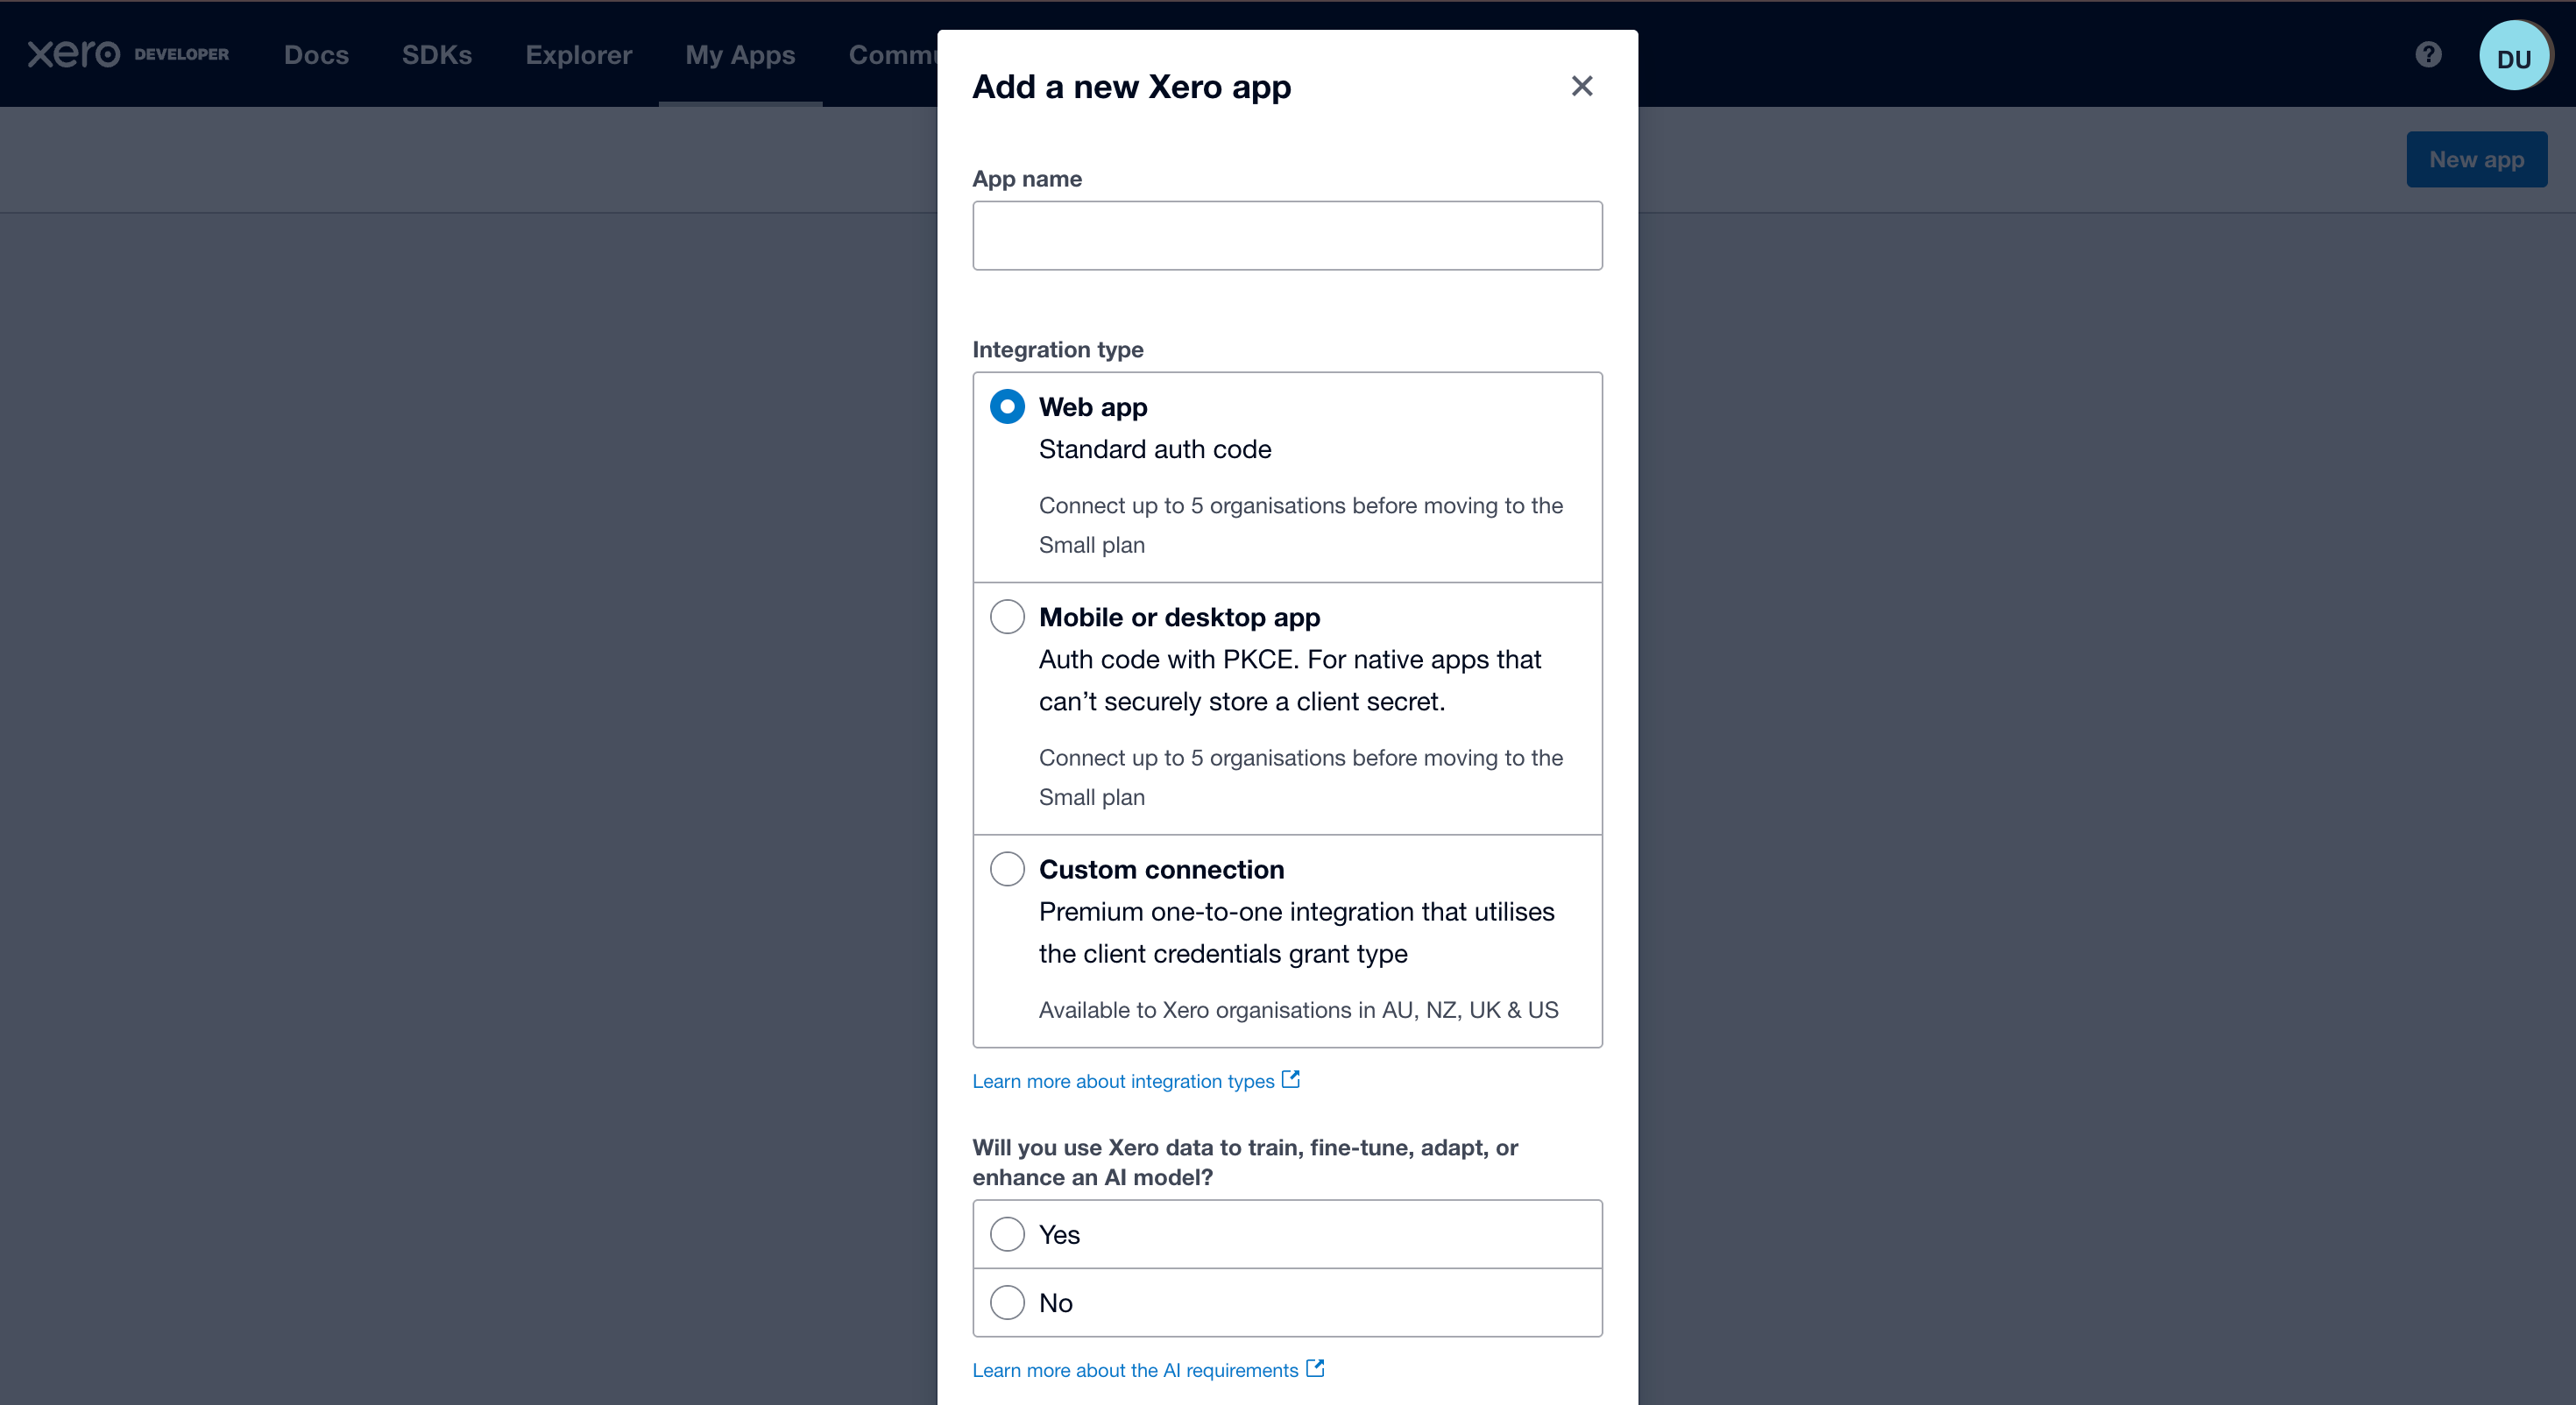
For the first organisation-details test, use:
accounting.settings.readFor invoice access, also authorise:
accounting.invoices.readThe scopes entered in Codex must match the scopes authorised in Xero Developer.
Step 1: Open Codex MCP Servers
Open Codex and go to:
Settings → MCP serversCreate a new local STDIO MCP server.
Use a clear name such as:
xero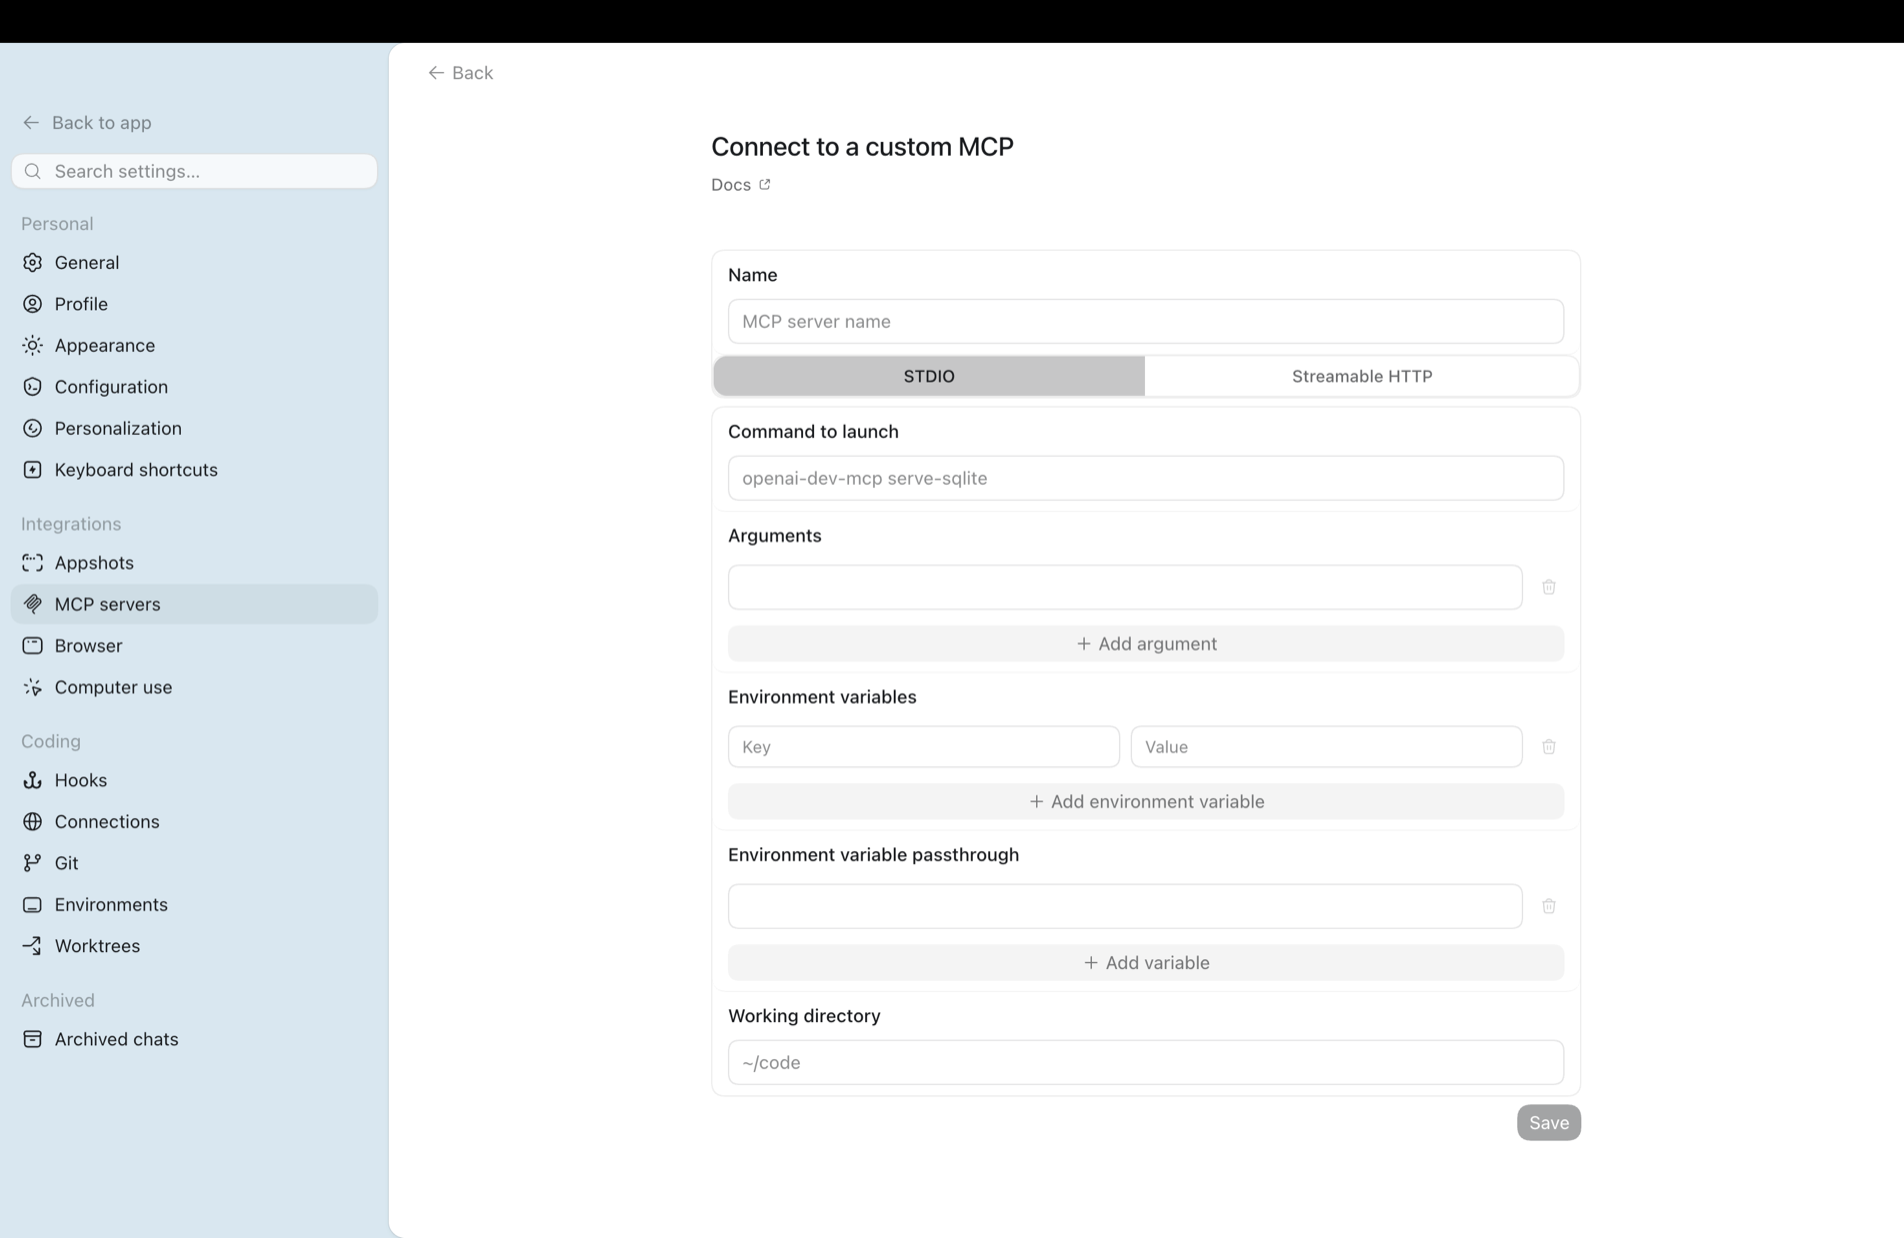
Success check: The Codex MCP server form is open and ready for configuration.
Step 2: Add the Xero MCP Server Command
Set Command to launch to the absolute npx path:
/opt/homebrew/bin/npxOn macOS, confirm the path in Terminal with:
which npxUse the path returned by that command if it is different.
Under Arguments, add these as two separate rows:
-y@xeroapi/xero-mcp-server@latestThe two values must be separate arguments.
The completed command is equivalent to:
/opt/homebrew/bin/npx -y @xeroapi/xero-mcp-server@latestLeave Environment variable passthrough empty.
You can leave the working directory at its default value unless your Codex setup requires a specific directory.
Success check: The command uses the absolute npx path and the package values appear as two separate arguments.
Step 3: Add the Xero Credentials and Scopes
Add these environment variables:
| Name | Value |
|---|---|
XERO_CLIENT_ID |
The current Client ID from the authorised Xero Custom Connection |
XERO_CLIENT_SECRET |
The current Client Secret from the same Custom Connection |
XERO_SCOPES |
A space-separated list matching the scopes authorised in Xero Developer |
For a basic read-only organisation test:
XERO_SCOPES=accounting.settings.readFor organisation details and invoice access:
XERO_SCOPES=accounting.settings.read accounting.invoices.readUse credentials from the same Xero Custom Connection. If the Client Secret has been rotated, replace the saved value in Codex before testing again.
Do not include quotation marks around values in the Codex form unless the interface adds them automatically.
Success check: Codex has the current Client ID, current Client Secret, and the same scopes authorised in Xero Developer.
Step 4: Save and Restart Codex
Click Save.
Fully quit Codex, then reopen it:
osascript -e 'quit app "Codex"'
open -a Codex
Start a new Codex conversation after the application reopens.
Codex loads the MCP server configuration when the application or session starts. A full restart ensures the server uses the latest command, credentials, arguments, and scopes.
Success check: Codex reopens without an MCP configuration error.
Step 5: Confirm the Xero MCP Server Is Available
Open Settings → MCP servers and confirm that the xero server is enabled.
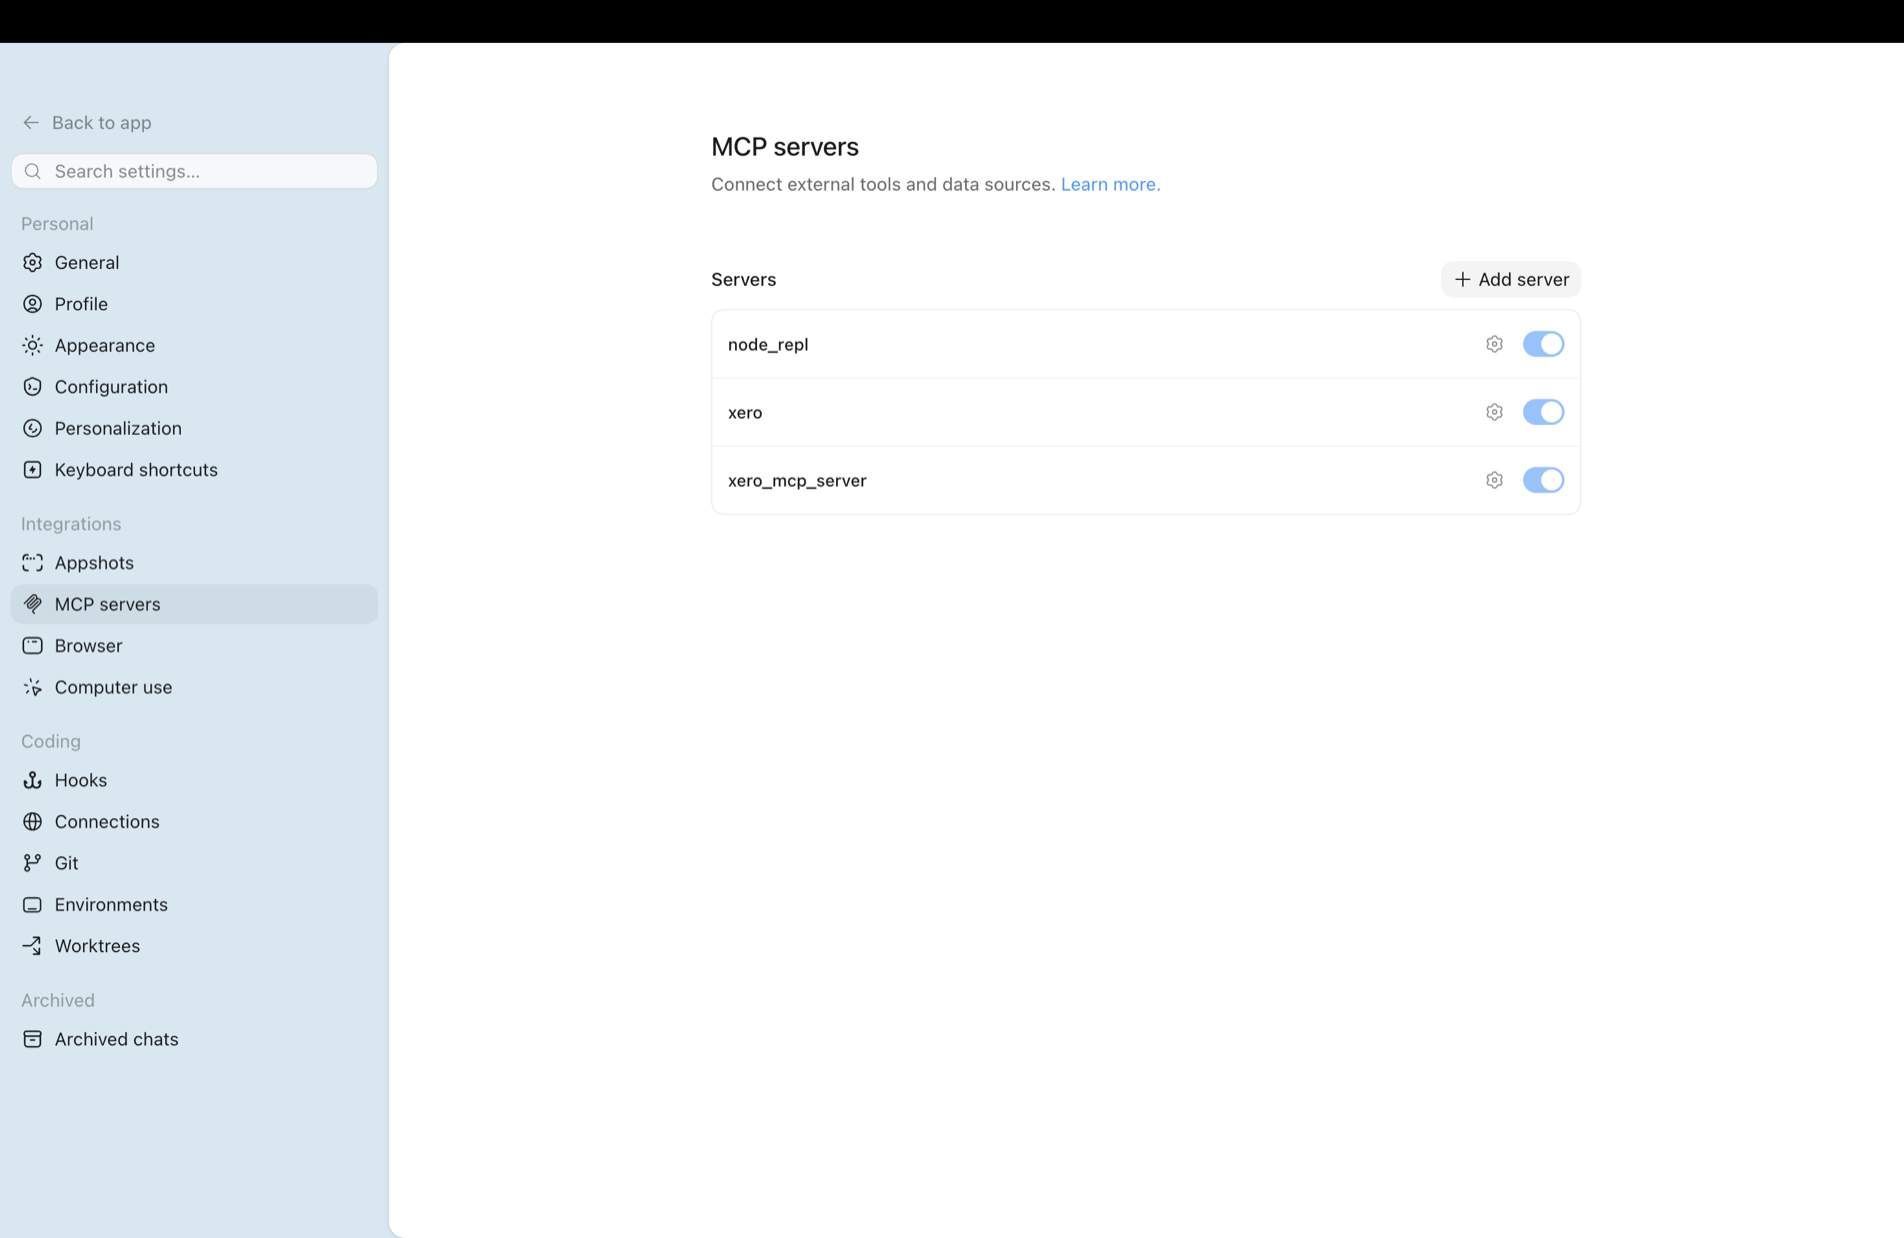
Then start a new conversation and ask Codex to use the Xero MCP server.
Use this first test:
Use only the Xero MCP server.

Call the read-only list-organisation-details tool.

Return the organisation name, country, and base currency.
Do not create or update any Xero records.
A successful response should include the organisation authorised through the Xero Custom Connection:
Organisation name: Demo Company (Global)
Country: <Demo Company country>
Base currency: <Demo Company currency>
The country and base currency depend on the Demo Company region.
Success check: Codex returns the expected Xero organisation.
Step 6: Test Invoice Access
Before testing invoices, confirm that this scope is selected and authorised in Xero Developer:
accounting.invoices.readThen confirm that XERO_SCOPES in Codex includes it:
accounting.settings.read accounting.invoices.readRestart Codex after changing the scopes.
Use this prompt:
Use only the Xero MCP server.

Call the read-only list-invoices tool and retrieve every available
page of invoices.

Report:

- total invoice count
- counts by status
- sales invoices versus bills where available
- open invoice count
- overdue invoice count
- total invoiced
- total paid
- total outstanding
- totals by currency
- the 20 most recent invoices

Show invoice number, contact, type, status, invoice date, due date,
currency, total, amount paid, and amount due where available.

Do not create or modify any Xero records.
Success check: Codex returns invoice data from the authorised Xero organisation without an authentication or scope error.
Step 7: Retrieve More Read-Only Xero Data
After the first tests succeed, add only the read scopes required for the Xero tools you want to use.
Then ask Codex to inspect the available Xero MCP tools and run the authorised read-only tools.
Example:
Use only the Xero MCP server.

First call list-organisation-details and confirm the connected
organisation.

Then inspect the available Xero MCP tools and run every authorised
read-only listing or reporting tool.

Retrieve all available pages.

For each data type, report:

- total records retrieved
- counts by status or type
- useful financial totals
- date range covered
- the most recent records
- overdue or incomplete records
- the MCP tool used
- any scope or pagination limitation

Do not create, update, approve, pay, or delete any Xero records.
Use the Demo Company while testing broader scopes or write-capable tools.
Example Xero MCP Prompts for Codex
The first organisation-details test above is the safest connection check. After it works, ask Codex for read-only data using prompts like these.
Count all invoices
This requires accounting.invoices.read to be authorised in Xero Developer and included in XERO_SCOPES.
Use only the Xero MCP server.

Call the read-only list-invoices tool.

Retrieve every available page of invoices and report:

- total invoice count
- counts by status
- sales invoices versus bills where available
- total amount invoiced
- total amount paid
- total amount outstanding

Do not create or modify any Xero records.
Find open and overdue invoices
Use this after invoice read access is working.
Use only the Xero MCP server.

Call the available read-only invoice tools.

Find all open and overdue invoices.

Report:

- invoice number
- contact
- invoice date
- due date
- status
- currency
- total
- amount paid
- amount due

Sort overdue invoices from oldest to newest.
Do not create or modify any records.
List accounts
Make sure the matching read scope is authorised in Xero Developer and included in XERO_SCOPES.
Use only the Xero MCP server.

Call the read-only list-accounts tool.

Group the accounts by account type and report:

- account name
- account code
- account type
- status
- tax type where available

Do not create or update any accounts.
List contacts
The contact details returned depend on the authorised scopes and the connected organisation’s data.
Use only the Xero MCP server.

Call the read-only list-contacts tool.

Report:

- total contact count
- customers and suppliers where identifiable
- contact name
- email address where available
- account number where available
- contact status

Show the 20 most recently updated contacts if update dates are available.
Do not create or update any contacts.
Retrieve a financial report
The official Xero MCP server exposes list-profit-and-loss for profit and loss reporting. Make sure the matching read scope is authorised in Xero Developer and included in XERO_SCOPES.
Use only the Xero MCP server.

Call the read-only list-profit-and-loss tool.

Return the profit and loss report for the current financial year.

Summarise:

- total income
- cost of sales
- gross profit
- operating expenses
- net profit

State the report date range and currency.
Do not create or modify any Xero records.
Retrieve as much read-only data as possible
The result depends on the scopes authorised for the Custom Connection.
Use only the Xero MCP server.

First call list-organisation-details and confirm the connected organisation.

Then inspect the available Xero MCP tools and run every authorised read-only listing or reporting tool.

Retrieve all available pages.

For each data type, report:

- total records retrieved
- counts by status or type
- useful financial totals
- date range covered
- the most recent records
- overdue or incomplete records
- the MCP tool used
- any scope, permission, pagination, or API limitation

Do not create, update, approve, pay, or delete any Xero records.
Diagnose a failed setup
Use this prompt to collect useful failure details without running write-capable tools.
Use only the Xero MCP server.

First check whether list-organisation-details is available.

If it fails, return:

- the MCP tool name
- the exact error message
- whether the failure appears related to authentication, scopes, tool discovery, or the connected organisation

Do not retry write-capable tools.
Do not create or update any records.
Common Xero MCP and Codex Errors
| Problem | What to check |
|---|---|
invalid_client |
Confirm the Client ID and Client Secret are current, belong to the same Custom Connection, and are saved in the Codex MCP server entry. |
The direct Xero token test works but Codex still returns invalid_client |
Delete and recreate the Codex MCP server entry so it no longer uses stale saved credentials. Then fully restart Codex. |
invalid_scope |
Confirm XERO_SCOPES matches the scopes authorised in Xero Developer. Separate multiple scopes with spaces. Reauthorise the Custom Connection after changing scopes when required. |
| Codex does not discover the Xero MCP server | Confirm the server is enabled, restart Codex, and start a new conversation. |
Codex cannot find npx |
Run which npx and use the returned absolute path as Command to launch. |
| The Xero package does not start | Confirm -y and @xeroapi/xero-mcp-server@latest are entered as two separate argument rows. |
| The wrong Xero organisation is returned | Confirm the credentials belong to the Custom Connection authorised for the intended organisation. |
| Invoice tools are unavailable | Add and authorise accounting.invoices.read, update XERO_SCOPES, and restart Codex. |
| The Codex TOML is invalid | Check table names, quotes, array syntax, and duplicate Xero MCP server blocks. |
Still stuck? Xero MCP troubleshooting works through these same failures across every MCP client, not just Codex.
Xero MCP With Codex FAQ
Does Codex support the Xero MCP server?
Yes. Codex can start the official Xero MCP package as a local STDIO server.
Which command should I use?
Use the absolute path returned by:
which npxOn many Apple Silicon Macs, this is:
/opt/homebrew/bin/npxHow should the arguments be entered?
Add these as two separate arguments:
-y@xeroapi/xero-mcp-server@latestWhich Xero scopes do I need?
Use only the scopes required by the tools you want to call.
For organisation details:
accounting.settings.readFor invoice access:
accounting.invoices.readWhen using both:
accounting.settings.read accounting.invoices.readWhy does Codex return invalid_client?
Codex is using a Client ID or Client Secret that Xero does not accept. Confirm both values come from the same authorised Custom Connection. If the credentials work outside Codex, recreate the Codex MCP server entry and restart the application.
Can I use the Xero Demo Company?
Yes. The Demo Company is the recommended first test because it contains fictional accounting data.
Can I connect a real Xero organisation?
Yes. Use a Custom Connection authorised for that organisation and review the required permissions and scopes before enabling access.
A Managed Xero MCP Option for Teams
The local Codex setup works well for one technical user.
For a team, every computer needs its own configuration, credentials, updates, and troubleshooting. A hosted connection can be easier to manage when several people need controlled access to the same Xero organisation.
Kipper is one managed option for teams that want a centrally managed Xero MCP connection with controlled access and audit logging. Where the official server hands you every tool it has, Kipper stays inside a fixed set of Xero records.
Learn more about a hosted Xero MCP connector for finance teams.