








How to Set Up a Local NetSuite MCP Bridge (Developer Guide)
Use a community local MCP bridge to connect developer clients to Oracle's hosted NetSuite AI Connector Service. Setup, OAuth, roles, risks, and sources.
On this page +
See it live
Ask Kipper about your NetSuite data.
Sales orders, stock on hand, invoices and vendor bills.
Schedule free onboardingNo signup. Runs in your browser.
The Model Context Protocol (MCP) gives AI assistants a structured way to call tools in business applications. Oracle brings MCP to NetSuite through the NetSuite AI Connector Service, which exposes NetSuite tools to approved AI clients.
In this guide, you’ll learn how to configure NetSuite, create OAuth and role boundaries, review a community bridge package, and connect a local MCP-compatible client. We use Claude Code as the example client, but the important distinction applies everywhere: Oracle provides the hosted NetSuite AI Connector Service; the local package is a bridge to that service, not an Oracle local server.
Using NetSuite with Local MCP Clients
Oracle’s NetSuite AI Connector Service provides the official hosted MCP implementation for NetSuite, enabling compatible AI clients to access approved NetSuite tools. Oracle documents standard connection paths for Claude and ChatGPT, and current ChatGPT instructions use Apps. Oracle does not provide a standalone local MCP server that you download and run for clients such as Claude Code, Cursor, or Gemini CLI.
To bridge this gap, community-developed MCP servers allow local AI clients such as Claude Code, Cursor, and Gemini CLI to connect to Oracle’s hosted AI Connector Service. This guide uses one of those community-developed MCP servers to connect an AI client to NetSuite locally.
Note: The community MCP server used in this guide is not developed, maintained, reviewed, or verified by Oracle, and it has not been reviewed or verified by us. Read its source and pin it to a specific version before you rely on it in production.
Security review: Before using any community bridge, review the package maintainer, source repository, released version, OAuth callback behavior, environment variables, dependency tree, tool list, and update history. Test in a NetSuite sandbox first.
What do you need before you start?
Before you begin, make sure you have:
- A NetSuite account.
- Permission to install SuiteApps and create integrations in NetSuite.
- An MCP-compatible AI client, such as Claude Code, Cursor, or Gemini CLI.
- Node.js 18.0.0 or later installed.
How the Connection Works
Here’s the path a request takes from your AI client to NetSuite and back:
Natural Language Request
          ↓
      AI Client
          ↓
  Local NetSuite MCP Server
          ↓
NetSuite AI Connector Service
          ↓
 MCP Standard Tools (records • reports • saved searches • SuiteQL)
          ↓
    NetSuite Account
          ↓
   Response to AI Client
How do you set up NetSuite MCP with an AI client?
Steps 1–5 happen inside NetSuite. Step 6 is your local MCP client configuration, and Step 7 is the browser authorization that finishes the connection.
Step 1: Enable SuiteCloud features
The first step is to enable the NetSuite features the SuiteApp and OAuth flow depend on.
Log in with Administrator access and go to Setup → Company → Enable Features, then open the SuiteCloud subtab. In that subtab:
- Check Server SuiteScript.
- Check REST Web Services.
- Check OAuth 2.0.
- Click Save.
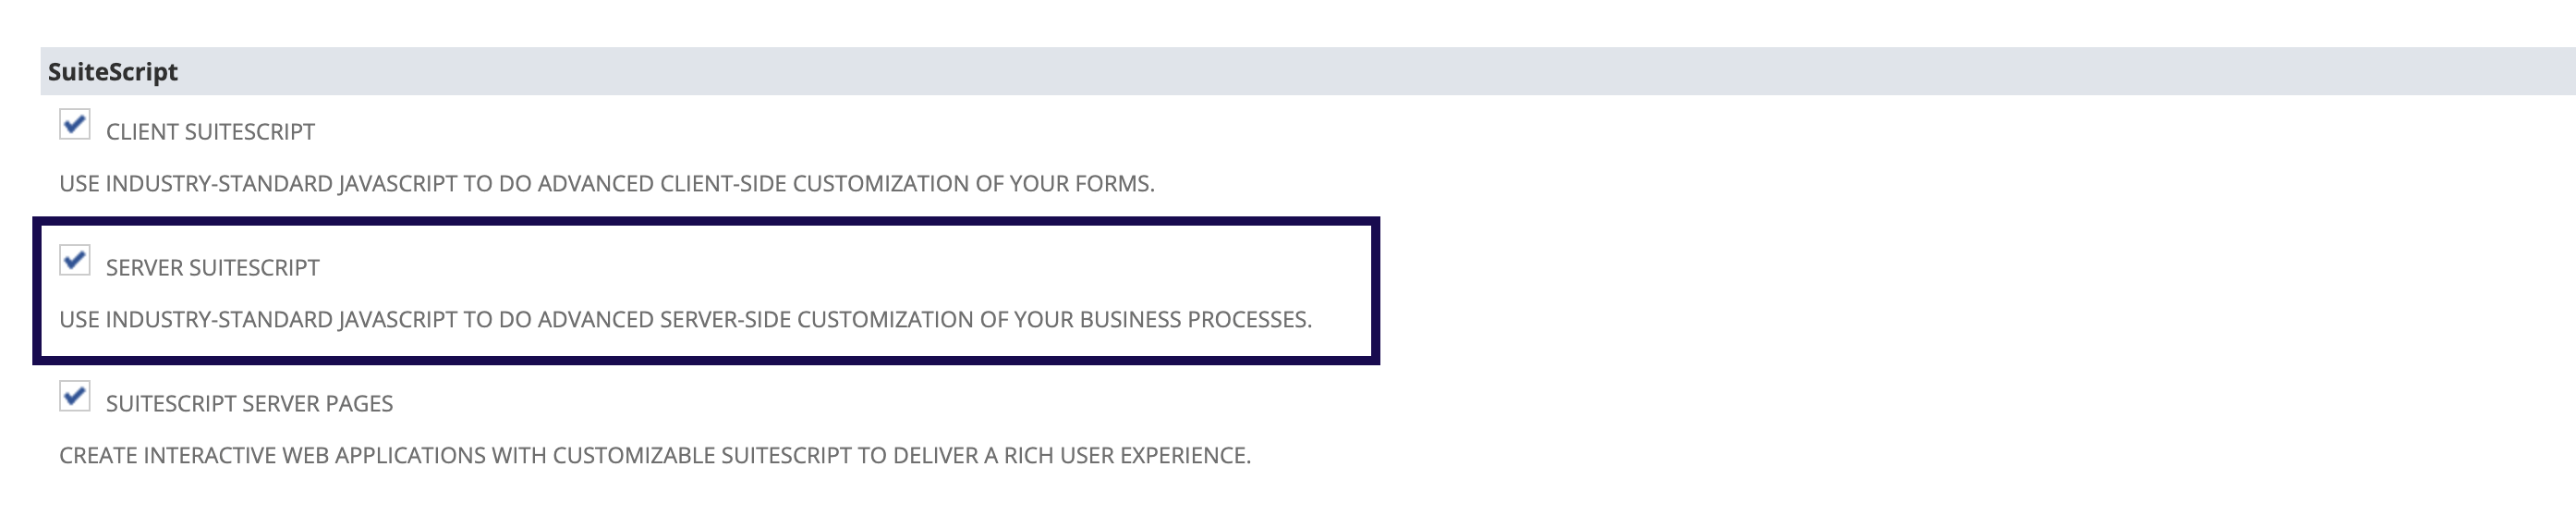 In the SuiteScript section, enable Server SuiteScript before installing the MCP Standard Tools SuiteApp.
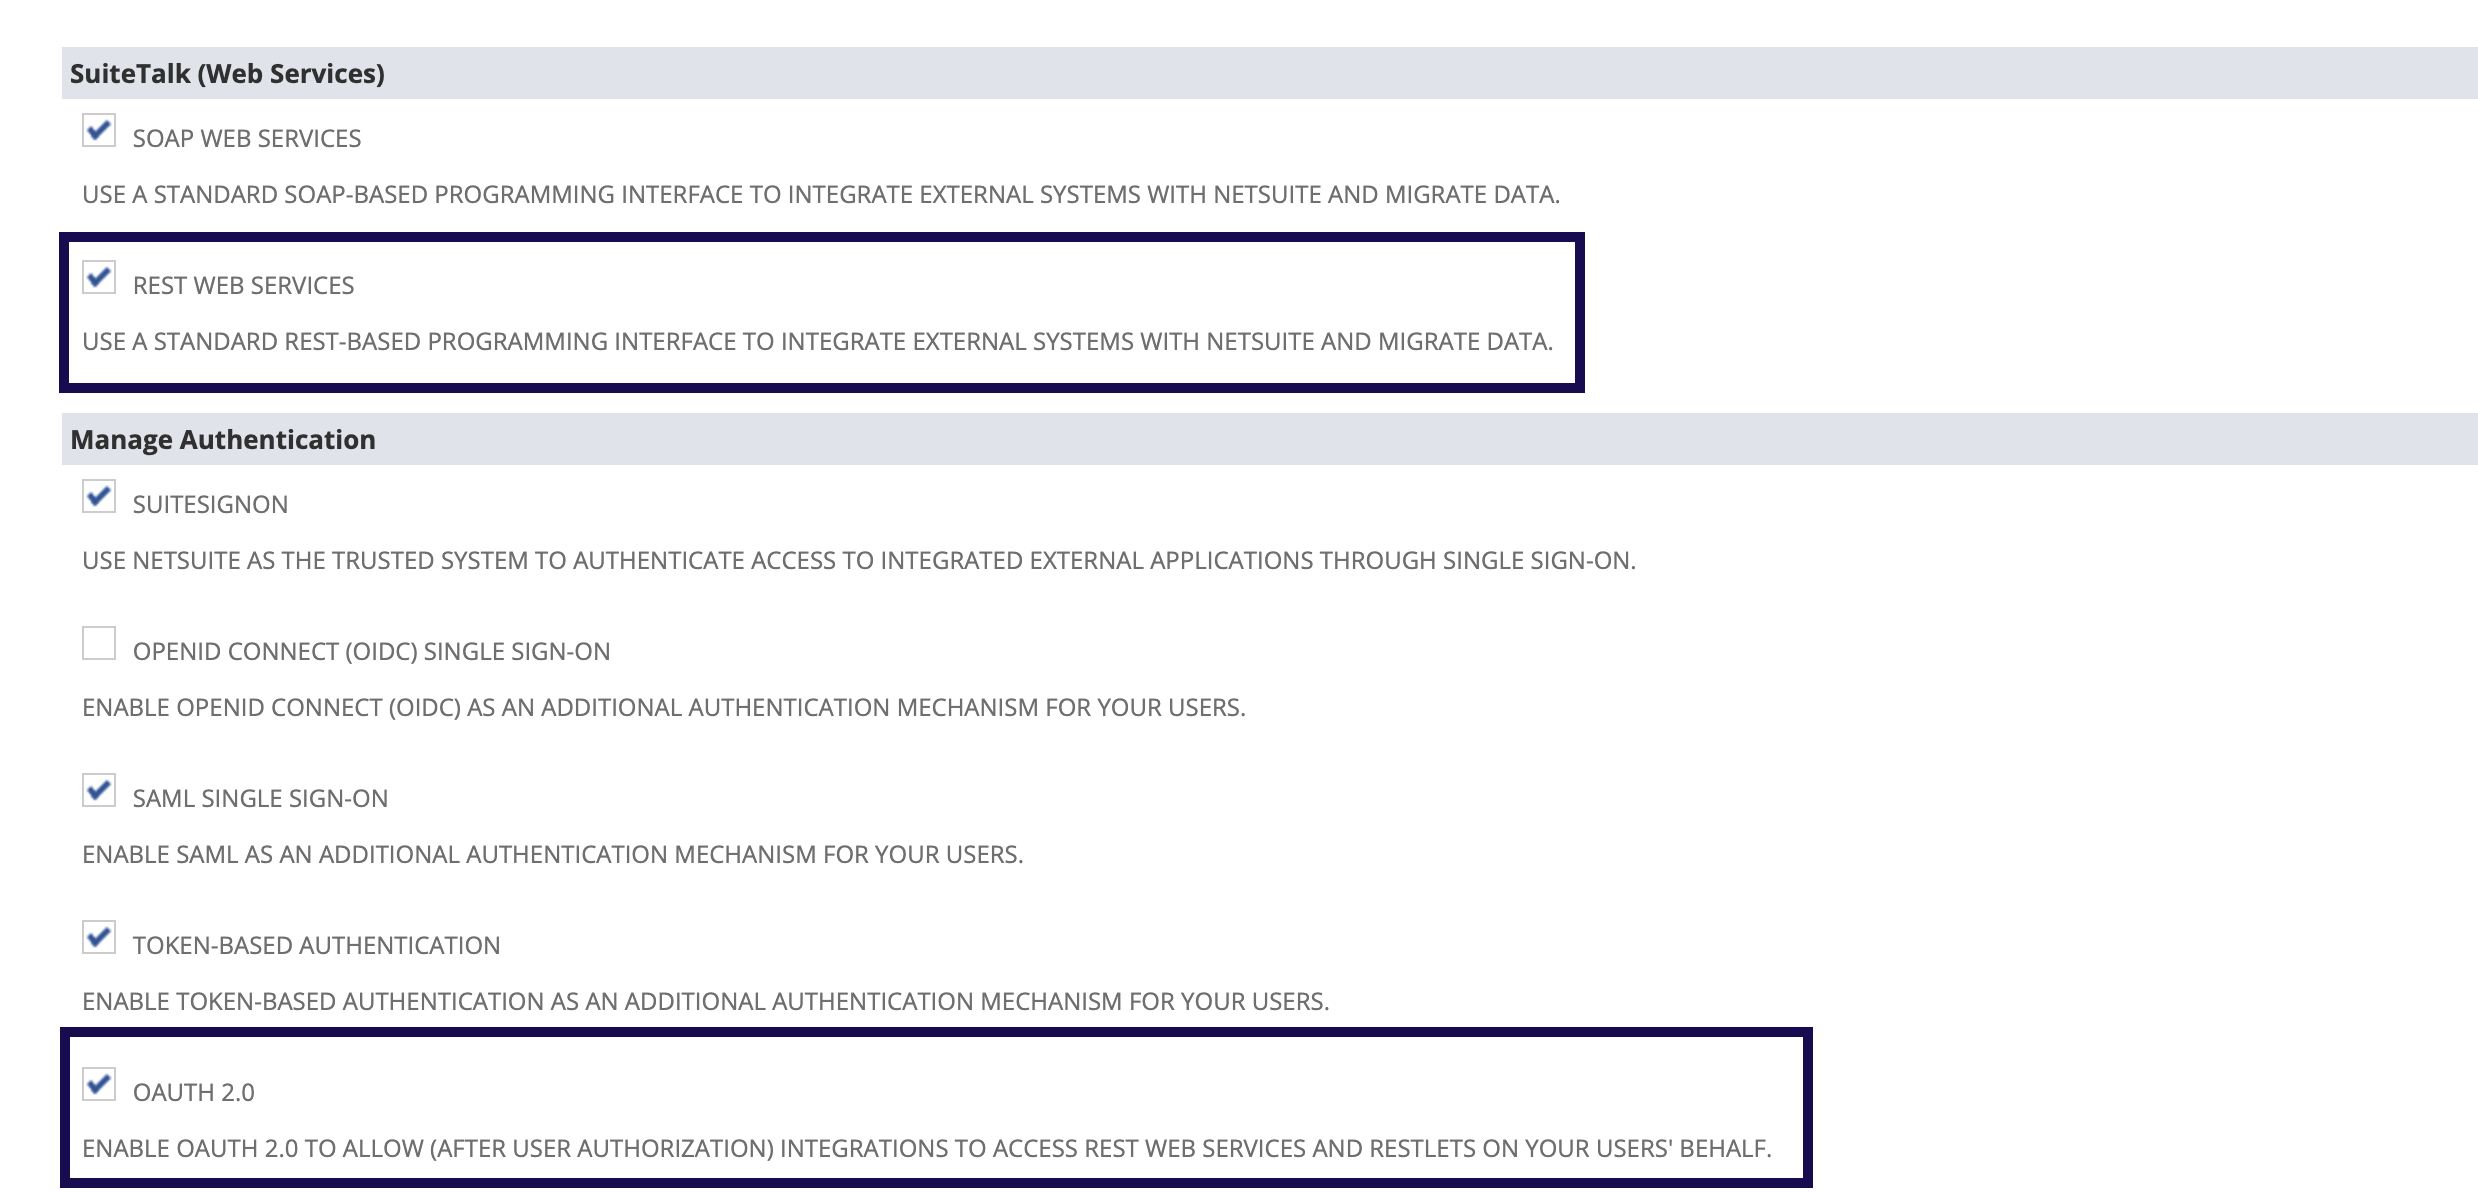 In SuiteTalk and Manage Authentication, enable REST Web Services and OAuth 2.0 before creating the OAuth integration record.
Step 2: Install the MCP Standard Tools SuiteApp
Next, install Oracle’s MCP Standard Tools SuiteApp in your NetSuite account. This SuiteApp provides the standard set of MCP tools exposed through the AI Connector Service.
These tools let AI clients perform supported NetSuite operations, such as searching records and executing SuiteQL queries. Without this SuiteApp, the AI Connector Service has no tools to expose.
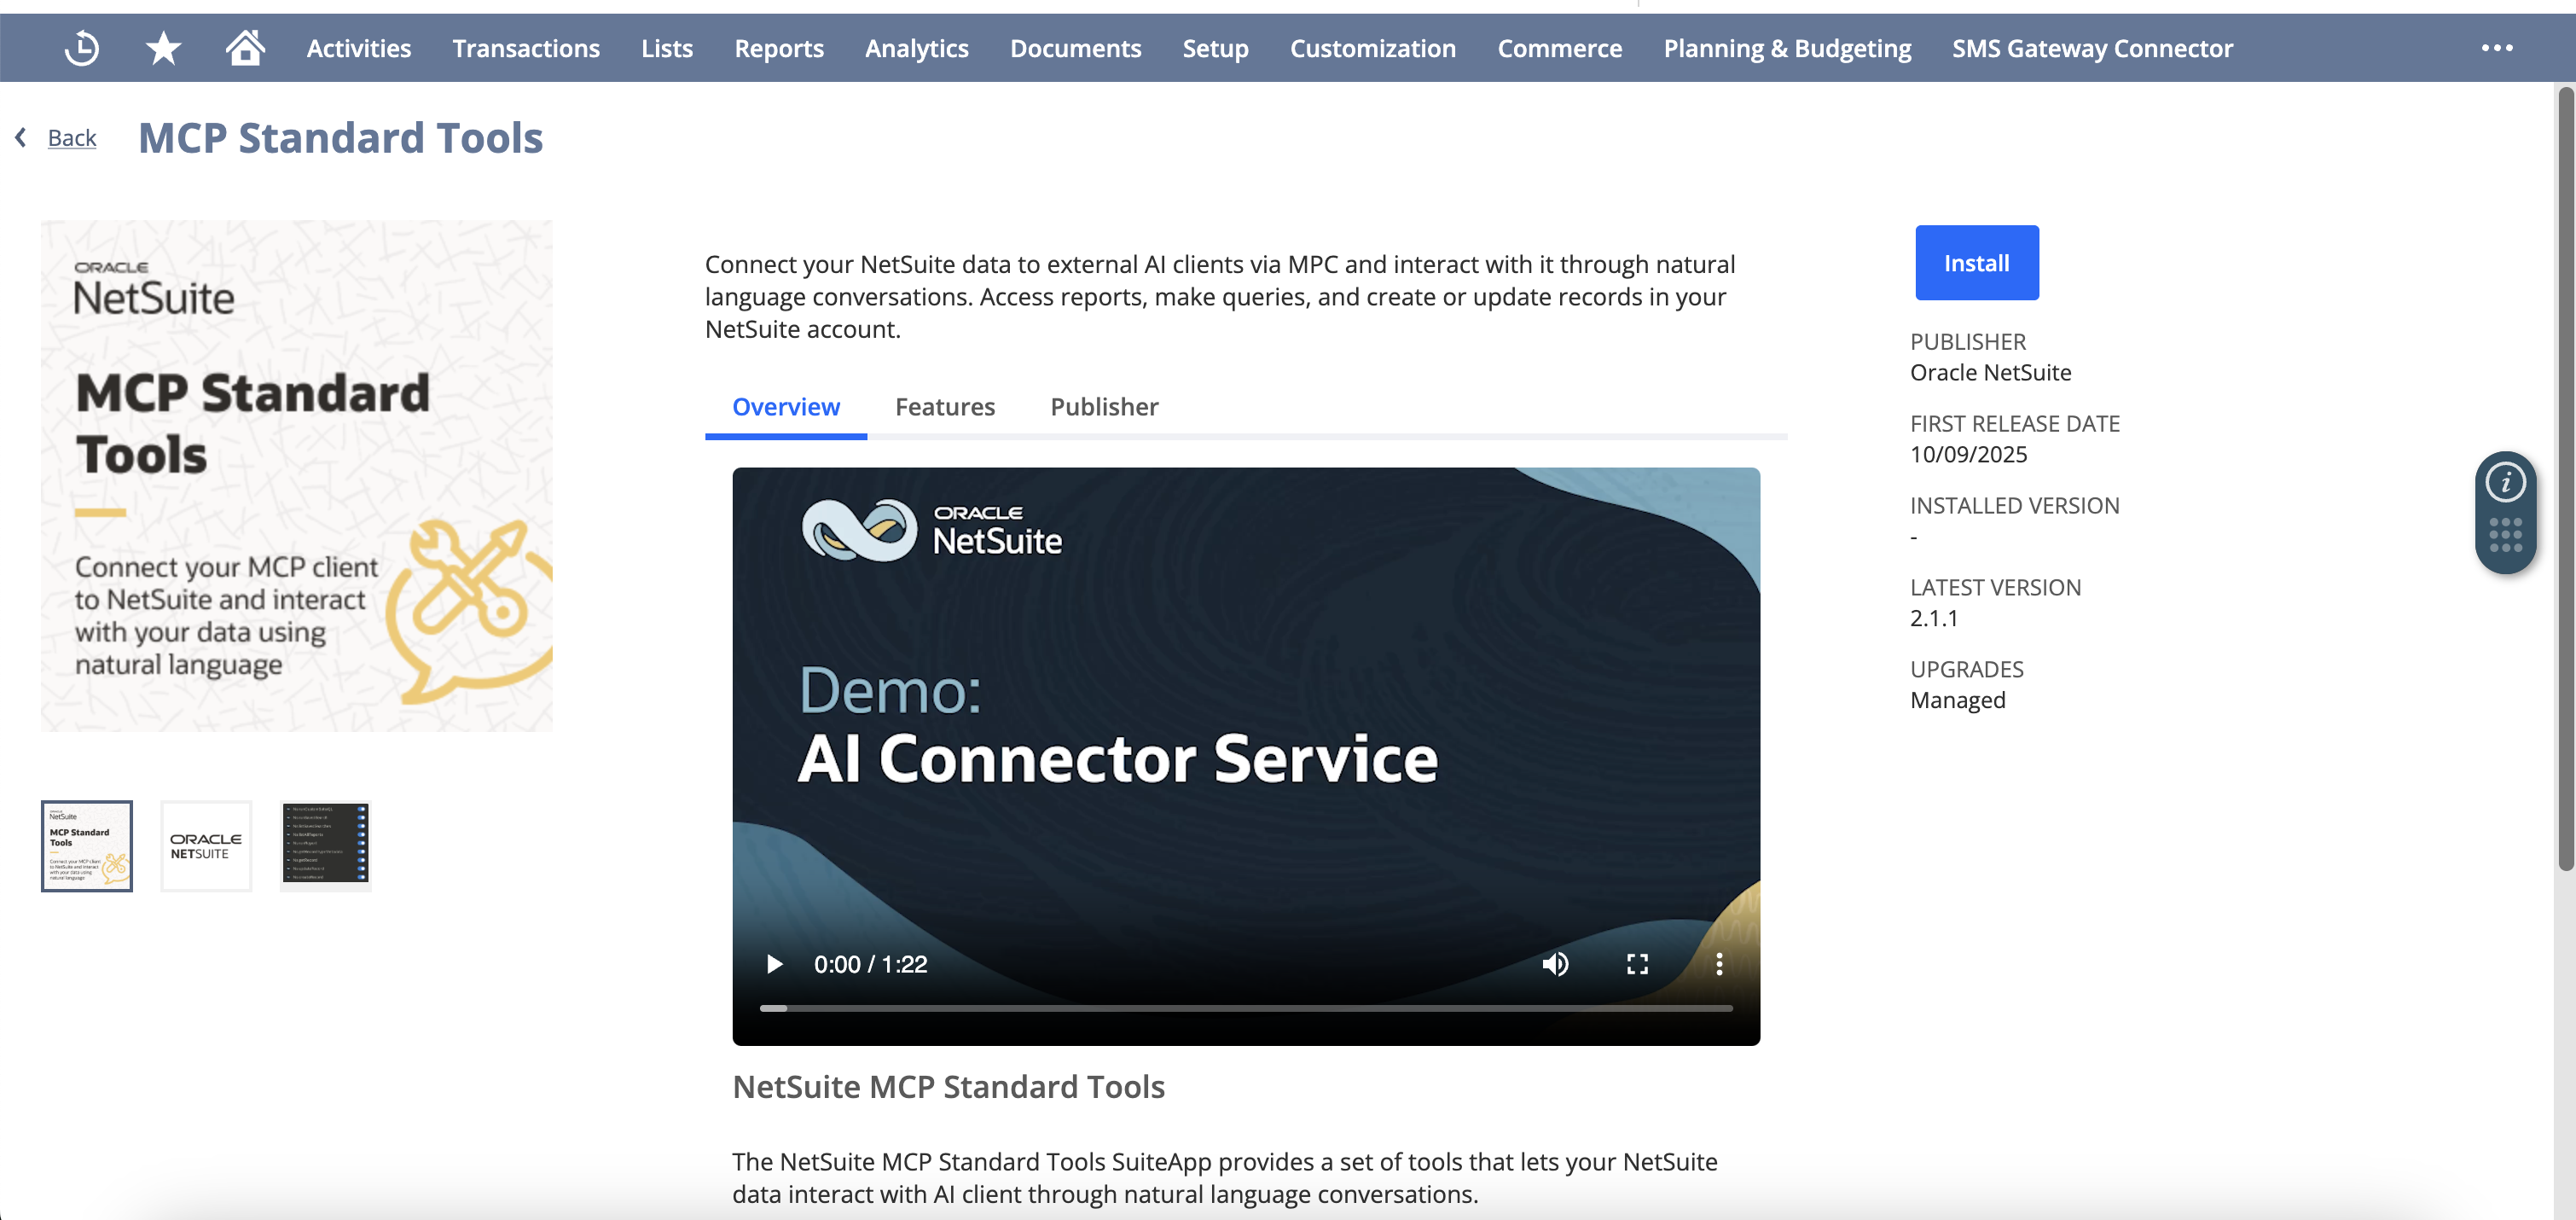
In NetSuite, go to SuiteApps → SuiteApp Marketplace. In the marketplace search box, search for MCP Standard Tools and choose the SuiteApp published by Oracle NetSuite. Open the SuiteApp details page and click Install.
Oracle’s official help page for the SuiteApp is here: MCP Standard Tools SuiteApp. NetSuite may still require you to install it from the in-account SuiteApp Marketplace after you sign in.
What you should see: the SuiteApp details page should show MCP Standard Tools, publisher Oracle NetSuite, and an Install button. After installation, the AI Connector Service has a set of standard NetSuite tools to expose to approved AI clients.
Troubleshooting: if the SuiteApps tab is not visible, you may be using a role or center that cannot access SuiteApp Marketplace. Switch to an Administrator role or ask your NetSuite administrator to install the SuiteApp or grant you SuiteApp installation access.
Step 3: Create an OAuth integration record
The AI client authenticates with NetSuite using OAuth 2.0. To enable this, create an Integration Record that represents your application in NetSuite.
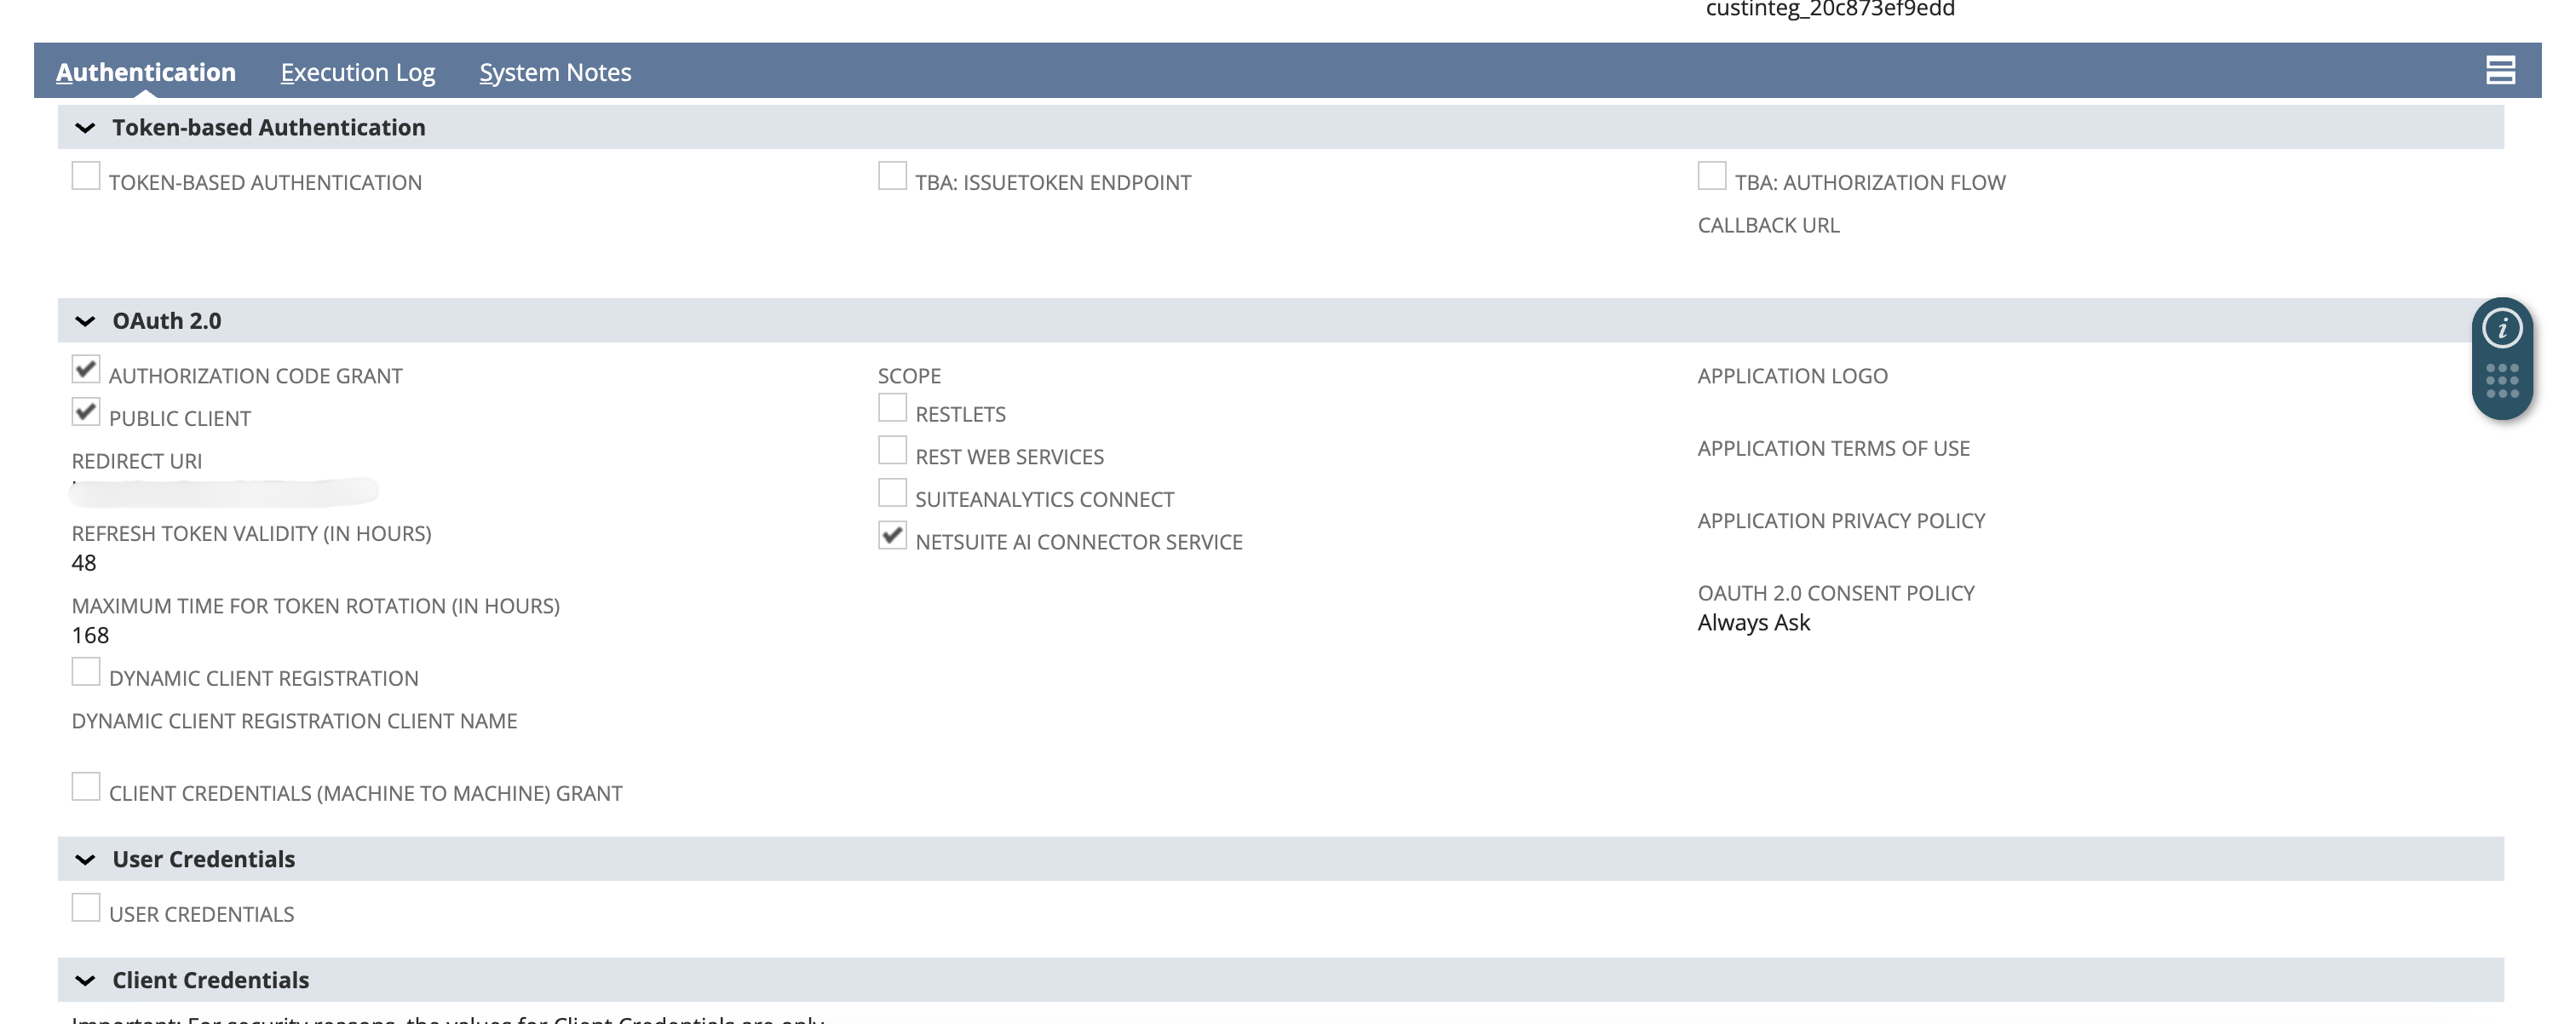
In NetSuite, go to Setup → Integration → Manage Integrations → New. You should see a new Integration form. Give the integration a clear name, then enable:
- NetSuite AI Connector Service
- Authorization Code Grant
- Public Client
Next, add your Redirect URI. The Redirect URI field appears only after you enable Authorization Code Grant. If you do not see the field, check that option first.
Enter the callback URL that the local MCP server will listen on:
http://localhost:8080/callbackThe port in this URL, 8080, must match the OAUTH_CALLBACK_PORT value in your MCP client configuration in Step 6. If you change the callback port to another value, update both places:
- NetSuite Integration Record Redirect URI:
http://localhost:<port>/callback - Local MCP client config:
"OAUTH_CALLBACK_PORT": "<port>"
Save the integration. After saving, copy the Client ID. You will paste it into NETSUITE_CLIENT_ID in Step 6. Because this integration is configured as a Public Client, you do not need a client secret.
Troubleshooting: if OAuth redirects fail later, compare the Redirect URI in NetSuite with OAUTH_CALLBACK_PORT in your local config. A one-digit port mismatch is enough to break the callback.
Step 4: Create a role
The AI client can only access the data and operations permitted by the NetSuite role used during authentication. Creating a dedicated role is recommended because it lets you control exactly what the AI can access.
In NetSuite, go to Setup → Users/Roles → Manage Roles and create a new role. You should see the role form with permission subtabs.
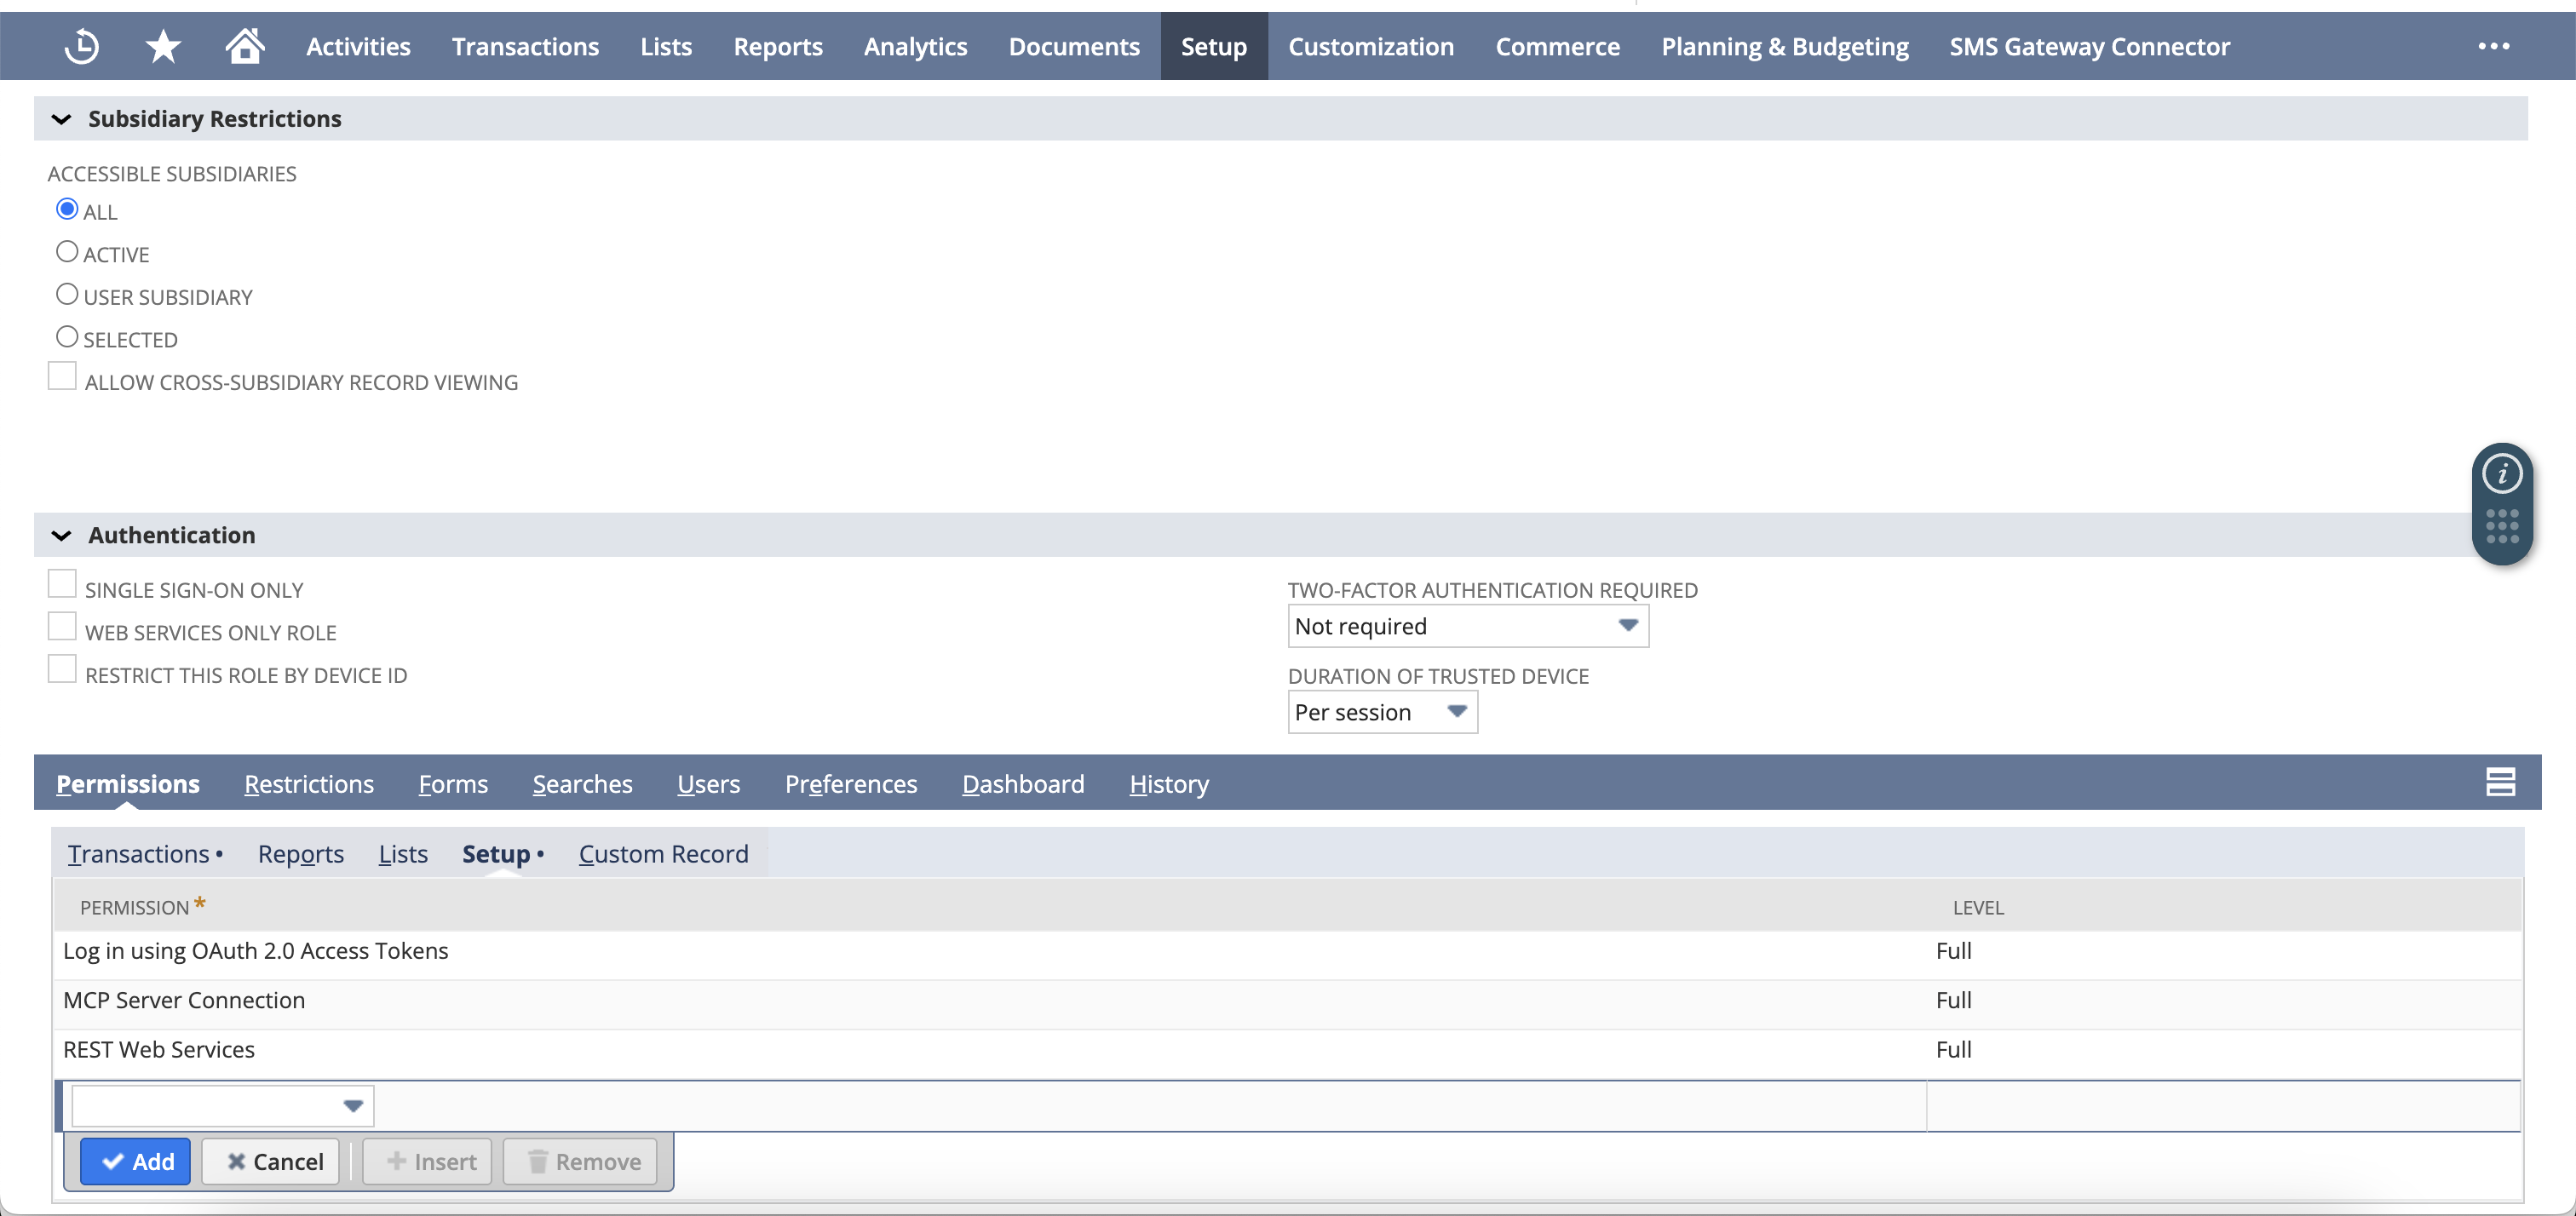
Open the role’s Permissions → Setup subtab. In the Permission dropdown, add the setup permissions Oracle documents for roles using the AI Connector Service:
- MCP Server Connection
- Log in using OAuth 2.0 Access Tokens
Set the level required by your NetSuite configuration, click Add after each permission, then save the role.
Oracle documents one more setup permission that is conditional rather than universal: REST Web Services. Add it to the role only if this role should create, retrieve, and update records through the MCP Standard Tools SuiteApp. It shares a name with the account feature you enabled in Step 1, but they are separate controls: the feature lets you install the SuiteApp, the role permission decides whether this role can reach records through it. For a first local test, leave the permission off.

Add any additional record permissions required for your use case. This role is the role you will select during OAuth in Step 7, and it controls what the AI client can read or do in NetSuite.
Security tip: Create a dedicated role specifically for AI access and grant only the permissions required for your use case. This helps keep your NetSuite data secure and limits what the AI client can access.
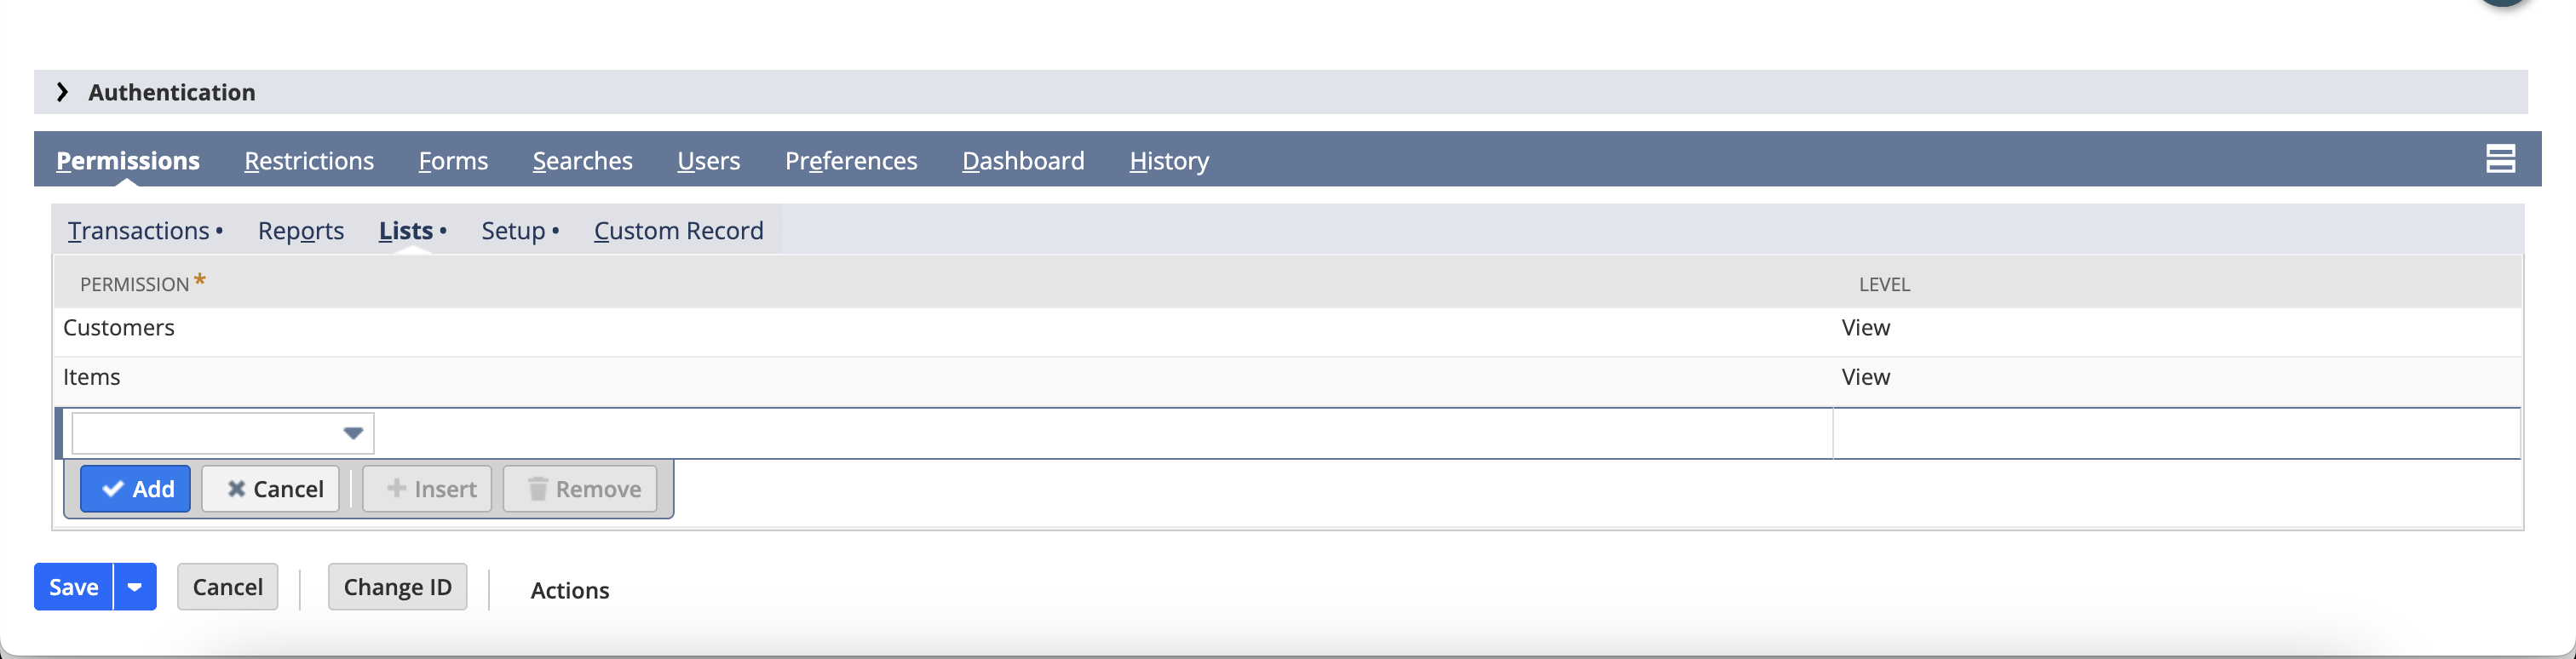
How role permissions affect AI access
The AI client can access only the NetSuite records and operations permitted by the role used during authentication. For example, if the role can access Customers but not Sales Orders, the AI client can retrieve customer data but will not be able to view or query sales orders.
If you want the AI client to work with additional record types, grant those permissions to the role in NetSuite. The AI client inherits the role’s permissions and cannot access data beyond what the role allows.
Step 5: Assign the role to a user
Once the role is created, assign it to the NetSuite user who will authenticate through the AI client.
In NetSuite, go to Setup → Users/Roles → Manage Users, open the user who will authenticate from the MCP client, and assign the role you created in Step 4. Save the user.
What you should see: during OAuth in Step 7, this role should appear in NetSuite’s role selector. If the role is missing, confirm you assigned it to the same NetSuite user who is signing in through the browser.
Step 6: Configure your MCP client
Now switch from NetSuite configuration to local MCP client configuration. You need three values:
- Account ID: identifies your NetSuite account.
- Client ID: copied from the Integration Record in Step 3.
- OAuth callback port: must match the Redirect URI port from Step 3.
You can find your Account ID in NetSuite under Setup → Company → Company Information → Account ID. It may also appear at the beginning of your NetSuite URL. For example:
123456
123456-sb1
A production URL might look like https://123456.app.netsuite.com. A sandbox account ID often includes the sandbox suffix, such as 123456-sb1.
Troubleshooting: if the MCP server cannot reach NetSuite, re-check the account ID first. Do not include .app.netsuite.com; use only the account ID value.
Next, configure your MCP client to connect to the NetSuite AI Connector Service by adding an MCP server configuration.
For Claude Code, the MCP configuration is stored in ~/.claude.json. Open this file in your preferred text editor, for example in Visual Studio Code:
code ~/.claude.jsonAdd the following NetSuite MCP server configuration, replacing the placeholder values with your NetSuite Account ID and OAuth Client ID:
{
  "mcpServers": {
    "netsuite": {
      "command": "npx",
      "args": ["@suiteinsider/netsuite-mcp@1.0.2"],
      "env": {
        "NETSUITE_ACCOUNT_ID": "your-account-id",
        "NETSUITE_CLIENT_ID": "your-client-id",
        "OAUTH_CALLBACK_PORT": "8080"
      }
    }
  }
}
Make sure OAUTH_CALLBACK_PORT is 8080 unless you used a different port in the Redirect URI in Step 3. The values must match exactly.
This guide pins @suiteinsider/netsuite-mcp to version 1.0.2, which was the current npm release when this article was updated. Beginners can use @latest for a quick local test, but production or repeatable developer setups should pin a reviewed version so a future package release does not change behavior without notice.
The @suiteinsider/netsuite-mcp npm package metadata points to the community dsvantien/netsuite-mcp-server repository. That is the GitHub repository referenced at the end of this article.
Save the configuration file and restart Claude Code so it loads the new MCP server configuration.
Step 7: Authenticate with NetSuite
With the configuration complete, launch your MCP client and start the OAuth authentication flow. The first time it connects, it opens a browser window where you sign in to NetSuite, choose the MCP-enabled role, and authorize access.
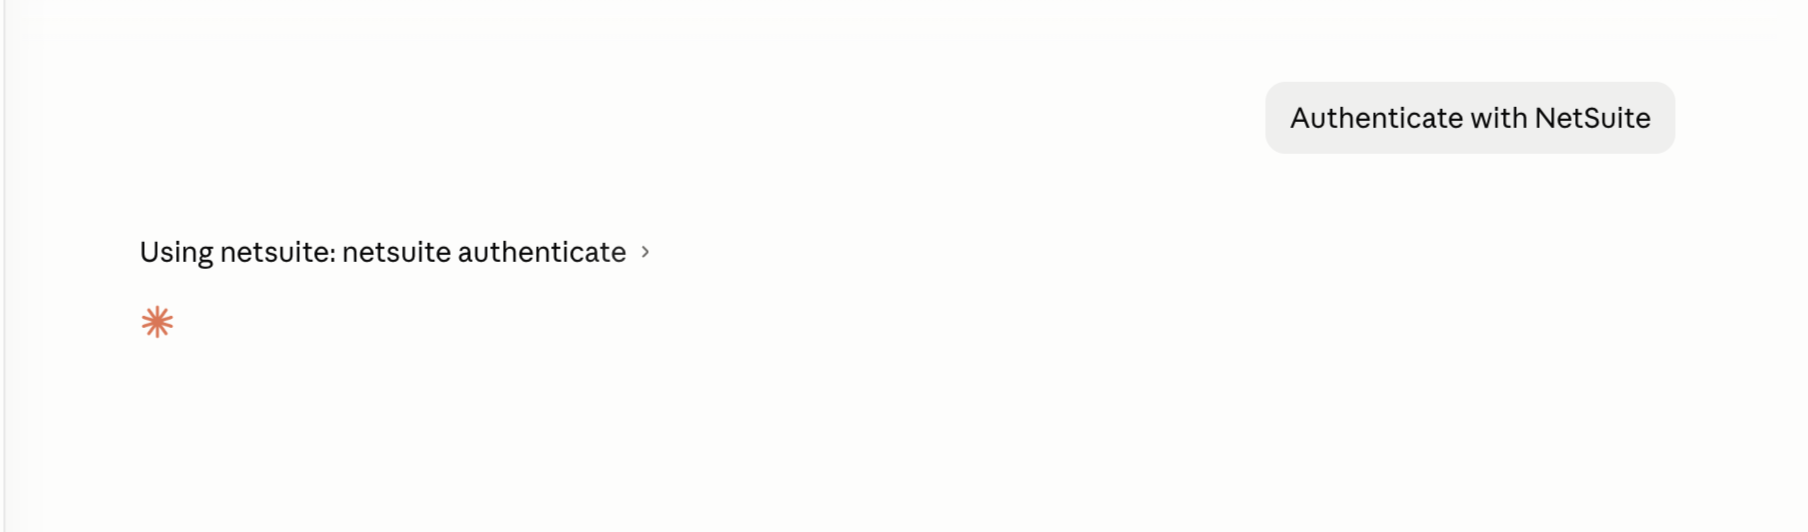
Sign in to NetSuite with the same user you assigned the role to in Step 5.
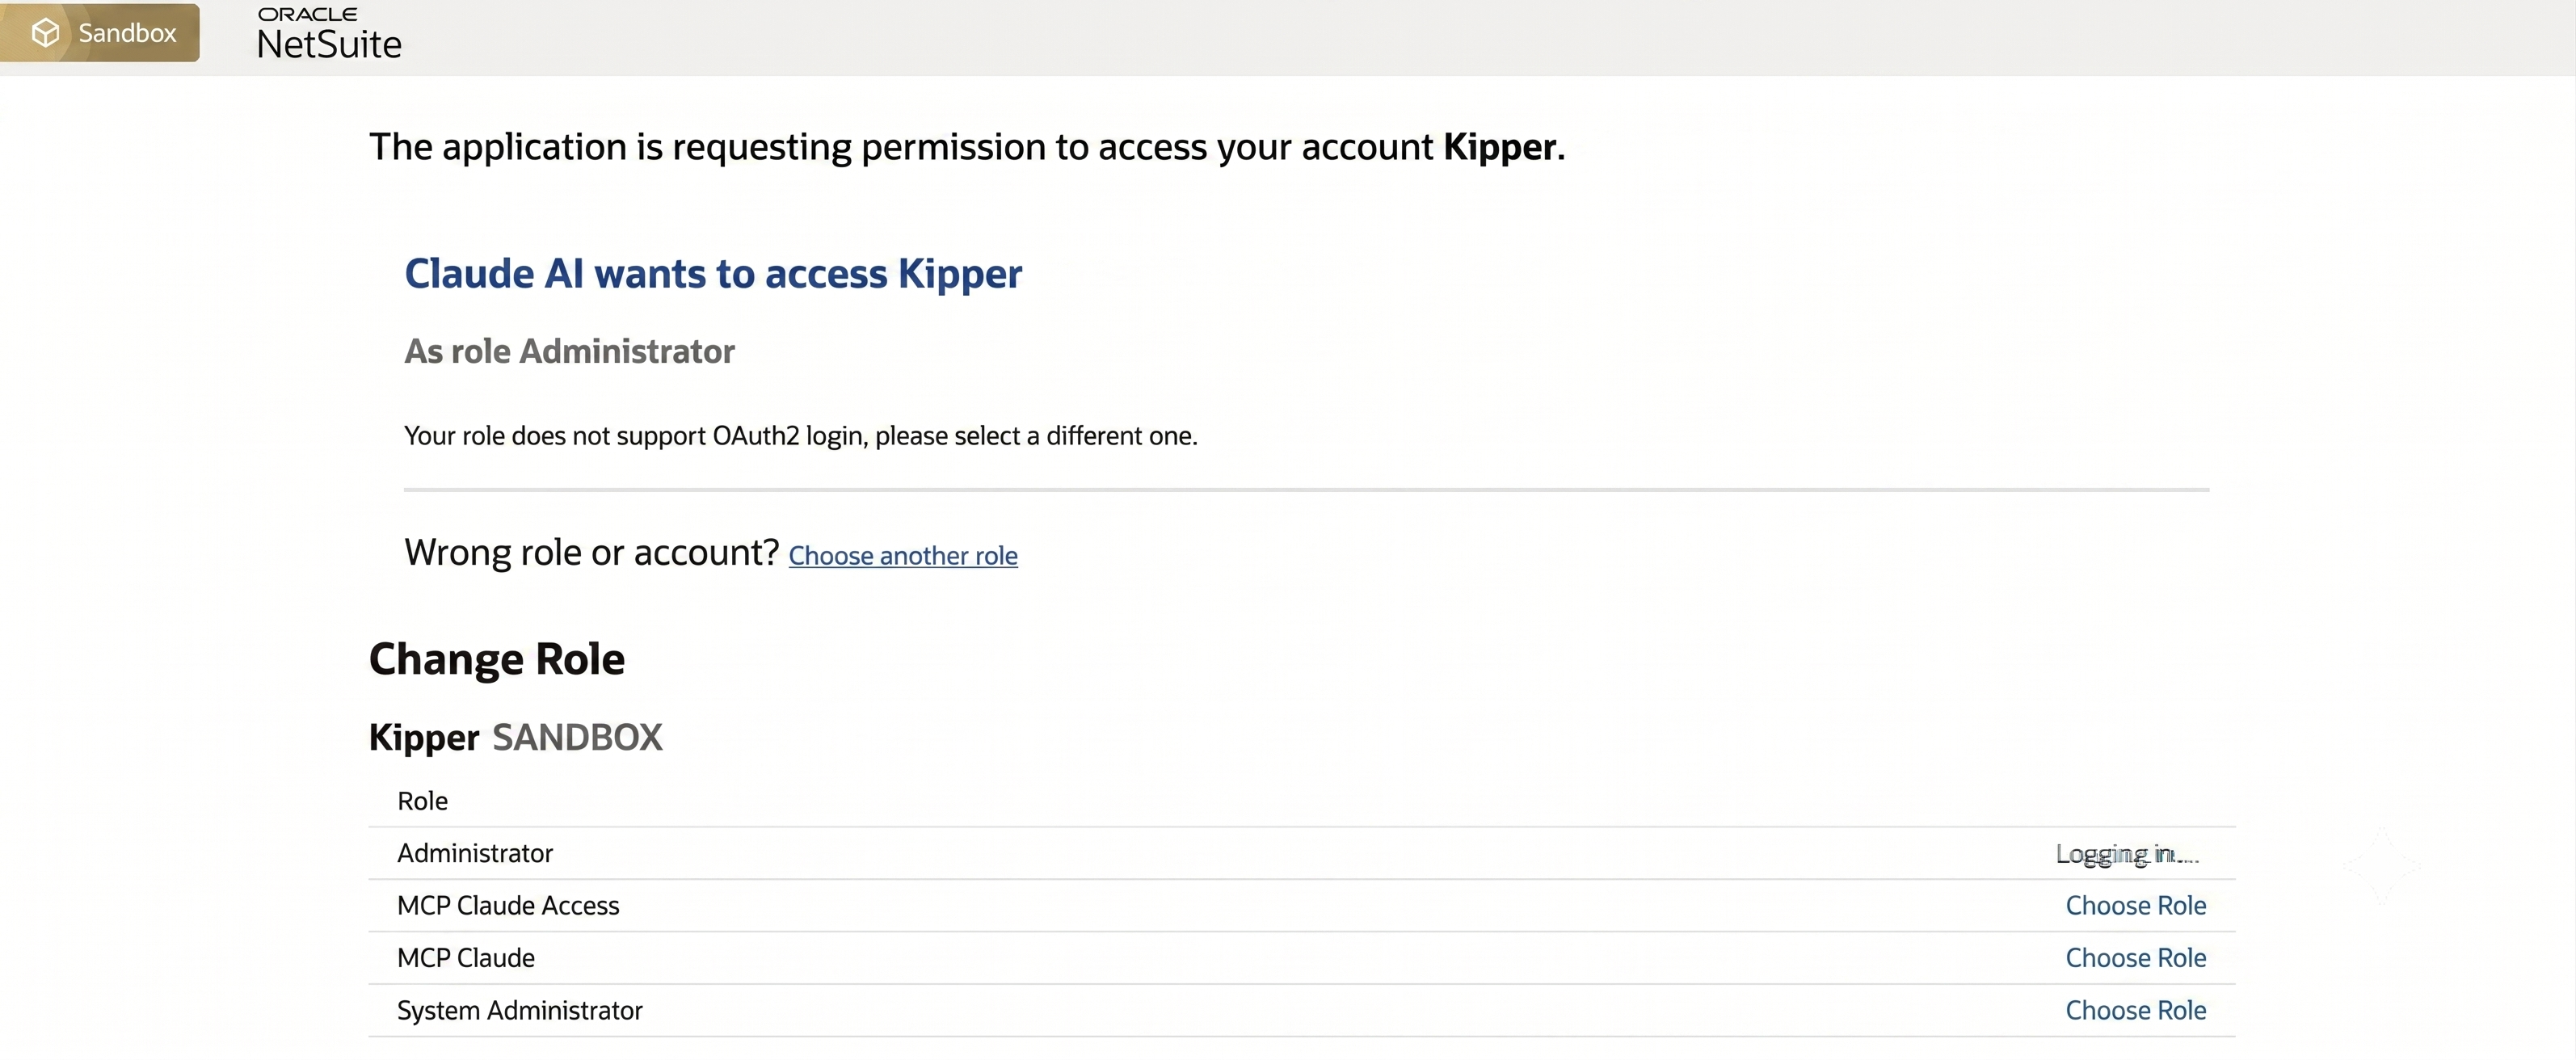
NetSuite may first try to authorize using your current role. If that role is not enabled for OAuth or the AI Connector Service, you will see an unsupported-role message such as “Your role does not support OAuth2 login.”
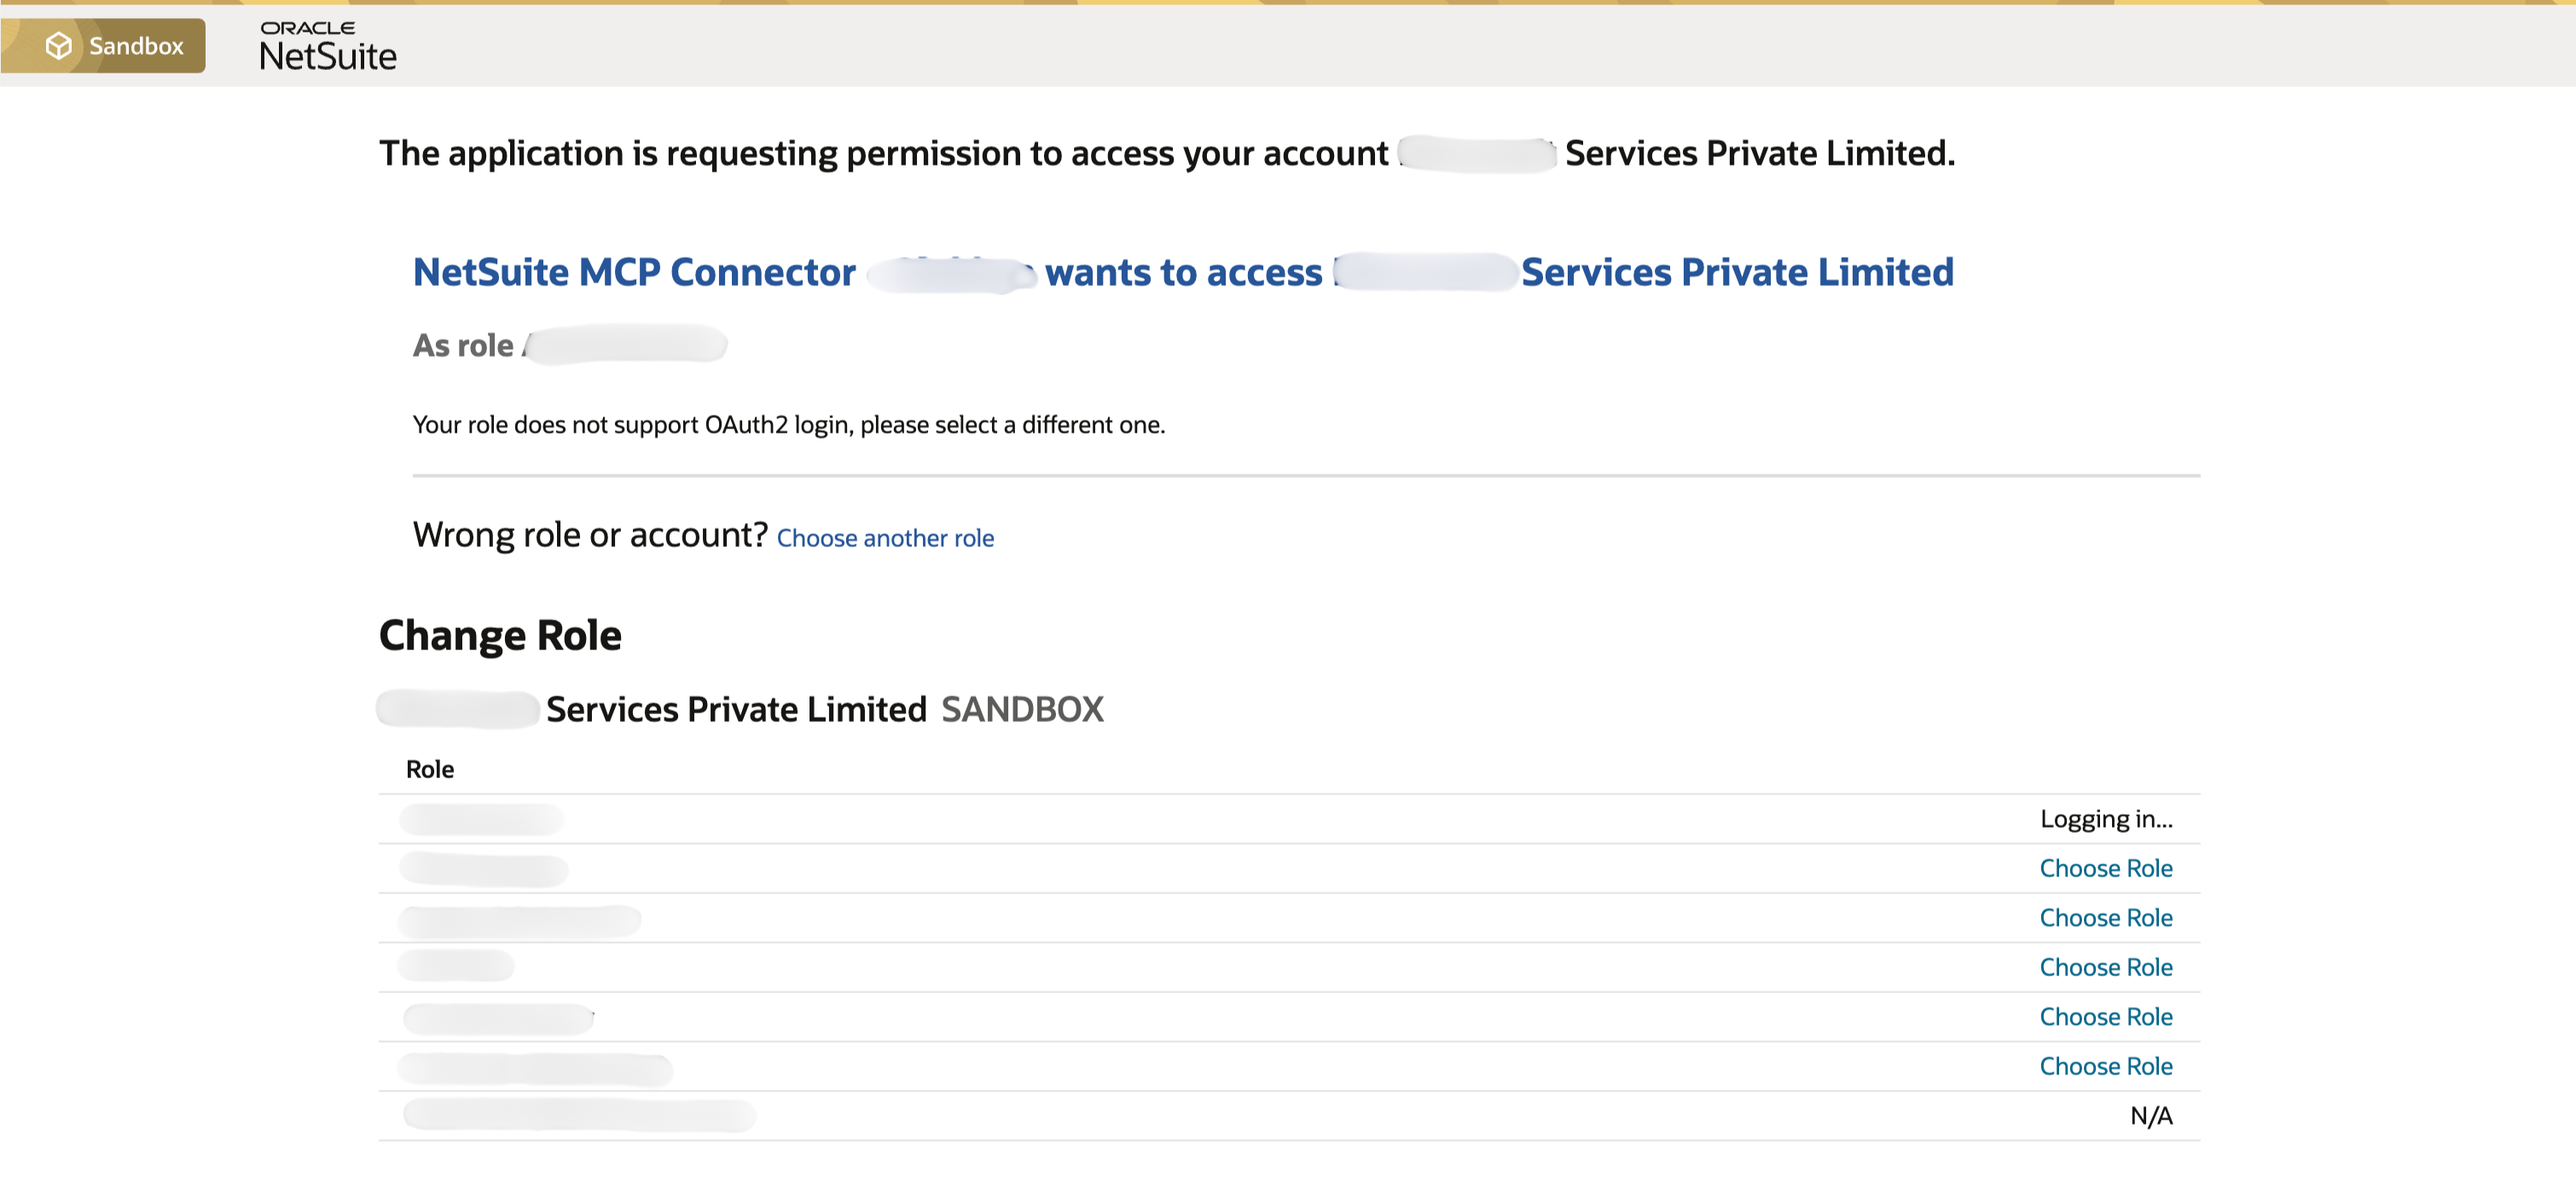
Click Choose another role, then click Choose Role next to the dedicated role you created in Step 4. Pick the role with the MCP server connection and Log in using OAuth 2.0 access tokens permissions. This role determines which NetSuite records and operations the AI client can access.
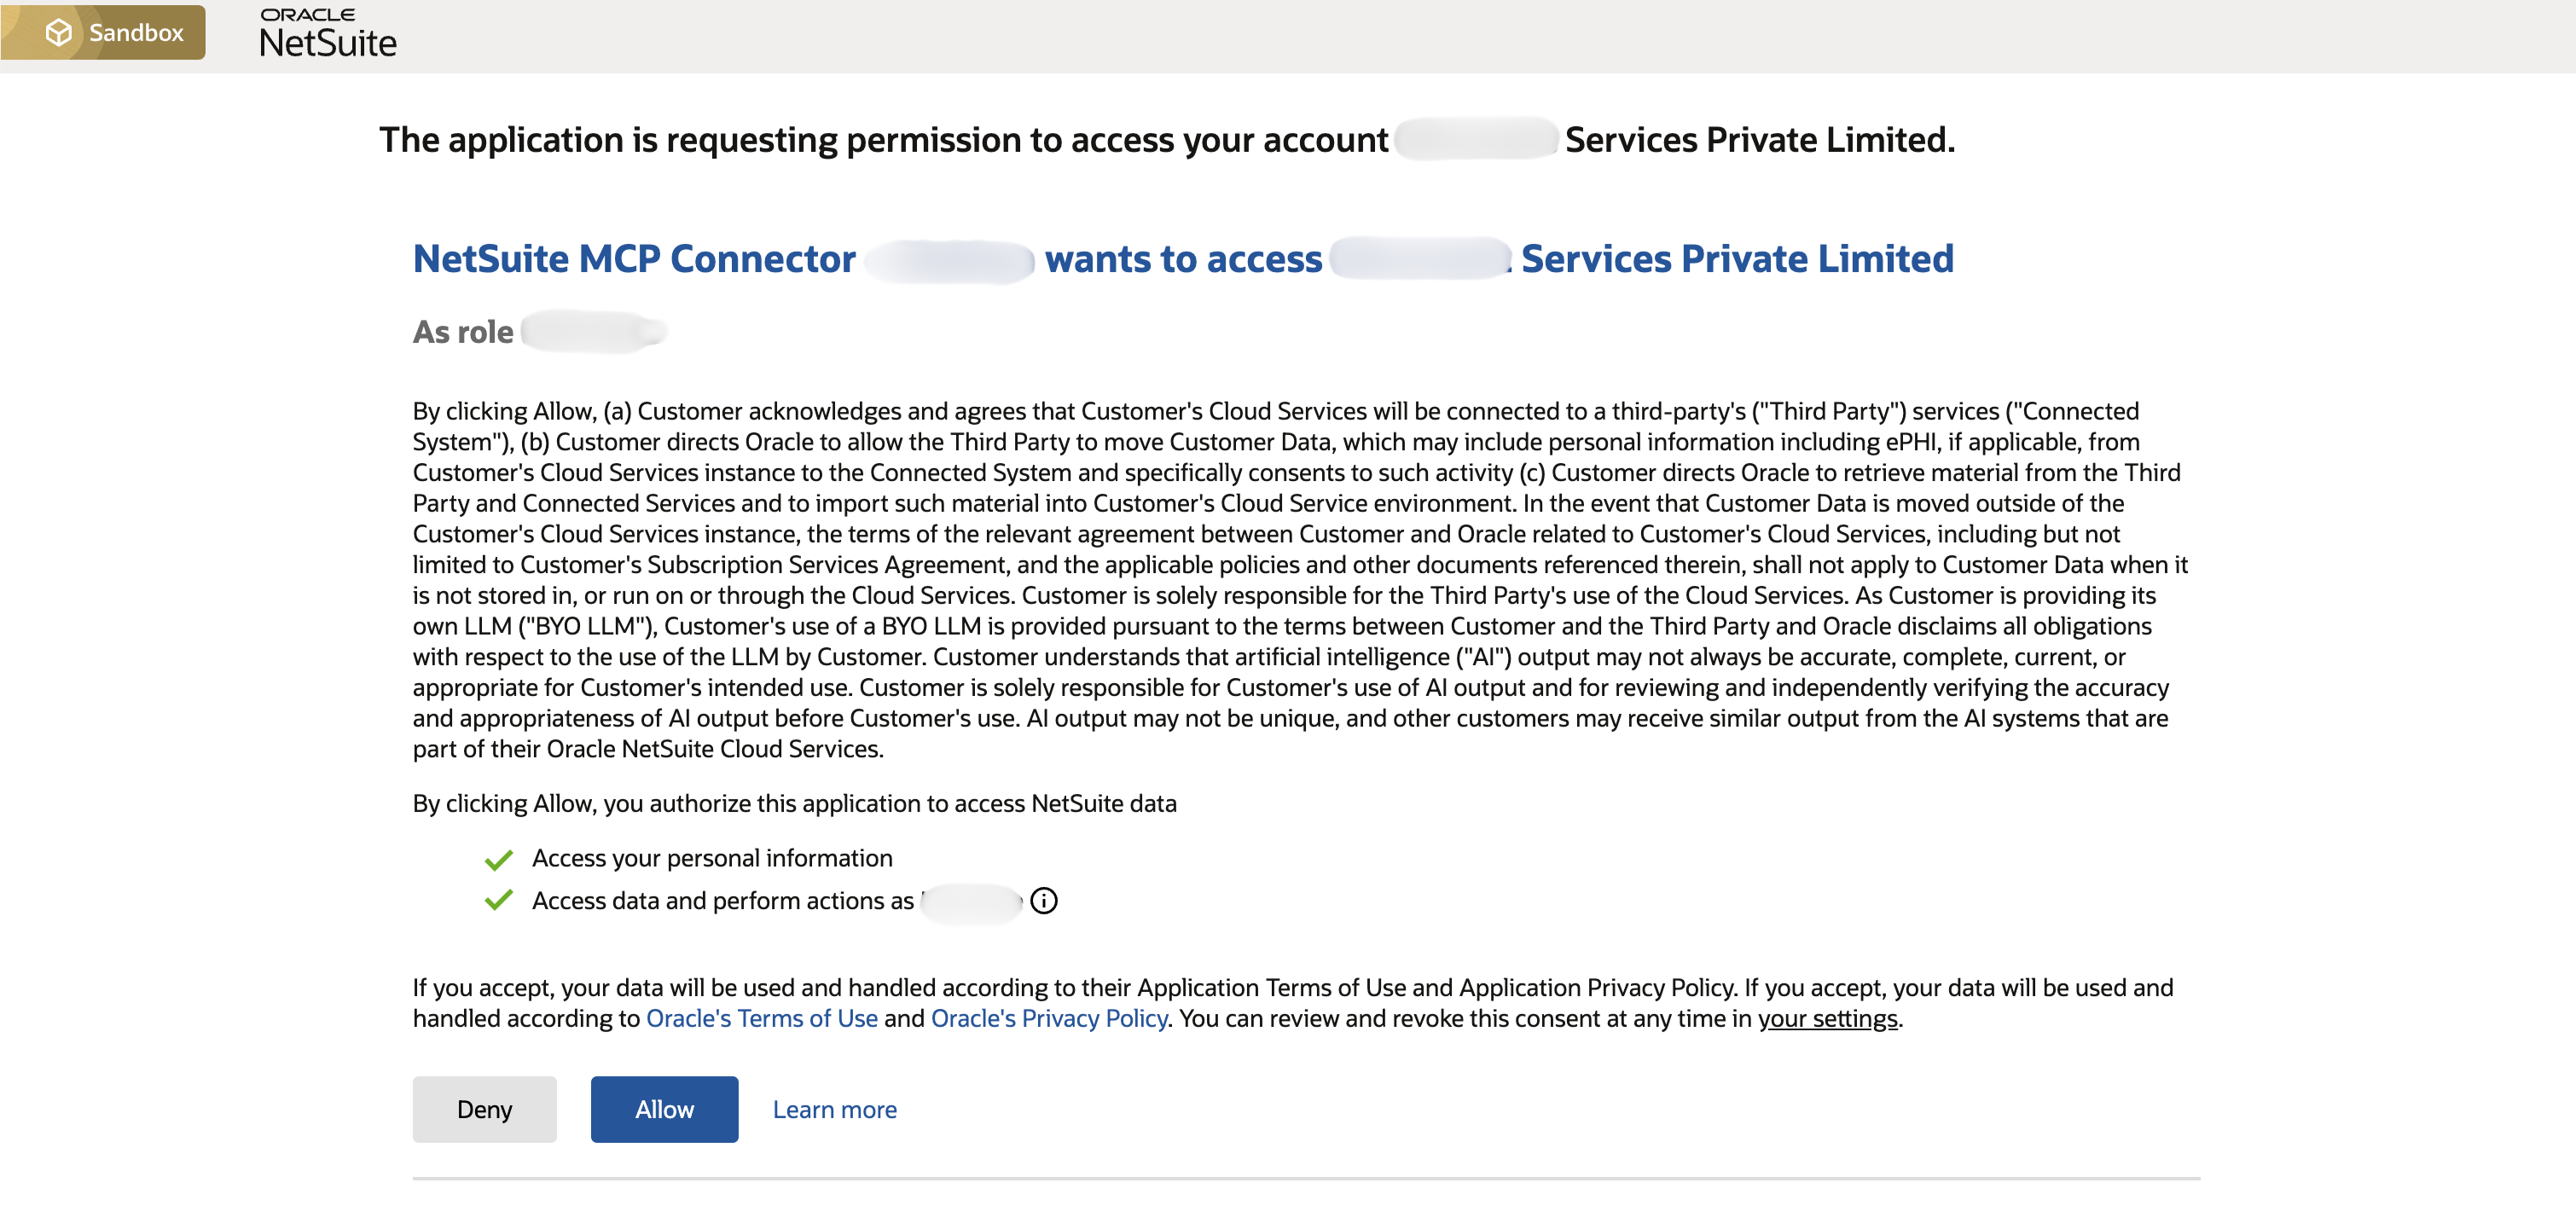
Review the requested access and click Allow.
When authorization completes, you should see an authentication success page telling you that you can close the browser window and return to your IDE. For the newly available tools to load, restart your chat session or reconnect the MCP server.

How do you query NetSuite in plain English?
With the connection live, ask focused questions about the records your role can access. Your AI client calls the MCP tools and returns the answer directly.
Try some examples
Here are a few examples to get started:
- Show me the latest 10 customers.
- List all open sales orders.
- Show all subsidiaries.
- Search for an item named “Laptop”.
- Find all invoices overdue by 30 days.
If you already know SuiteQL, you can execute queries directly as well:
SELECT * FROM customer FETCH FIRST 10 ROWS ONLYFor example, asking “Show me the latest 10 customers.” returns the following results:
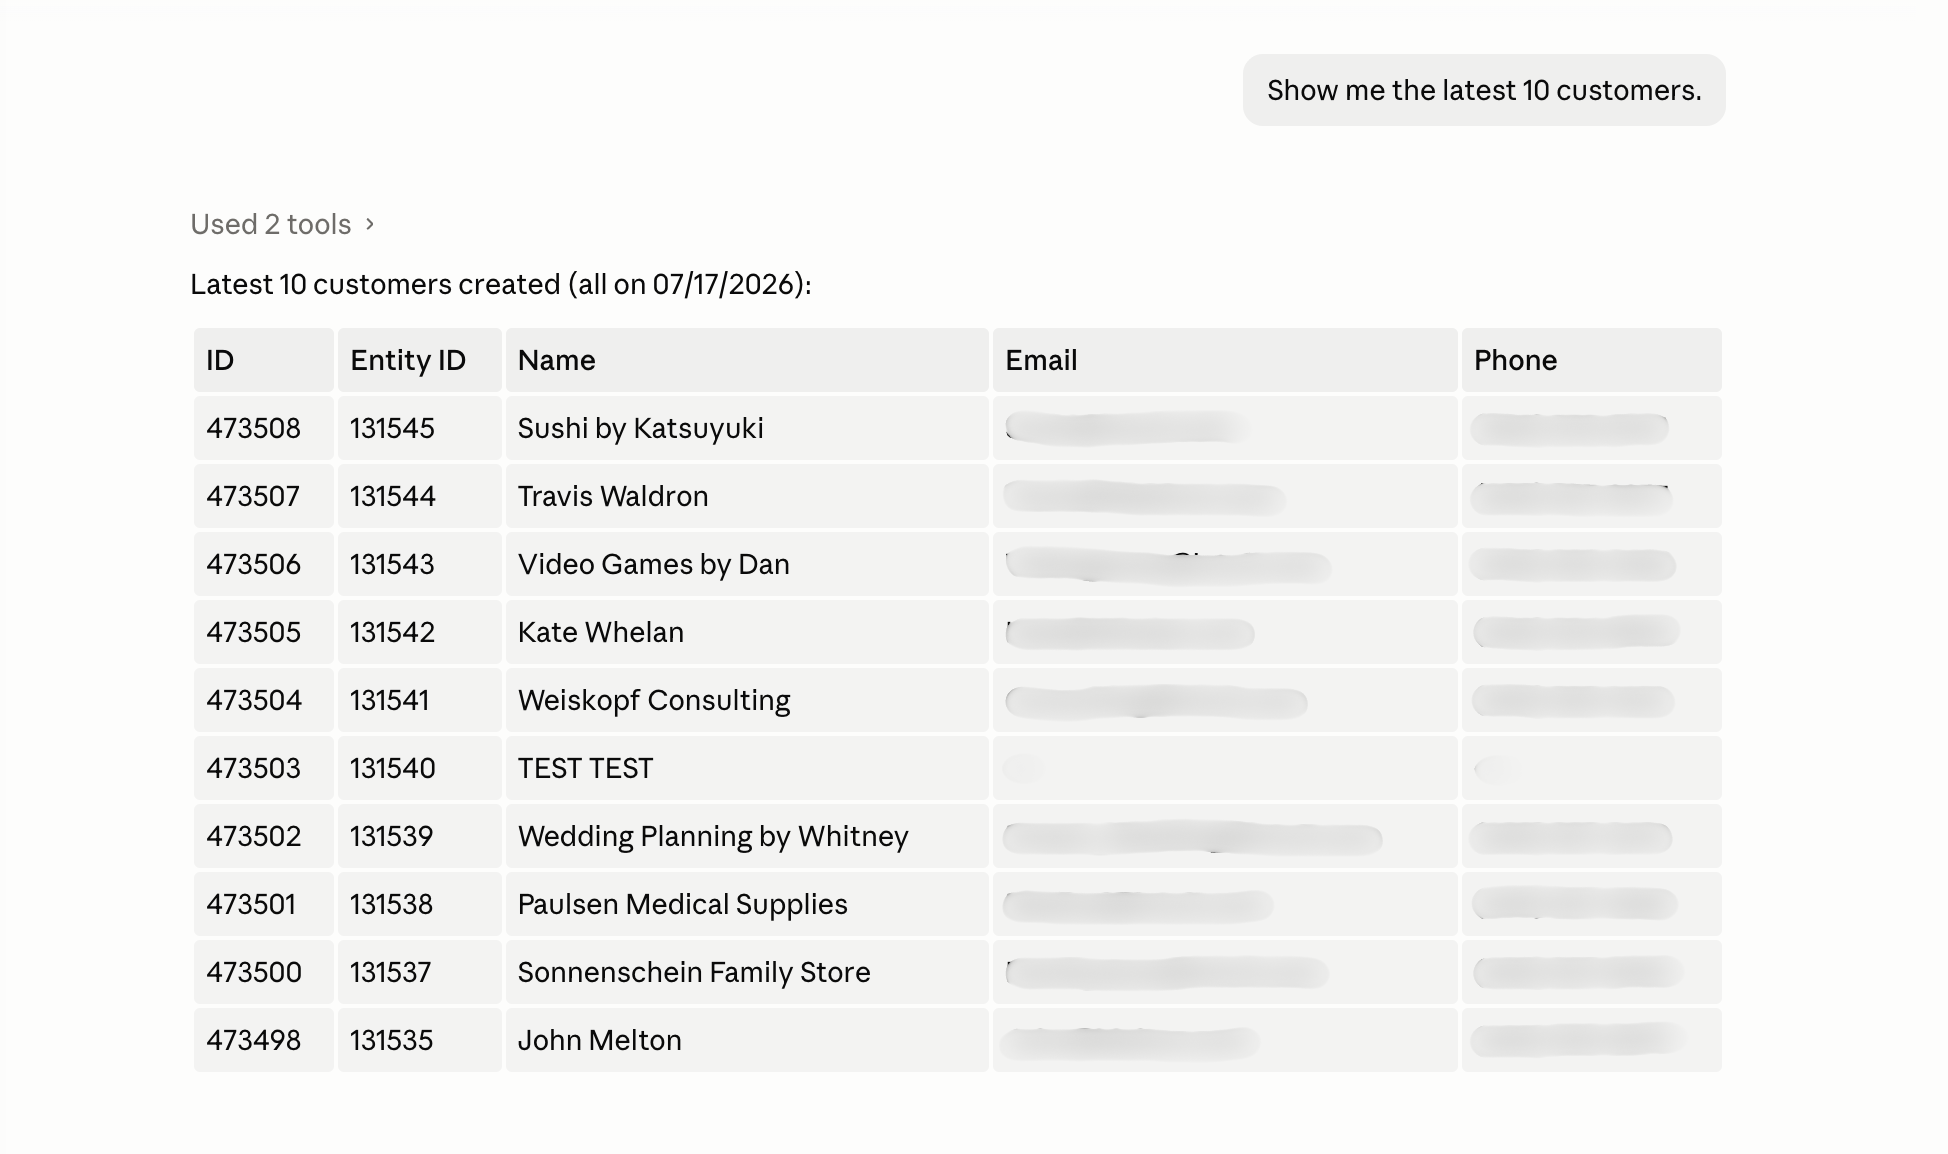
From here you can ask follow-up questions, look up a specific record, filter by a field, or total a set of results.
Using Other AI Clients
Although this guide uses Claude Code for the setup examples, the same community-developed MCP server can also be used with other MCP-compatible AI clients, including Cursor and Gemini CLI. The NetSuite-side setup stays the same. The local client configuration is the part that changes.
Two clients that look like they belong here actually do not. ChatGPT connects through Oracle’s own app listing with no local process at all. See How to Connect NetSuite to ChatGPT Using the NetSuite App. Codex has both a directory plugin and a native remote MCP entry that reach Oracle’s hosted service directly, so a bridge is its last resort rather than its first. See How to Connect NetSuite to Codex Using the NetSuite Plugin.
Self-Managed Bridge vs Oracle Remote Access vs Kipper
| Route | Best for | What you manage |
|---|---|---|
| Oracle standard remote access | Claude or ChatGPT users following Oracle’s documented connector path | NetSuite features, SuiteApp, roles, OAuth consent, AI-client policy |
| Community local bridge | Developers using local MCP clients | Package review, local process, callback ports, environment variables, version pinning |
| Kipper managed connector | Teams that want governed finance answers | Kipper onboarding, permission sets, user access, audit review |
Is there a managed option for teams?
Everything above is a single-machine setup: one config file, one OAuth callback bound to one localhost port, one NetSuite seat. That is the right shape for a developer evaluating what NetSuite MCP can do. It is the wrong shape the moment the answer is “great, can the sales team use this too.” There is no central administration, no per-user permissions, no record of what anyone asked, and every additional person still needs their own NetSuite seat and role.
Kipper is built for that second question. An admin authorizes NetSuite once; approved people then ask from Slack, from Microsoft Teams, by text, or from an MCP-enabled AI client without a NetSuite login of their own. Access is read-only by architecture, permissions are set per user or team, and every question and answer is logged. NetSuite plans start at $1,000/month with up to 20 active users included, and additional active users are $25/month (pricing as of August 2026).
Review Kipper’s NetSuite MCP connector, the broader NetSuite MCP guide, pricing, or book a demo.
Key Points and Security Best Practices
When connecting AI clients to NetSuite through the AI Connector Service, keep these points in mind:
- Oracle does not provide a standalone local MCP server. This guide uses a community-developed MCP server that connects to Oracle’s hosted NetSuite AI Connector Service.
- Available tools depend on the installed NetSuite MCP Standard Tools SuiteApp. The AI client can only use the MCP tools exposed by the installed SuiteApp.
- The AI client can only access records and perform operations permitted by the authenticated user’s NetSuite role.
- Create a dedicated NetSuite role for AI access instead of using an existing administrator role.
- Grant the role View access only to the NetSuite record types (such as Customers, Sales Orders, Items, or Invoices) that the AI client needs, and grant only the record and operation permissions required for your use case.
- Test in a NetSuite Sandbox before connecting a production account.
Related Reading
- How to Connect NetSuite to Codex Using the NetSuite Plugin
- NetSuite MCP Permissions Explained
- NetSuite MCP Troubleshooting
- NetSuite MCP SuiteQL Access Explained
- How to Connect NetSuite to ChatGPT Using the NetSuite App
- How to Connect NetSuite to Claude Using the NetSuite Connector
- The NetSuite MCP guide
FAQ
Is there an official NetSuite MCP server I can run locally?
Not as a standalone server you download and run on your machine. NetSuite’s MCP server is the hosted AI Connector Service. The local package in this guide is a community bridge for MCP-compatible developer clients.
Do I need a NetSuite license to use it?
Yes. The AI Connector authenticates as a NetSuite user and inherits that user’s role and permissions, so every person using it needs a seat.
Can I build my own MCP tools?
Yes. Oracle supports custom MCP tools built with SuiteScript and SDF and exposed through the AI Connector Service, but that is a separate path from running the community local bridge used in this guide, and its integration record must be configured manually.
Is the community MCP server safe to use?
Treat it like any other third-party dependency that can access business data. Read the source, review the maintainer and OAuth behavior, test in sandbox, and pin a reviewed version before using it in a workflow you depend on.
Should I use a local bridge for a whole finance team?
No. A local bridge is best for one technical user or a sandbox test. Wider team use needs central administration, per-user permissions, audit review, and a support owner.
Sources
NetSuite Official Documentation
- Get Started with the NetSuite AI Connector Service
- MCP Standard Tools SuiteApp
- NetSuite AI Connector Service
- Finding Your NetSuite Account ID
Community Implementation
- NetSuite MCP Server (GitHub), the source repository listed in the npm metadata for
@suiteinsider/netsuite-mcp @suiteinsider/netsuite-mcpon npm