








How to Connect NetSuite to Claude (Step-by-Step Setup)
A step-by-step guide to connecting NetSuite to Claude: setup, the required NetSuite role, security risks, and real example queries to try first.
On this page +
See it live
Ask Kipper about your NetSuite data.
Sales orders, stock on hand, invoices and vendor bills.
Schedule free onboardingNo signup. Runs in your browser.
Claude can connect to NetSuite through Oracle’s NetSuite AI Connector Service when your NetSuite account, role, SuiteApp, and Claude workspace support the connector path.
The work is mostly on the NetSuite side: enable the required features, install the MCP Standard Tools SuiteApp, create a scoped non-administrator role, and authorize Claude with that role. Once connected, Claude can call the NetSuite tools available to that role.
This guide walks through exactly how to set it up: what you need in NetSuite, what you need in Claude, what it looks like once it’s running, and, importantly, what to watch out for.
What Is the NetSuite AI Connector Service, Really?
Before you touch any settings, it’s worth being precise about what you’re installing, because the naming gets confusing fast.
The NetSuite AI Connector Service is Oracle NetSuite’s own, officially maintained integration layer for connecting AI assistants, Claude included, to a live NetSuite account. It’s built on MCP, an open protocol, which means it isn’t locked to one AI vendor. The same underlying service can, in principle, be used by any MCP-compatible client.
There are two ways to expose NetSuite data through it:
- MCP Standard Tools SuiteApp: Oracle’s pre-built SuiteApp that exposes standard tools for records, reports, saved searches, and SuiteQL. This is the option most teams should start with.
- Custom Tools: built by your own developers for bespoke workflows, using NetSuite’s tooling for creating custom MCP tools.
This post covers the standard, most common path: connecting Claude to NetSuite using the MCP Standard Tools SuiteApp.
Why This Matters (Beyond “It’s Cool”)
A few real, everyday problems this actually solves:
- “Is this invoice paid?”: answered in seconds, without anyone leaving their chat window.
- “Which customer has the most unpaid invoices right now?”: a query that used to mean building or hunting down a saved search.
- “How many open sales orders does this account have?”: a lookup that currently costs someone a Slack message to finance and a wait.
The point isn’t to replace your finance team’s judgment; it’s to remove the multi-click, multi-person retrieval tax that sits in front of information your team already has a right to see.
Prerequisites
Here’s the thing: most setup guides lump “things you need” and “things you’re about to build” into one long checklist. In reality, you only need three things walking in. Everything else (the custom role, the SuiteApp, the integration record) gets created during the walkthrough below, not before it.
What you actually need before you start:
- A NetSuite account on a supported release, with the AI Connector Service feature available
- NetSuite Administrator access: you’ll only need this for the one-time setup itself; it is not what your day-to-day AI role will run on (more on that below)
- A Claude account with access to connectors (check Claude’s current plan and connector documentation at support.claude.com, since plan-specific limits do change)
- If you’re on a Claude Team or Enterprise plan, an Owner or Primary Owner needs to enable the connector for the organization first (Organization settings → Libraries and access → Connectors). Individual members can’t add it themselves, only connect to it once it’s been enabled org-wide. On Pro or Max, any user can add it directly, so this doesn’t apply.
That’s it. The custom AI role, the MCP Standard Tools SuiteApp, and the integration record are all things Part 1 walks you through creating, not boxes to check beforehand.
A note on security posture: Before connecting any AI client to a system holding financial and customer data, take a few minutes to read NetSuite’s own “Associated Risks, Controls, and Mitigation Strategies” documentation. It’s not boilerplate; it directly informs how you should scope the custom role you’re about to create.
Part 1: Steps in NetSuite
This is where the custom role, the SuiteApp, and the integration record actually come into existence; none of them need to exist before you get here.
- Enable the AI Connector Service feature. Log in with Administrator access and go to Setup → Company → Enable Features, then click the SuiteCloud subtab. From there:
- Check Server SuiteScript
- Check OAuth 2.0
- Also check REST Web Services. Oracle lists this one separately: it isn’t required for the AI Connector Service itself, but it is required to install the MCP Standard Tools SuiteApp, which the next step does. Enable it now and save yourself a trip back.
- Click Save.
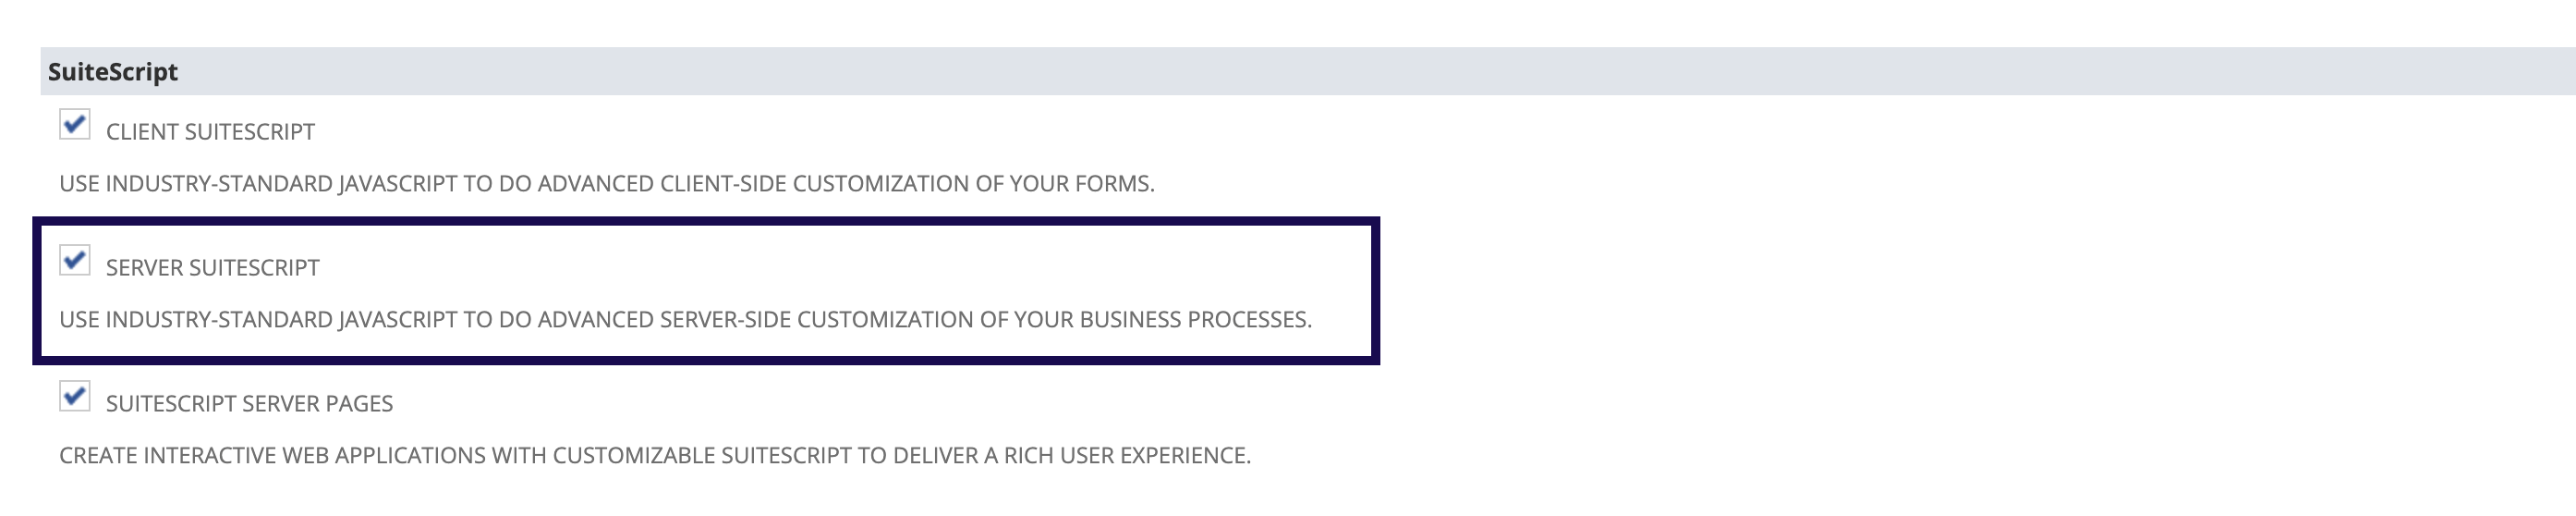 In the SuiteScript section, enable Server SuiteScript before installing the MCP Standard Tools SuiteApp.
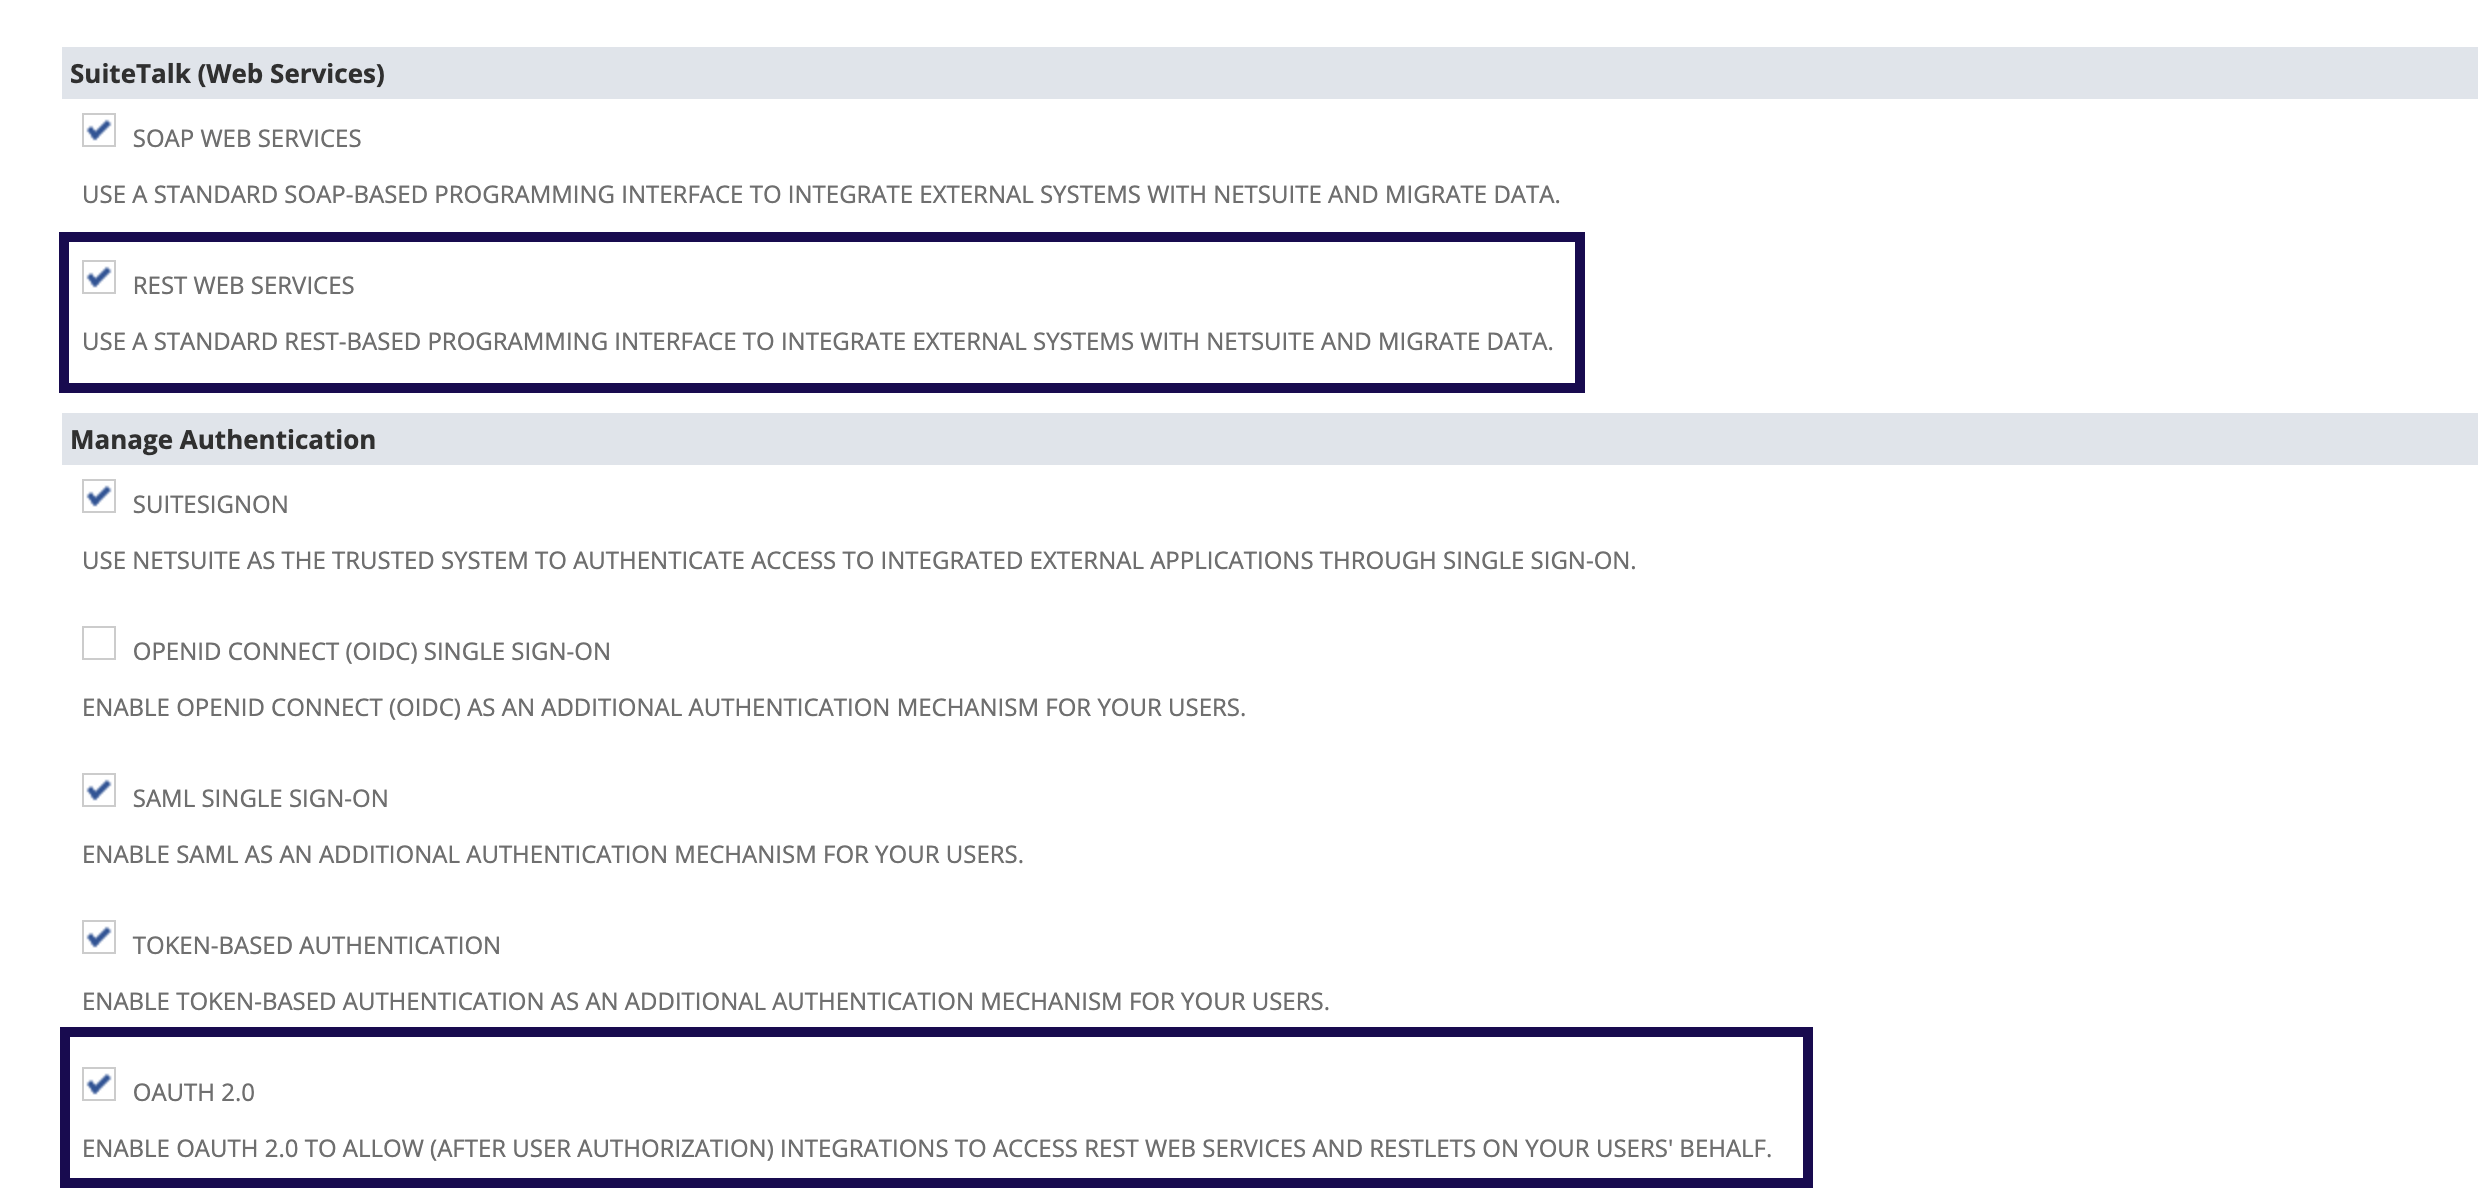 In SuiteTalk and Manage Authentication, enable REST Web Services and OAuth 2.0 so Claude can connect through the AI Connector Service.
- Install the MCP Standard Tools SuiteApp. This is what exposes NetSuite’s standard tool set to any connecting AI client. Go to SuiteApps → SuiteApp Marketplace, search for “MCP Standard Tools,” and install it. (Note: an older “MCP Sample Tools” SuiteApp has since been deprecated, so make sure you’re installing “MCP Standard Tools,” not the retired one.)
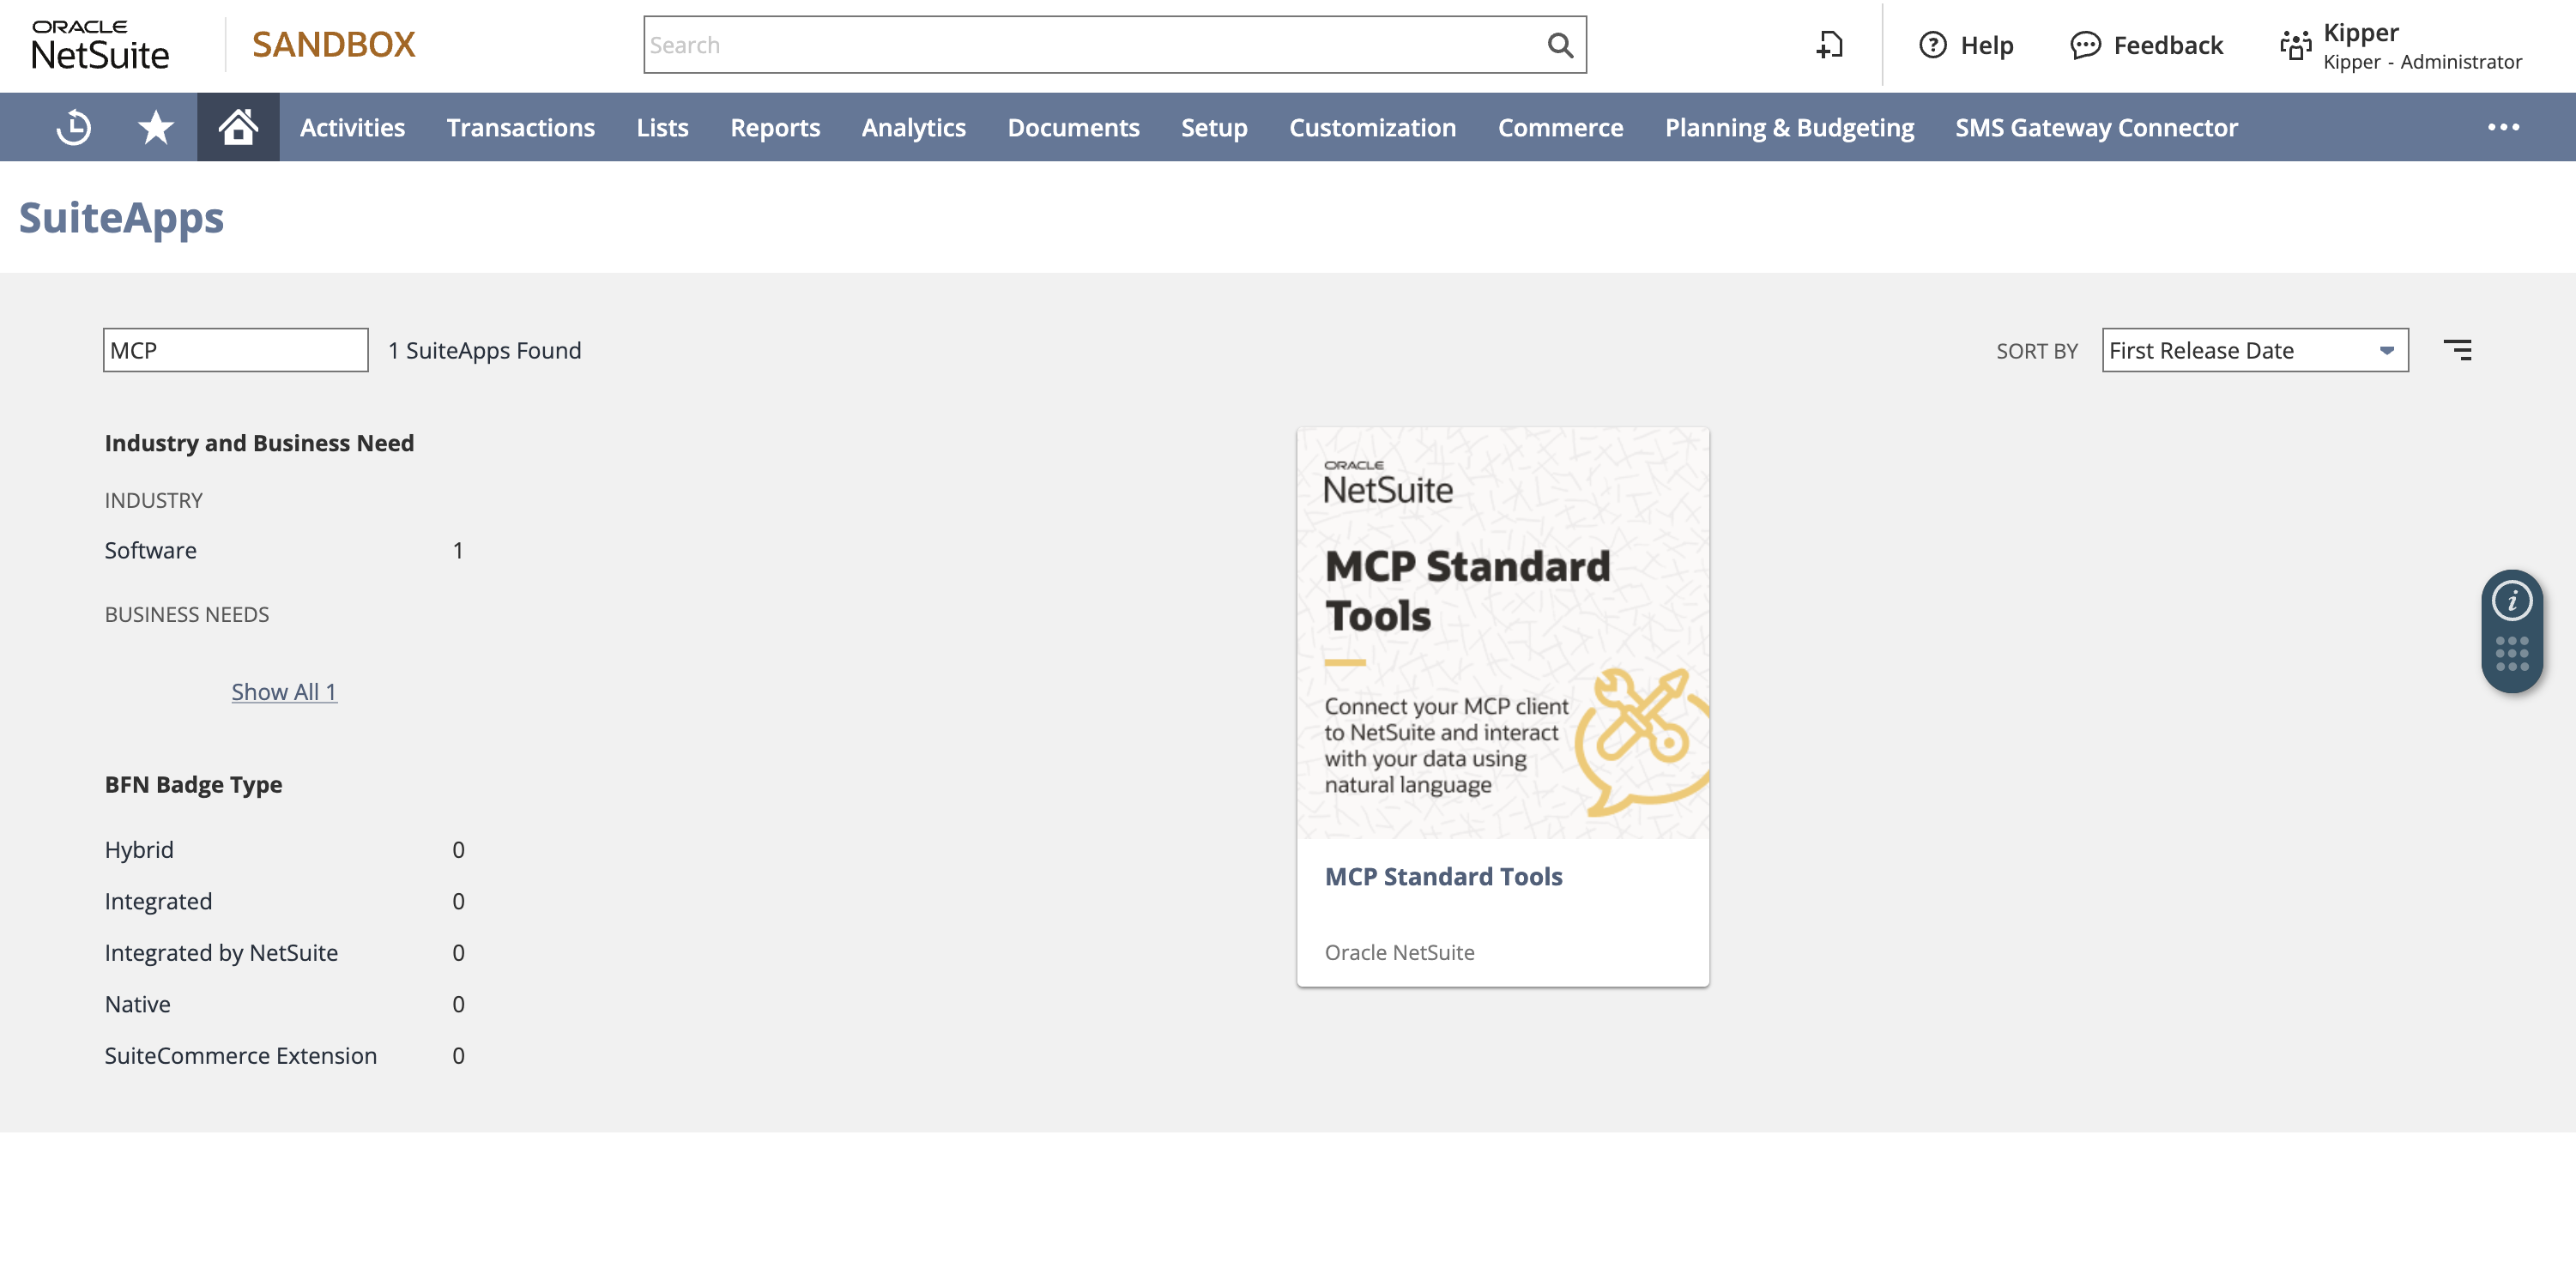 Search for MCP Standard Tools in the SuiteApp Marketplace, then open the Oracle NetSuite SuiteApp before installing it.
- Create a dedicated custom role for MCP access. Do not attempt to use the Administrator role here: NetSuite explicitly blocks the AI Connector Service from running under the Administrator role, or any role with full/unrestricted permissions. This isn’t a limitation to work around; it’s the whole point. Go to Setup → Users/Roles → Manage Roles, create (or edit) the role, and under Permissions → Setup, add:
- MCP Server Connection
- Log in using OAuth 2.0 Access Tokens: a different permission from the similarly-named “Log in using Access Tokens,” so double-check you’ve picked the right one
- REST Web Services: only if you want this role to create, retrieve, and update records through the SuiteApp. This is the same name as the account feature you enabled in step 1, but it is a separate control: the feature lets you install the SuiteApp, the role permission decides whether this role can touch records through it. For a read-only Q&A role, leave it off.
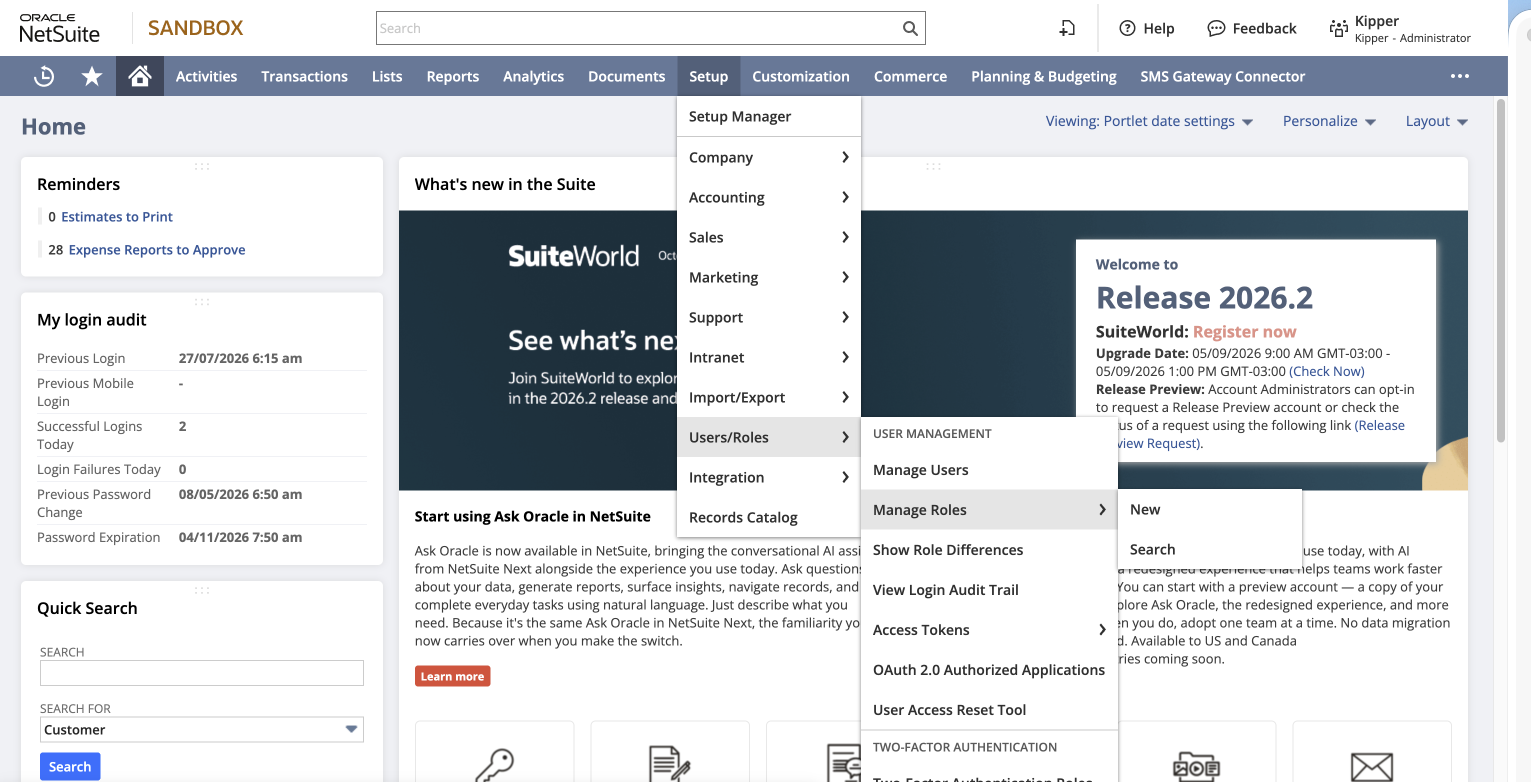 The role tools live under Setup → Users/Roles → Manage Roles. Choose New to build a dedicated role from scratch.
 Under Permissions → Setup, add MCP Server Connection and Log in using OAuth 2.0 Access Tokens, the two permissions that let the role connect through the AI Connector Service.
- Assign only the permissions the role actually needs, beyond the setup permissions above. Set this up deliberately:
- If cross-subsidiary visibility is required, enable Accessible Subsidiaries → All and Allow Cross-Subsidiary Record Viewing.
- Grant view/search access to the record types you want Claude to answer questions about (e.g., invoices, customers, transactions).
- Only grant create/edit permissions if you genuinely intend to let Claude create or update records. More on why that deserves real caution below.
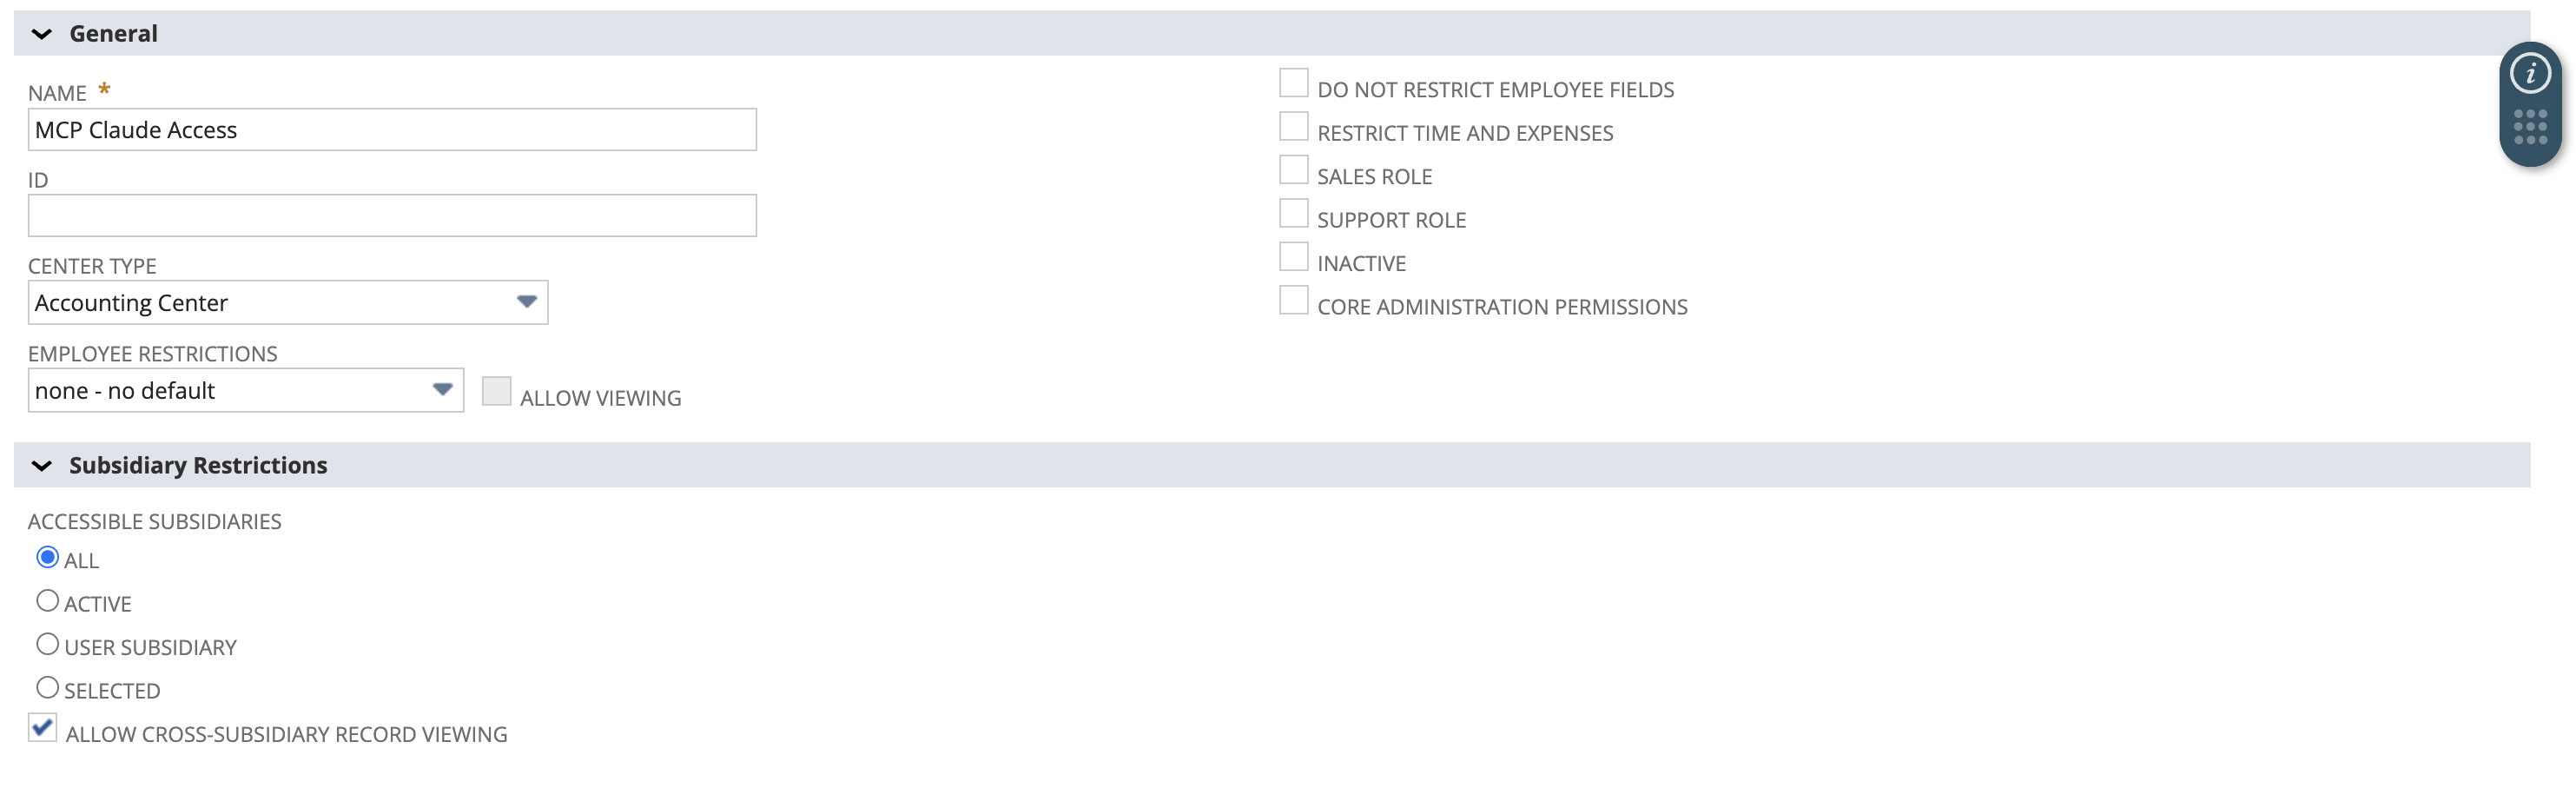 Give the role a clear name like “MCP Claude Access.” Set the subsidiary scope here: enable All plus cross-subsidiary viewing only if the role genuinely needs to see across subsidiaries.
 Under Permissions → Transactions, grant only the record types Claude should answer on. Keep the level tight: View is enough for read-only lookups; Full allows changes.
So how does this role actually get used by MCP? Creating the role isn’t the last step; the role only does anything once two more things happen:
- Assign the role to the user(s) who will be connecting Claude to NetSuite (via their employee record, under the Access/Roles section). A role sitting unassigned doesn’t grant anyone anything.
- Select that role during the OAuth authorization step, not the Administrator role. When you (or whoever is connecting) authorizes Claude’s access, either the first time in the Claude connectors flow or through the NetSuite login/consent screen, NetSuite will prompt for a role if the logged-in session doesn’t already have one active. That selection is what actually ties the MCP session to this specific role’s permissions for that connection. If you accidentally authorize with the wrong role, NetSuite will reject it outright if it’s the Administrator role, or simply scope Claude down to whatever the selected role can see if it’s a different, unintended role.
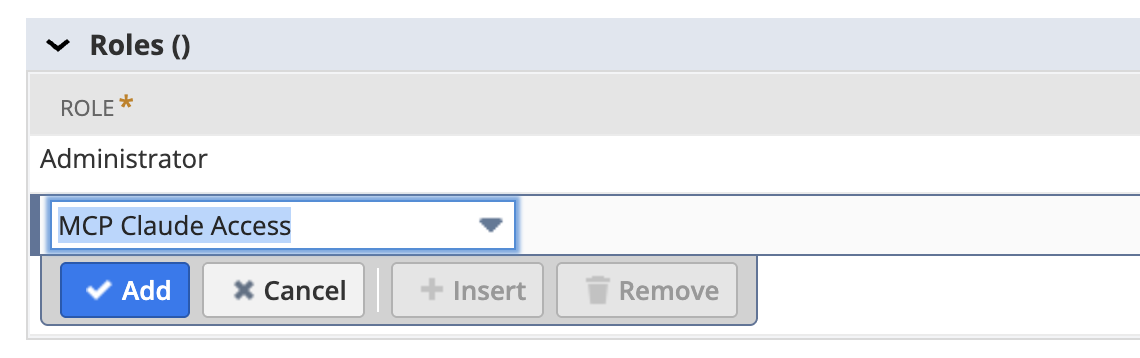 A role does nothing until it’s assigned. Add it to the connecting user’s employee record so it’s available to pick at authorization time.
In short: the role is the permission boundary, assignment is what makes a person eligible to use it, and the role picked at authorization time is what Claude is actually “wearing” for that connection.
Pro tip: If you’ve just created a role and assigned it to a user, but it isn’t showing up as an option to select during authorization, don’t assume something’s misconfigured right away; it’s often just a stale session. Log all the way out of NetSuite (not just switch roles) and log back in before retrying the connection from Claude. This alone resolves the “my new role isn’t in the list” issue more often than any actual permission fix does.
- Confirm the Integration Record, but only after you’ve completed Part 2 below. This step is a bit out of order by nature: the integration record doesn’t exist yet at this point in the setup, because it only gets created once you’ve actually connected from Claude. Come back to this step after finishing the “Steps in Claude” section.
What happens here depends on which path you’re using:
- MCP Standard Tools SuiteApp (the path this guide covers): after your first successful connection from Claude, NetSuite automatically creates the integration record for you. No manual setup needed.
- Custom MCP tools: if you’ve built your own tools instead of using the standard SuiteApp, the integration record is not auto-created; you have to set it up yourself. That process is out of scope for this guide and will be covered in a future post.
Either way, once the record exists, an Administrator (or any user with sufficient permissions) can review it under Setup → Integration → Manage Integrations. From there you can also see and adjust the concurrency limit, or disable the integration entirely if needed.
Part 2: Steps in Claude
Once NetSuite is configured, connecting from Claude is short:
- Go to claude.ai and log in.
- Navigate to Search and tools → Add connectors.
- This step differs depending on your Claude plan:
- Pro or Max: Under the Connectors section, select the Web tab and find the NetSuite AI connector.
- Team: Go to Organization settings, find the Libraries and access section, and click Connectors. Click Add, then search for “NetSuite.” Click the + icon next to it. If you don’t have sufficient access to add connectors for the organization, you may see a Request option instead. Use that to ask an Owner or Primary Owner to enable it.
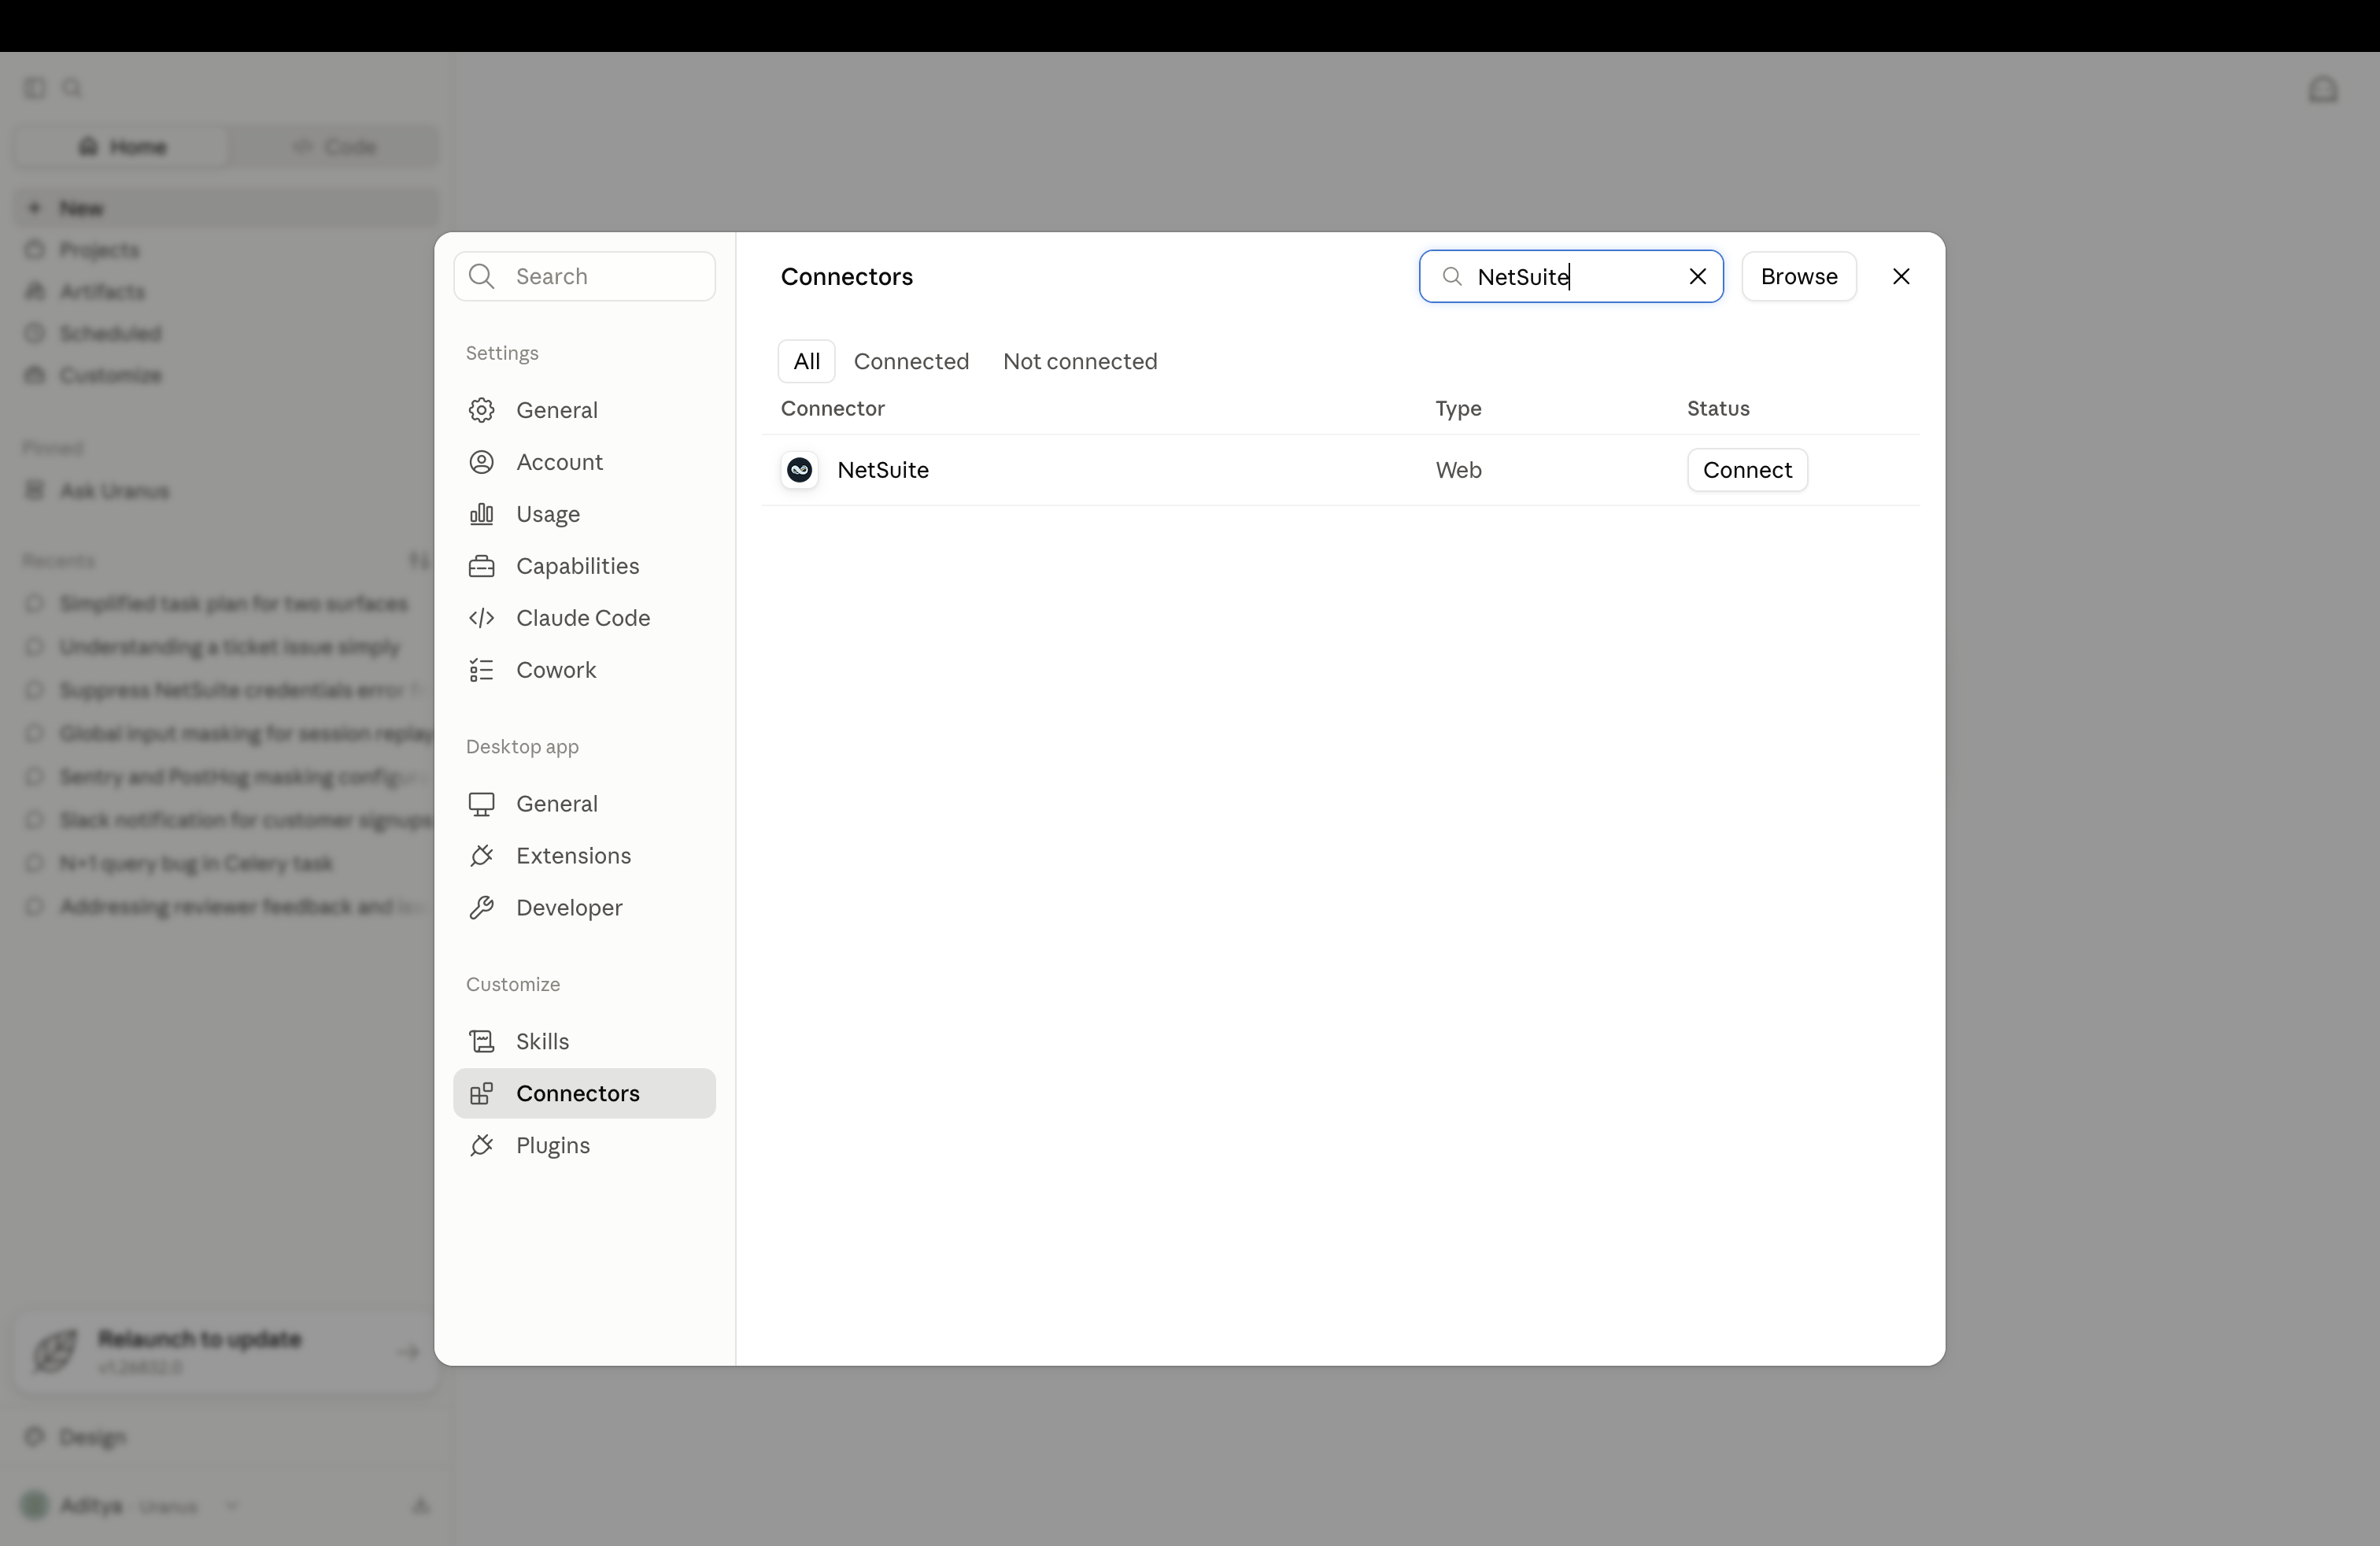 In Claude’s Connectors settings, find NetSuite and click Connect to start authorization.
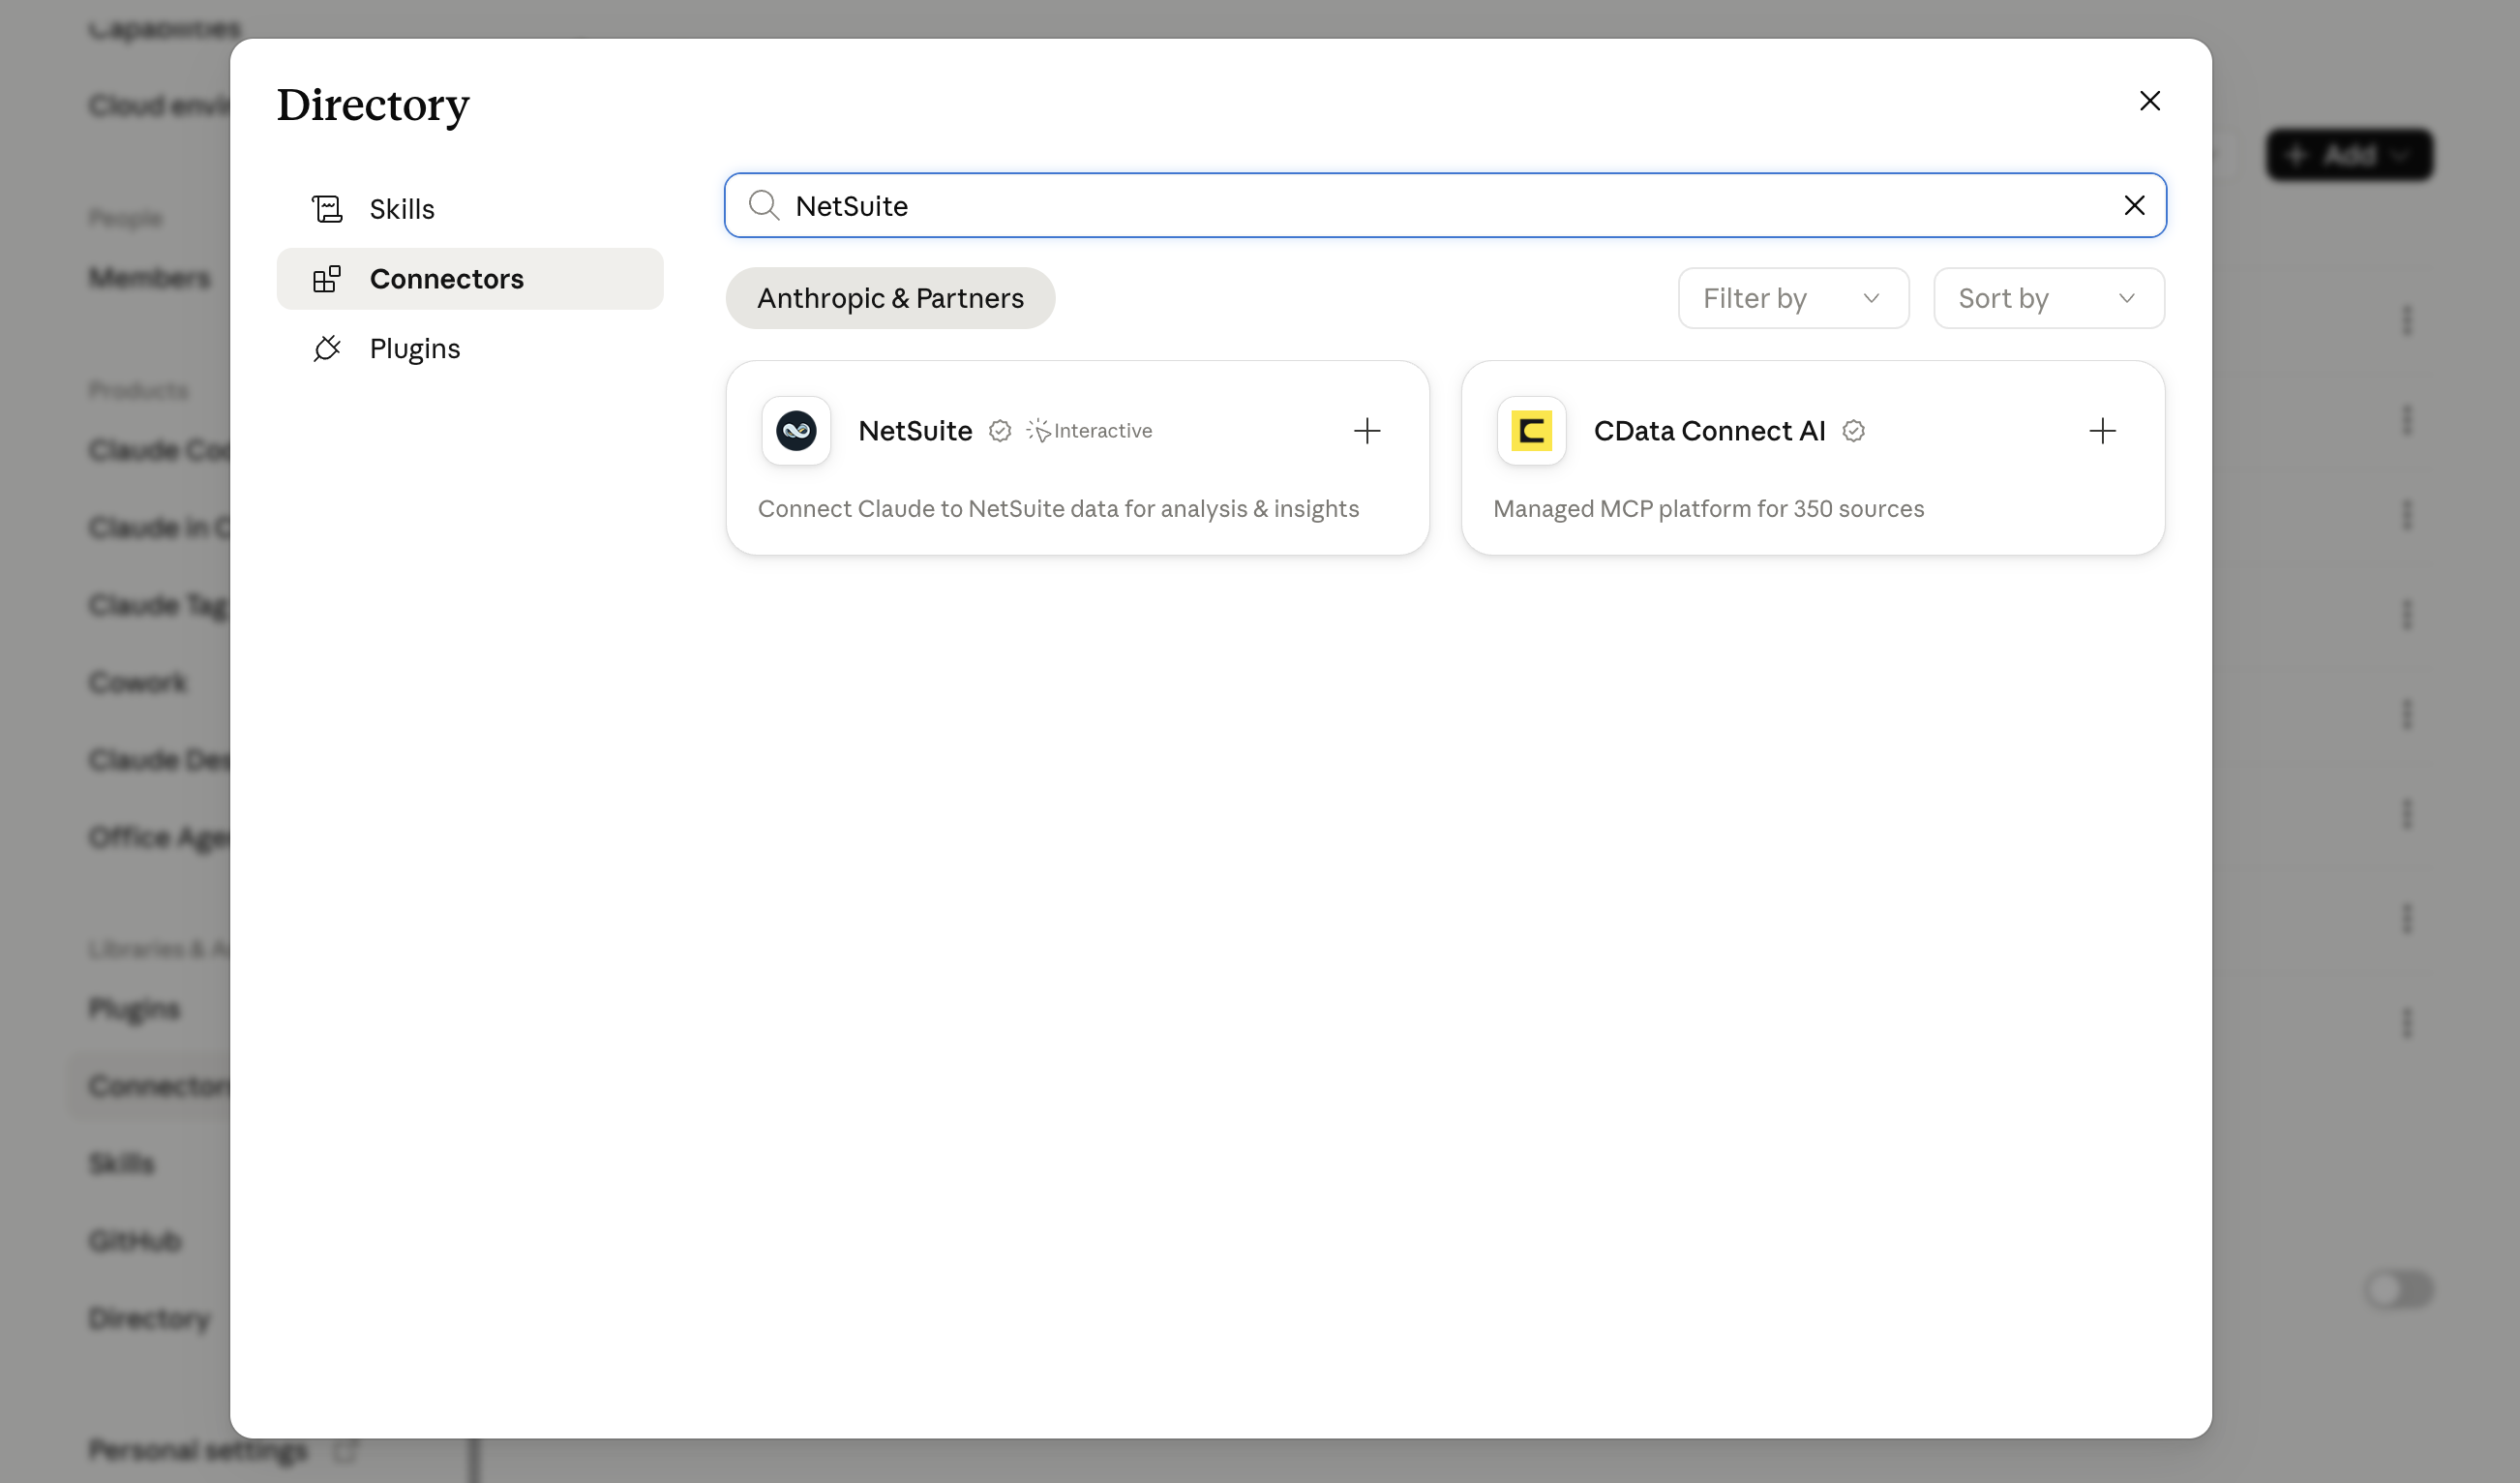 Search the connector directory for “NetSuite” and pick the official NetSuite AI connector, not a similarly named third-party option.
- Once the connector has been added, you still need to connect it to your NetSuite account: click Connect.
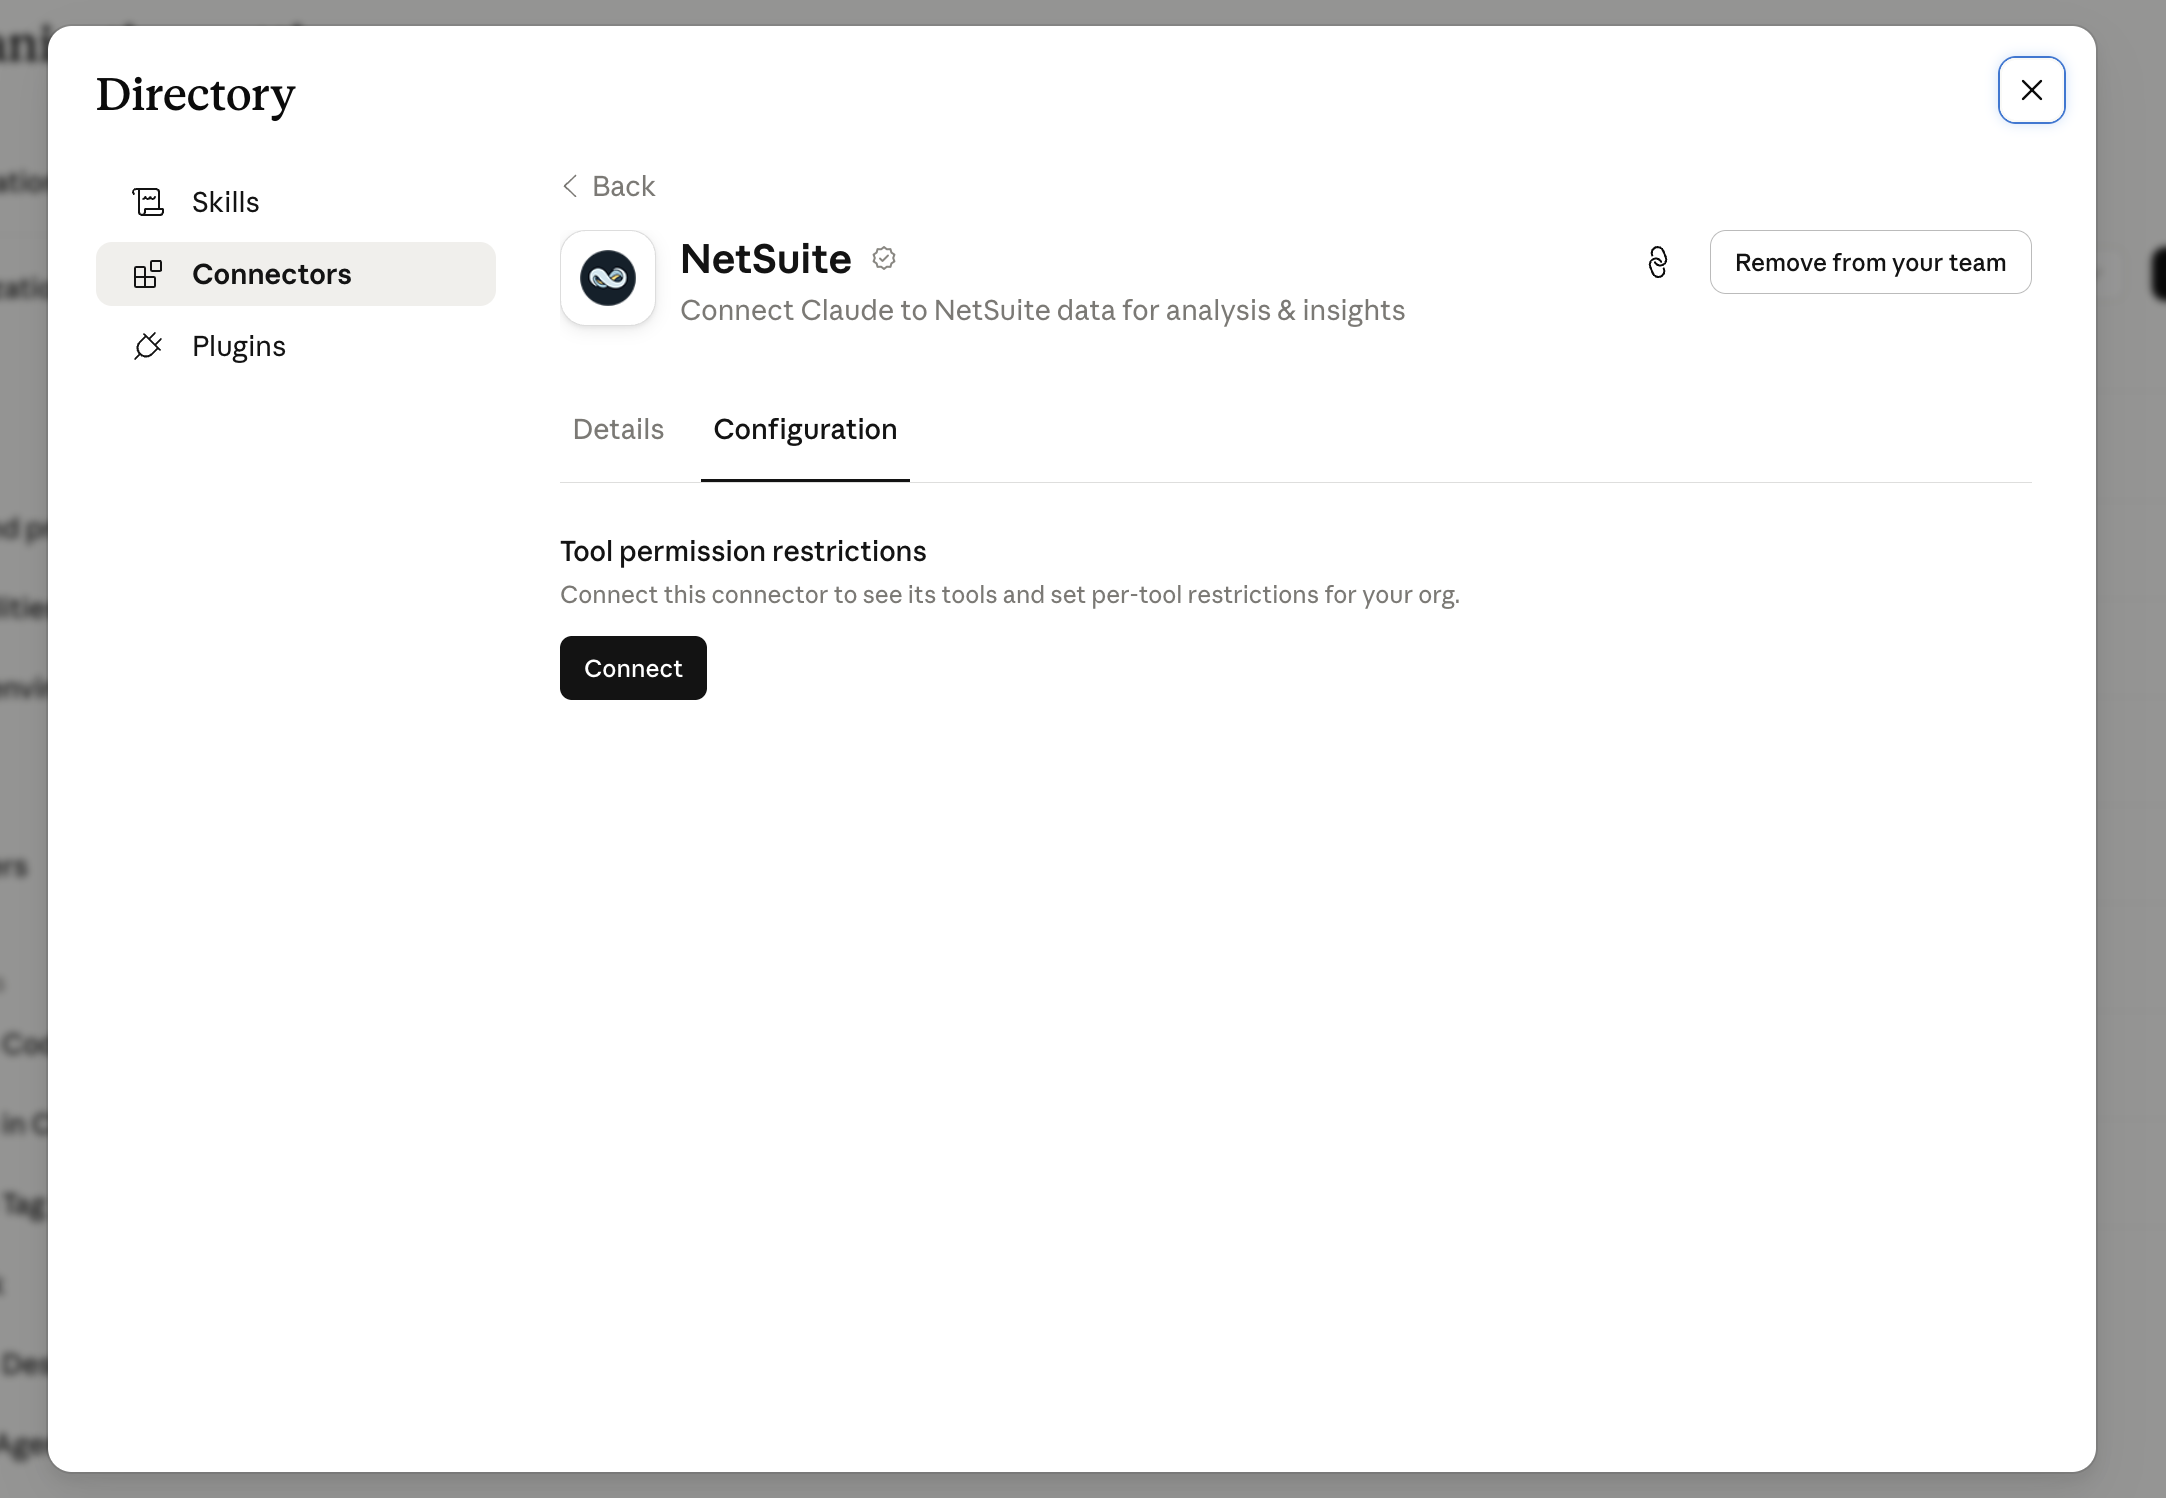 Adding the connector isn’t the same as connecting it. Click Connect to actually authorize it against your NetSuite account.
-
Paste your account’s Server URL, replacing
<accountid>with your real NetSuite account ID:https://<accountid>.suitetalk.api.netsuite.com/services/mcp/v1/suiteapp/com.netsuite.mcpstandardtools
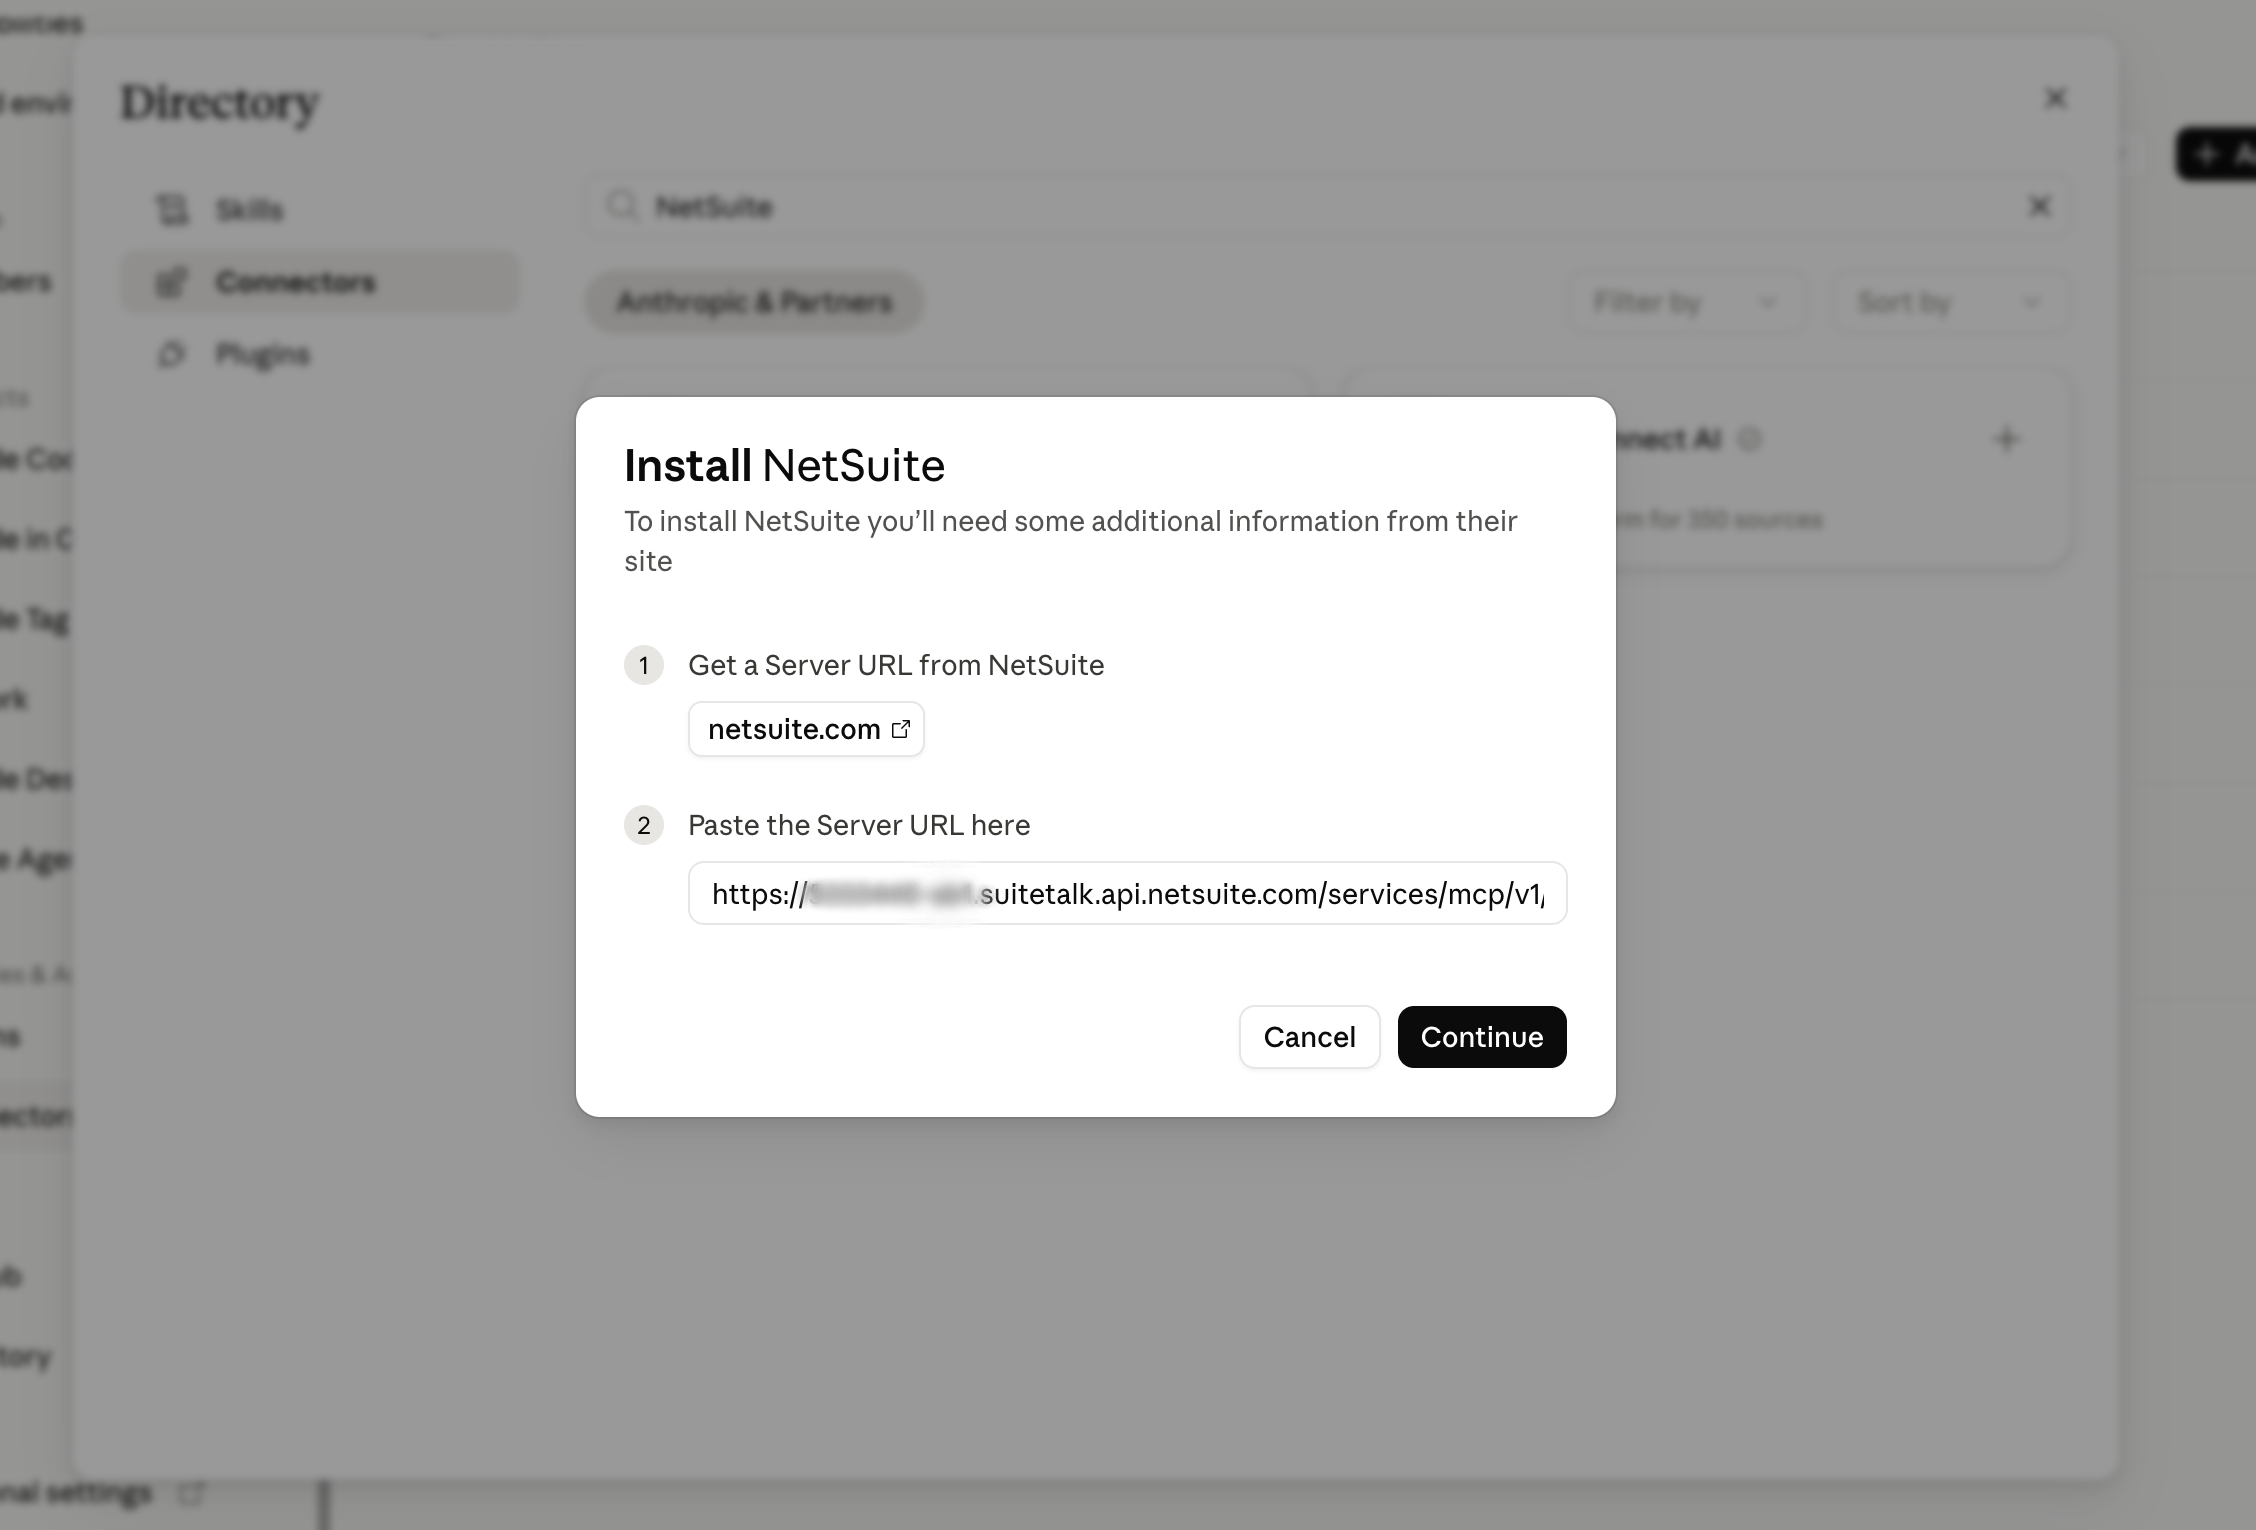 Paste your account’s Server URL, swapping in your real account ID. This is the address of your NetSuite MCP endpoint.
- Click Continue.
- Go to Search and tools → Manage connectors, find NetSuite, and click Connect again to complete authorization.
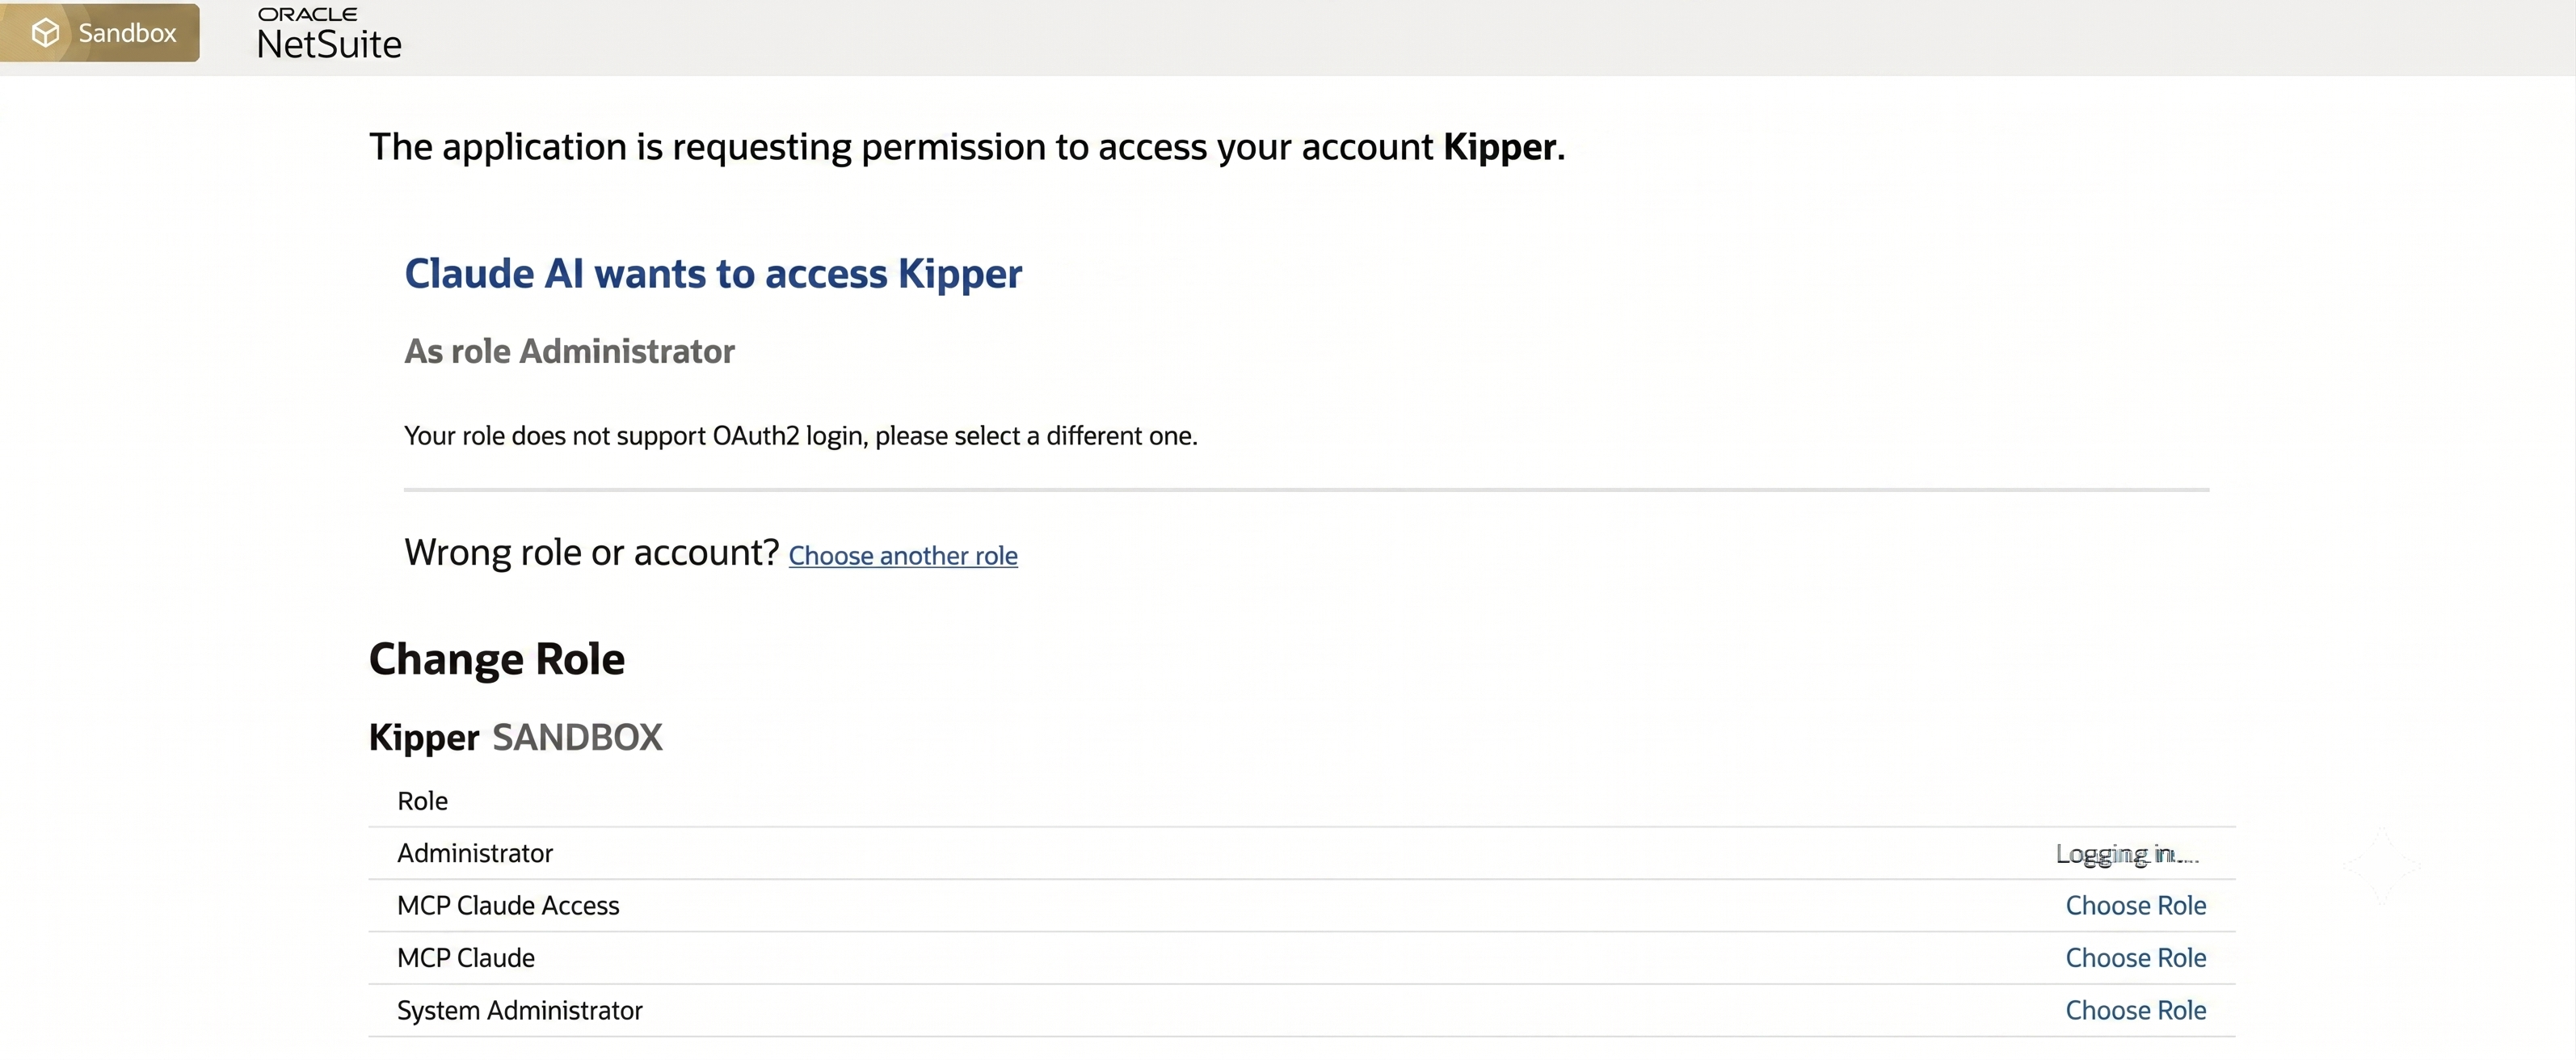 If you authorize with the Administrator role, NetSuite rejects it outright, so pick your dedicated MCP role from the Change Role list instead.
- On first connection, Claude will prompt you to allow or deny access to your NetSuite account. This is your moment to actually read what you’re approving.
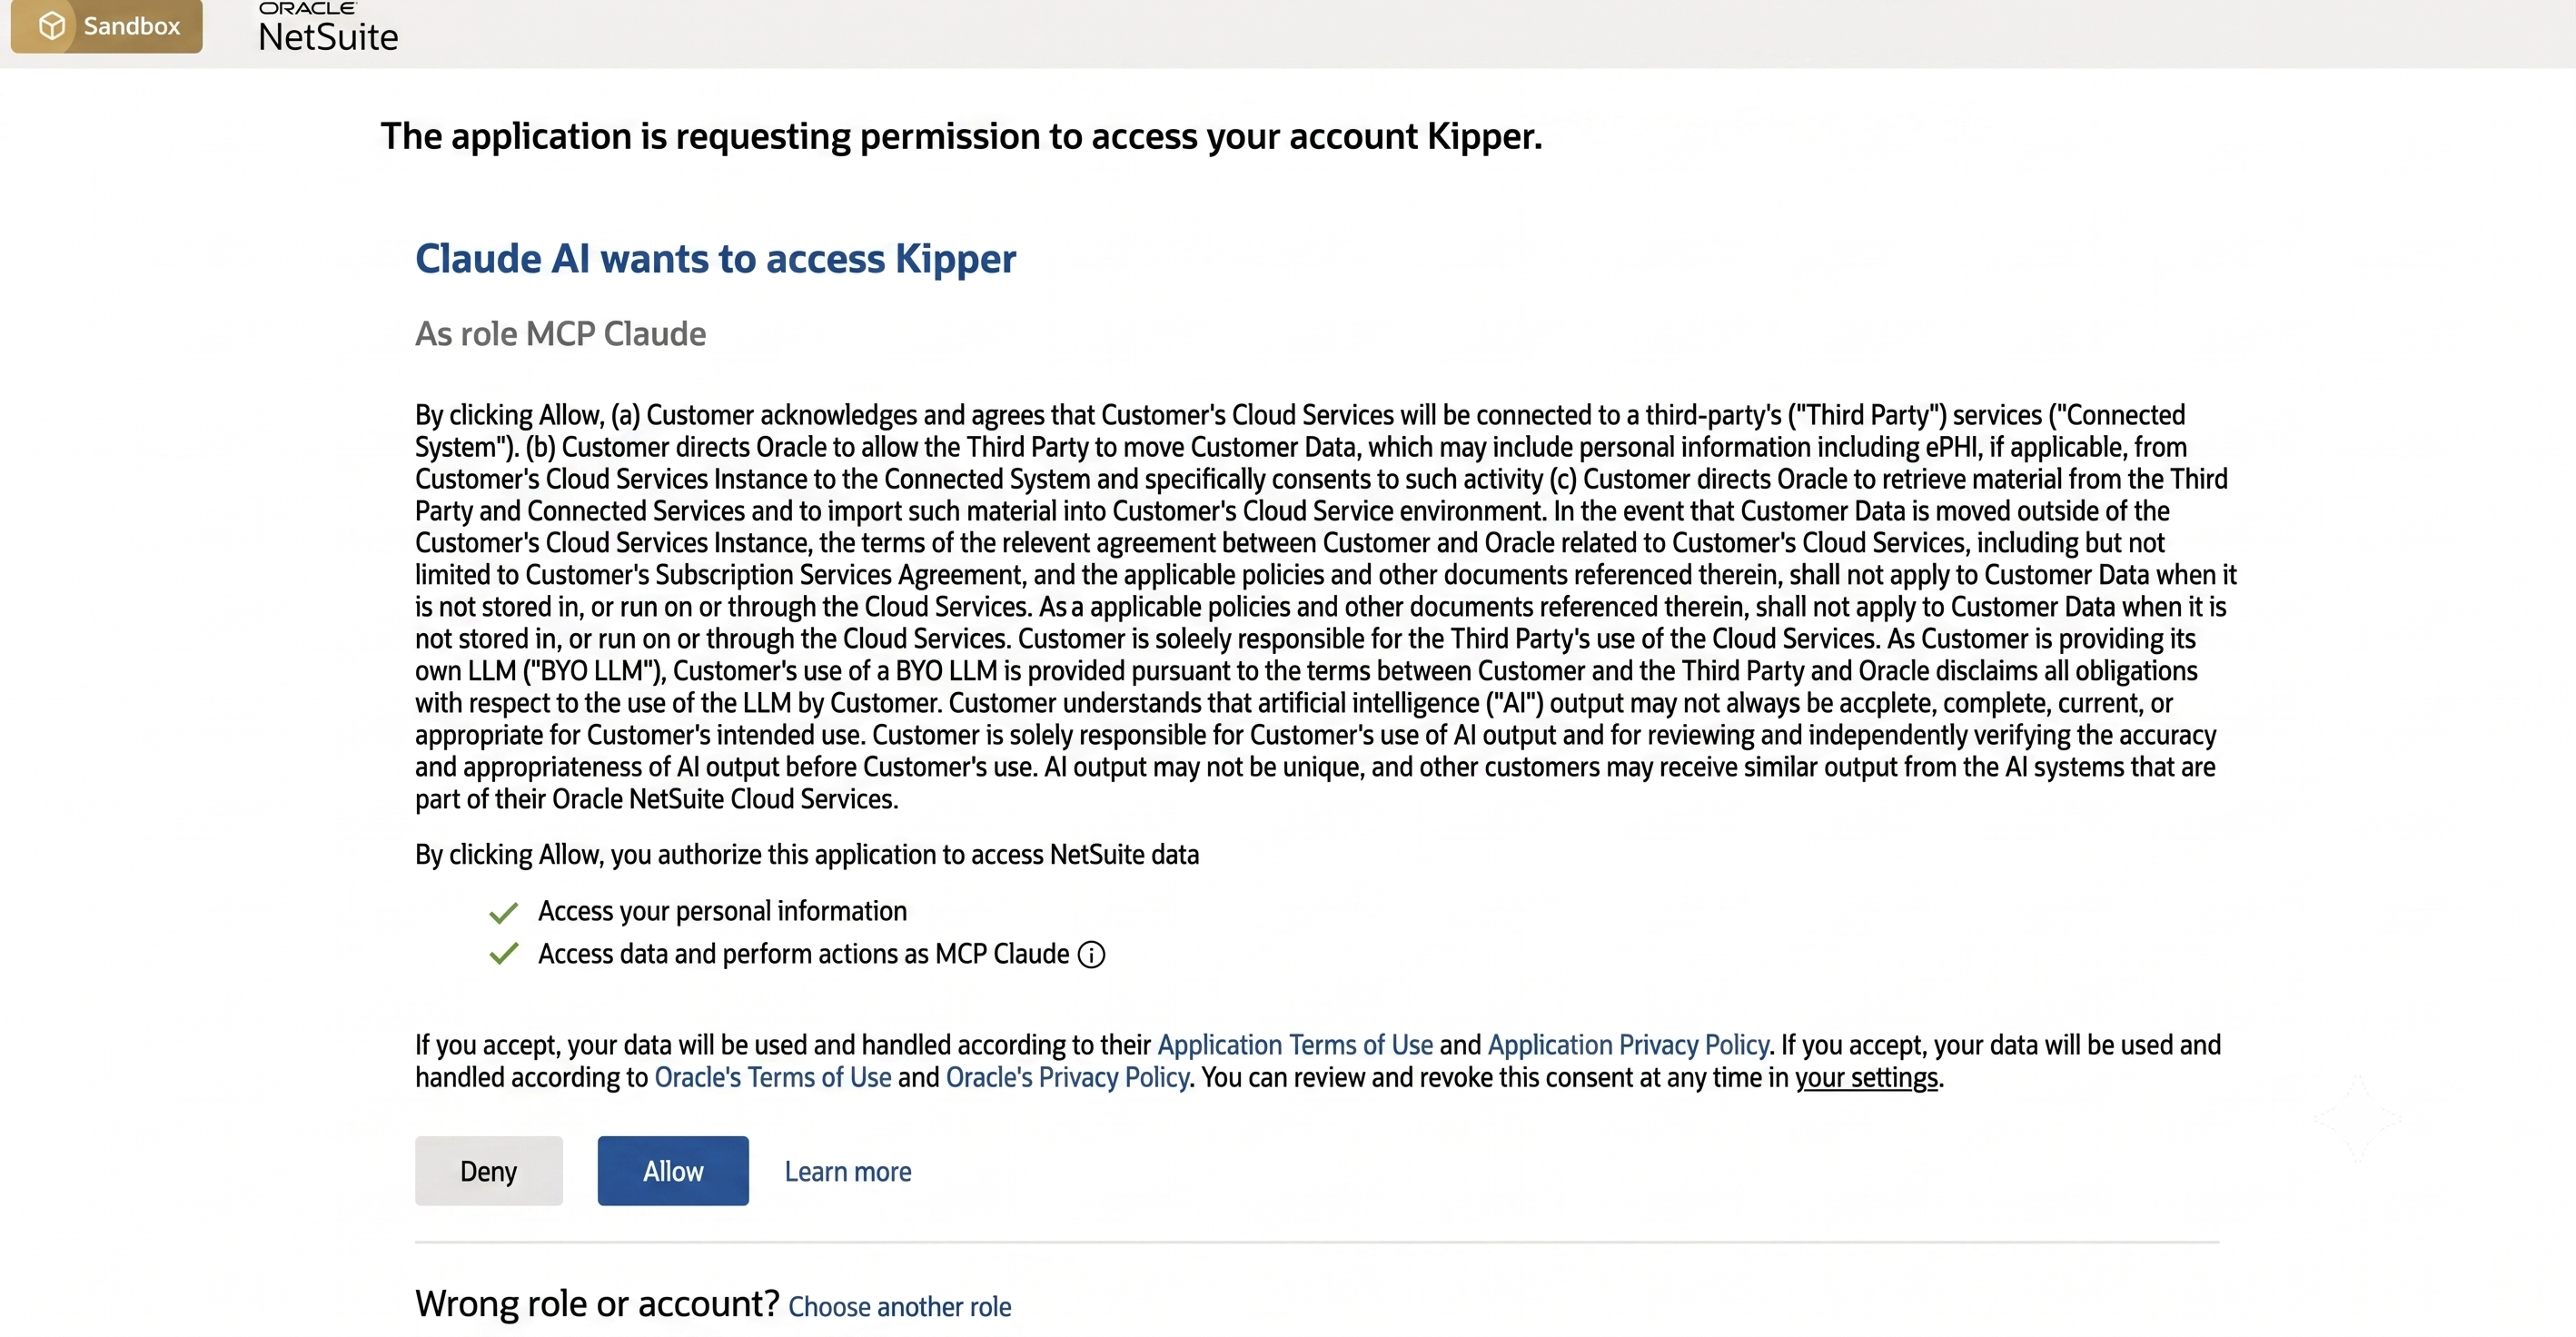 NetSuite’s own consent screen. Note that it shows the role you’re connecting as (“MCP Claude Access”). Read what you’re approving before clicking Allow.
- Once approved, you’ll see a confirmation popup, and the NetSuite connector will now appear whenever you click the Search and tools icon in a new chat.
That’s it. The connection persists across conversations, so you don’t need to reconnect every time you open a new chat.
Prefer a custom setup? If you’re not using the pre-built SuiteApp (say, your team built custom MCP tools), Claude also supports adding a custom connector: go to Settings → Connectors → Add custom connector, name it, and paste your own NetSuite AI Connector Service URL instead.
Example Questions to Try
Once connected, this is where it gets genuinely useful. Try asking Claude things like:
- “Which customers have unpaid invoices over 60 days, and what’s the total for each?”
- “Is invoice #10234 paid?”
- “List all open sales orders for [customer name].”
- “Which vendor bills are due in the next 7 days?”
- “What’s the quantity on hand for SKU-9032?”
- “Run the AR Aging Summary report for the UK subsidiary.”
Behind the scenes, Claude asks permission before each NetSuite tool call, then returns a real answer built from your records:
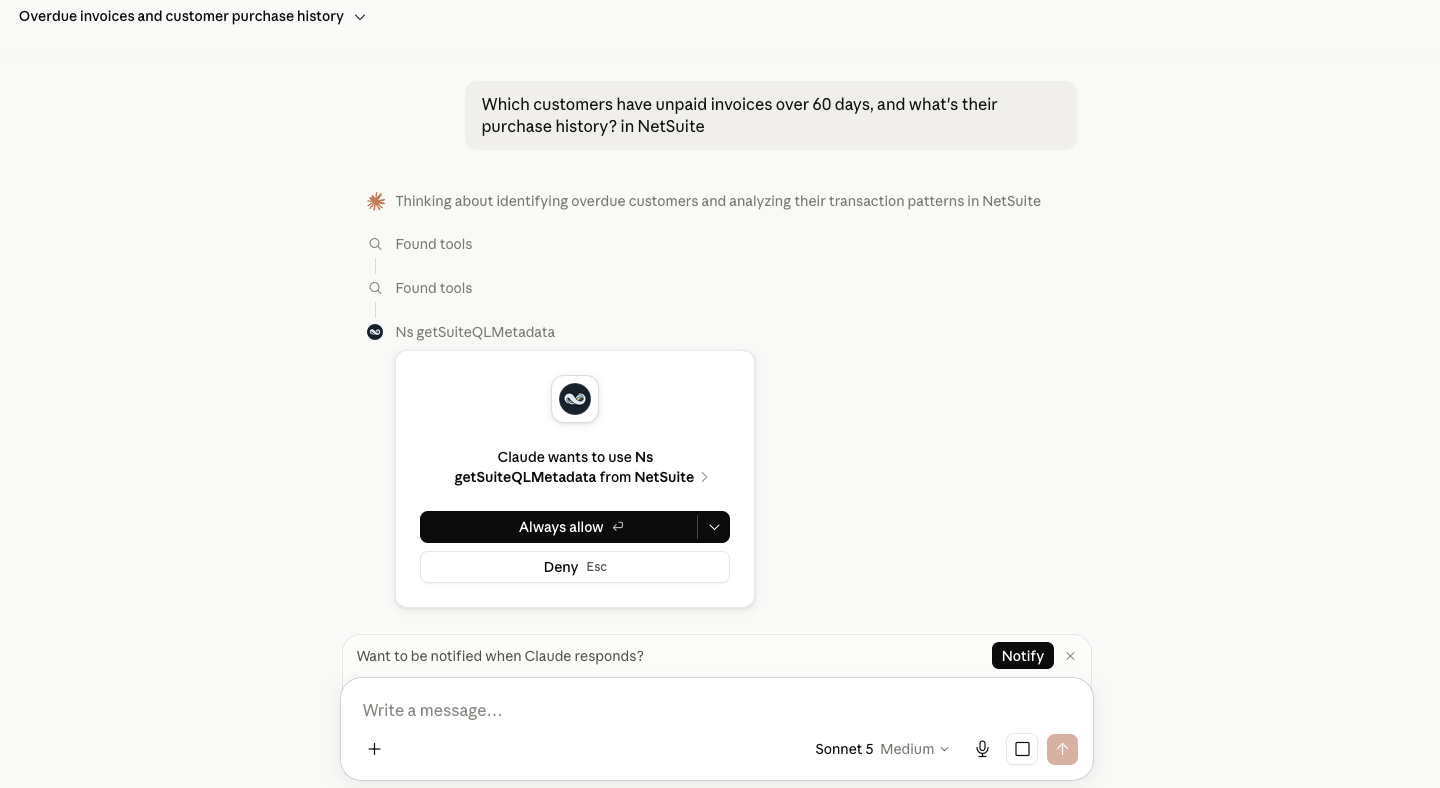 Claude asks before each NetSuite tool call. “Always allow” trusts that tool for the session; “Deny” blocks it.
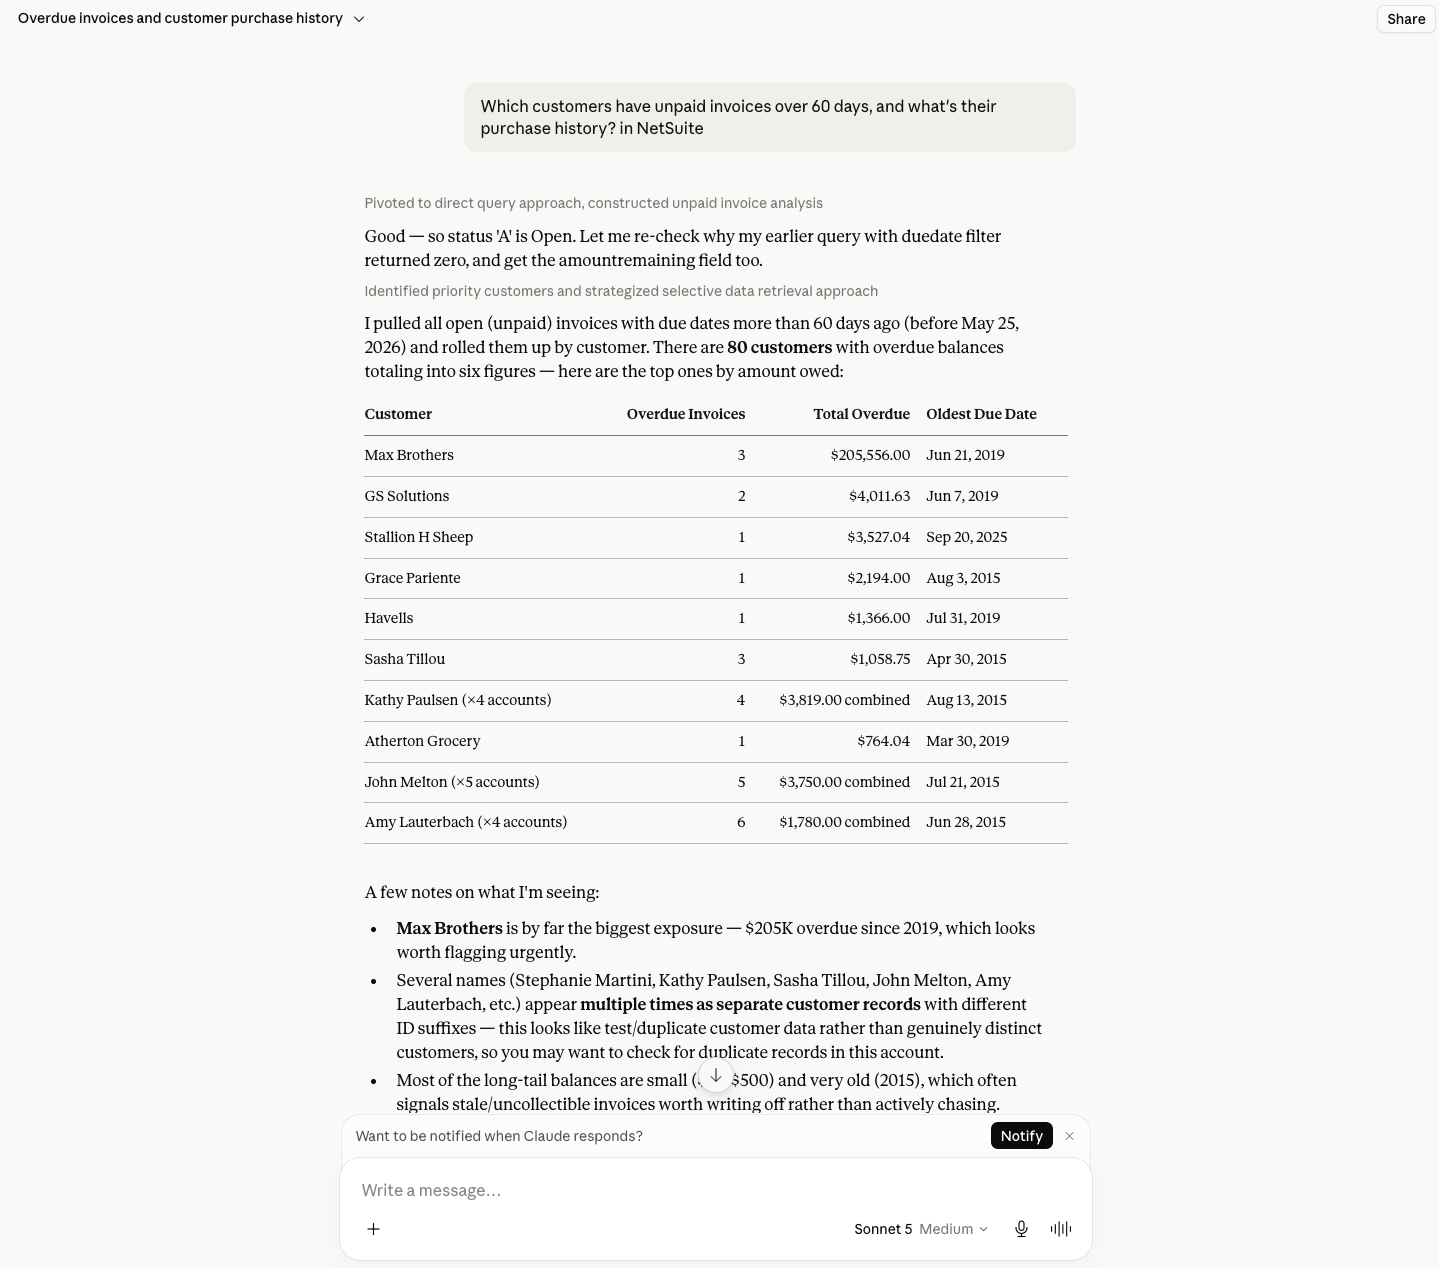 A real answer: overdue invoices rolled up by customer, straight from NetSuite records, no saved search required. (Data shown is from a NetSuite sandbox.)
Even a simple count works the same way: ask in plain language and Claude queries NetSuite for the figure:
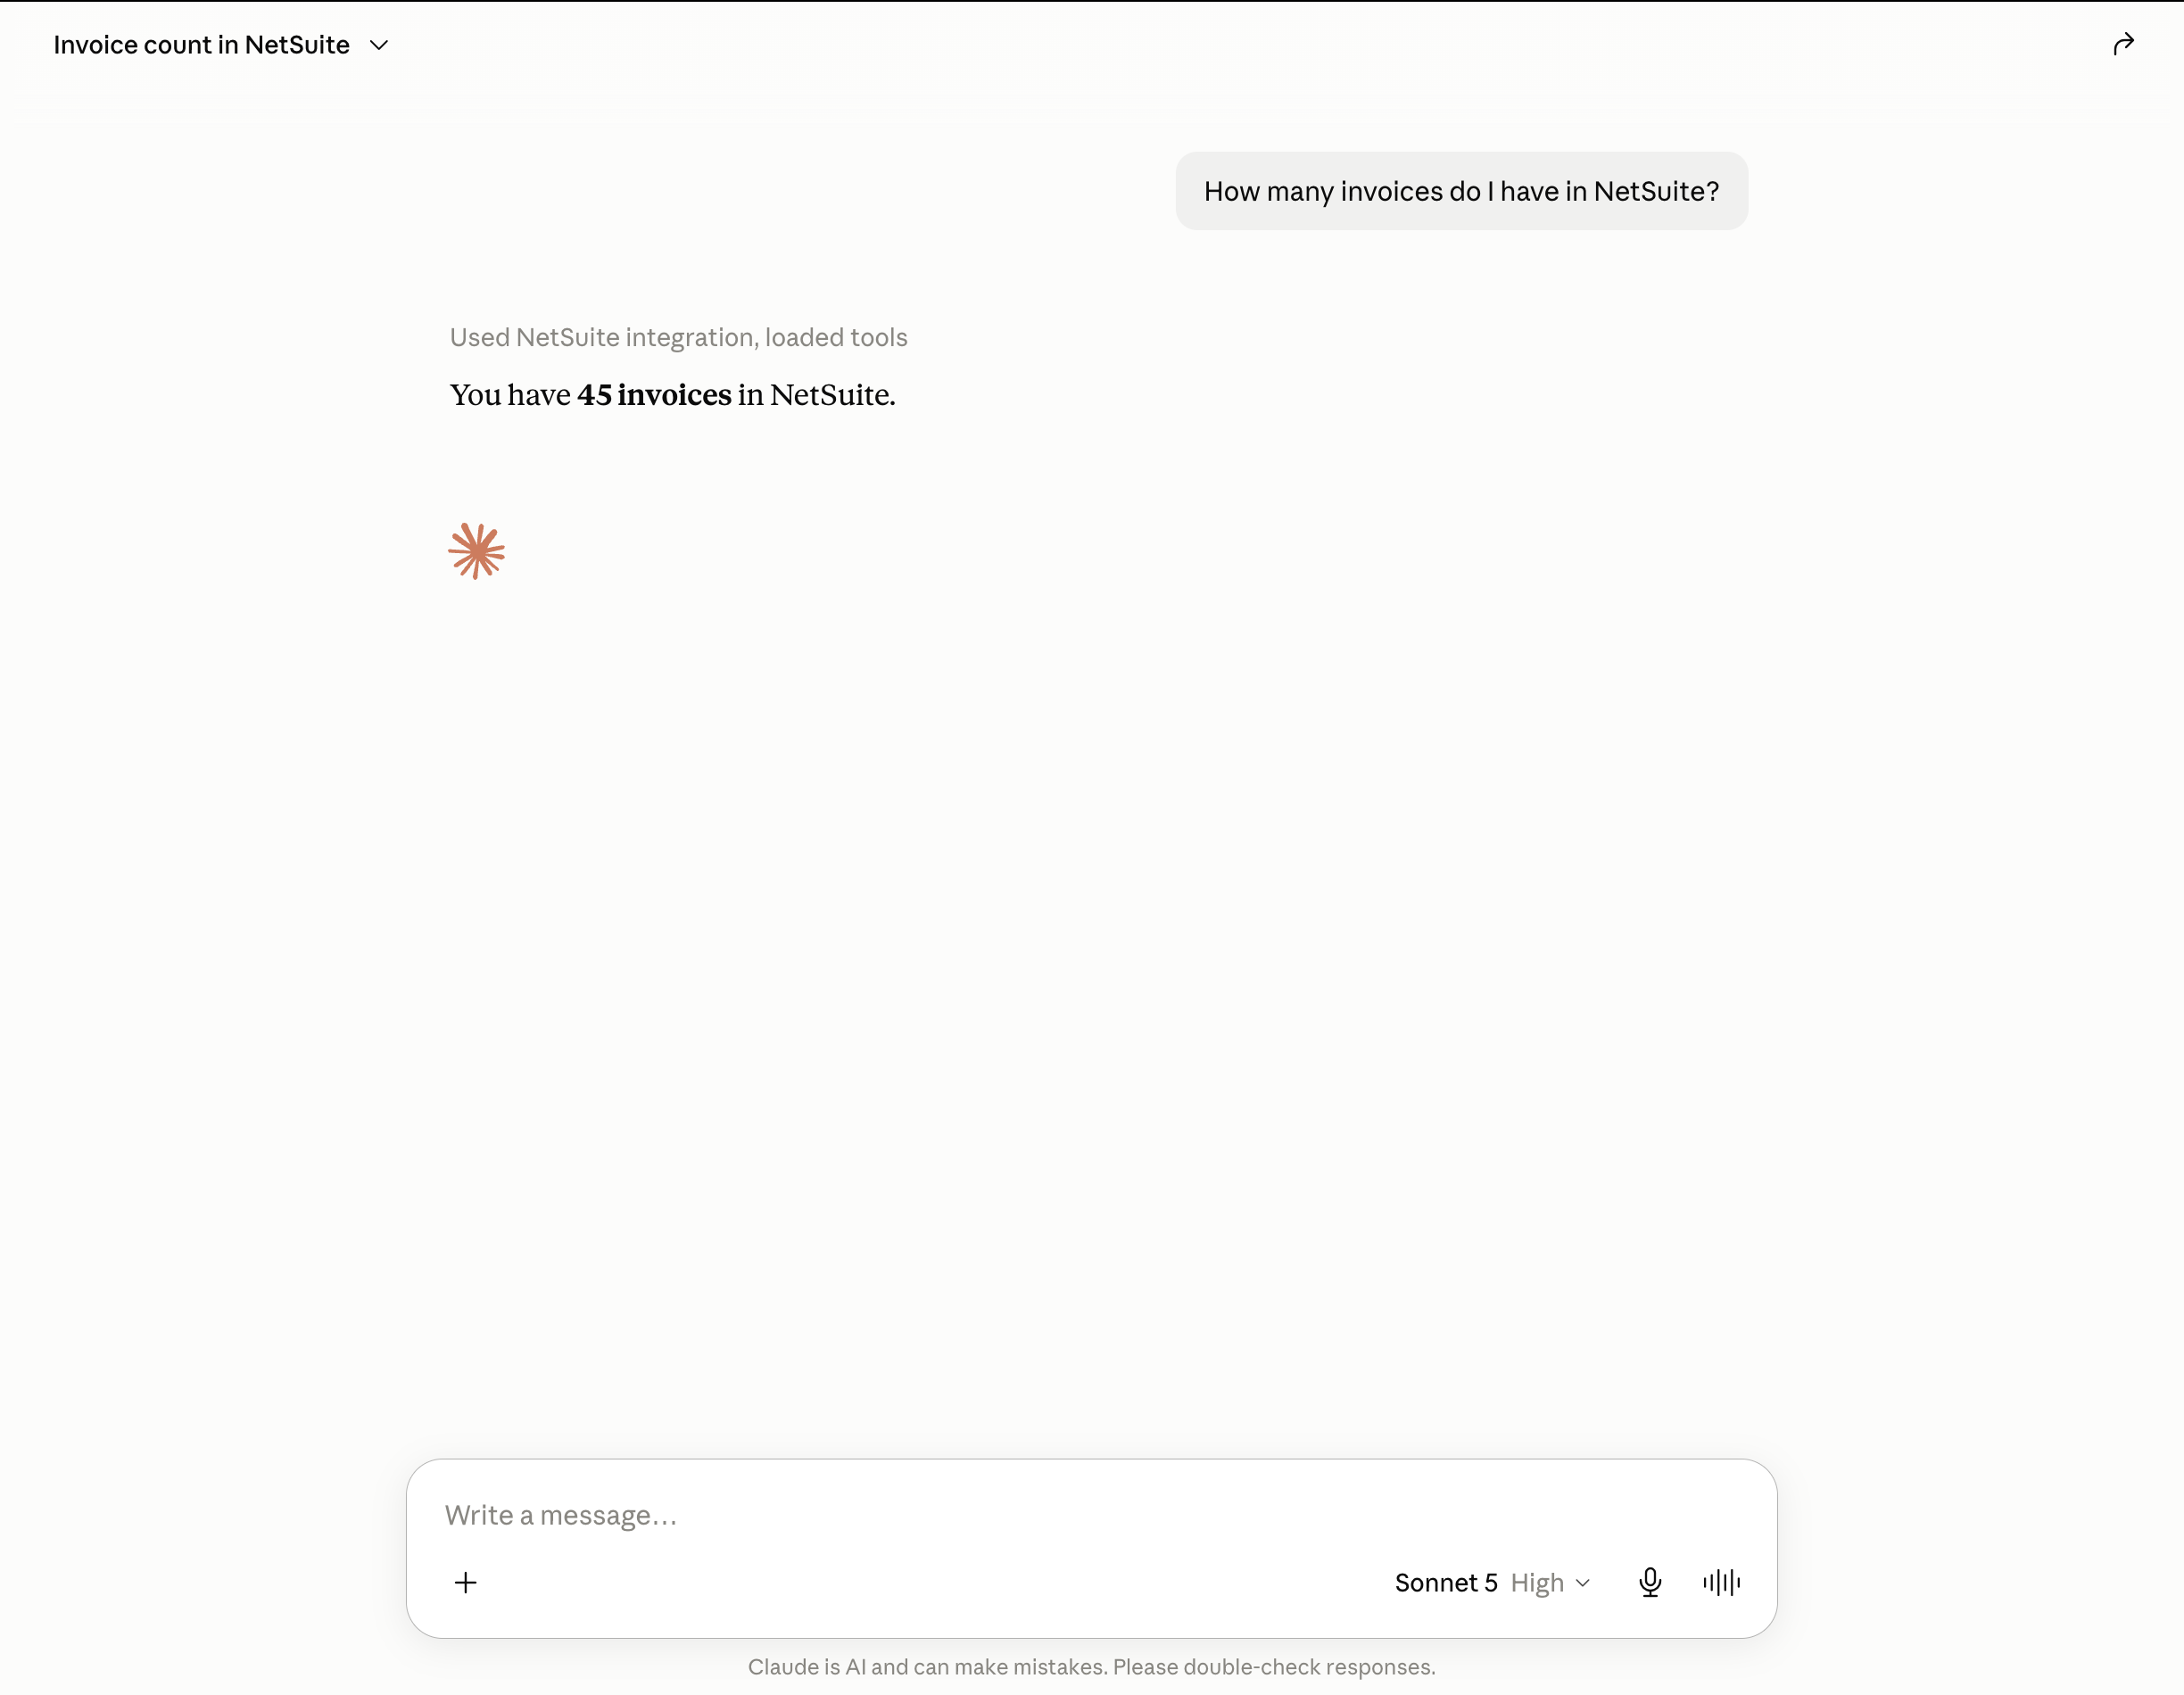 Simple counts work the same way: ask in plain language and Claude queries NetSuite for the figure.
A note on reports specifically, because this is the most commonly misstated part of NetSuite MCP: reports are not off-limits. Oracle’s Standard Tools include ns_listAllReports, which returns your standard and custom reports, and ns_runReport, which runs one and returns results, plus helper tools for filtering by subsidiary, accounting book, accounting context, and nexus. Alongside those sit ns_listSavedSearches and ns_runSavedSearch, the record tools, and the SuiteQL tools.
What is true is that access is not automatic. Whether Claude can run a given report depends on your role’s report permissions, its subsidiary scope, and whether that particular report’s shape survives the round trip. Seeing a report in the NetSuite UI is not proof that ns_runReport will return the same thing for the connected role. Test the specific reports your team relies on rather than assuming parity, and for repeatable finance outputs compare whether a report, a saved search, a record lookup, or a SuiteQL query is the safer fit. That comparison is laid out in NetSuite MCP SuiteQL Access Explained.
Concerns (Read This Before You Roll It Out Widely)
This is the part that’s easy to skip and the part that matters most.
Hallucination. Claude is a language model, not a database viewer; it reasons over what the connector returns, and like any AI system, it can occasionally misstate or misinterpret data, especially with ambiguous or compound questions. Treat answers as a strong first draft, not a final source of truth for anything that goes into an audit, a filing, or a customer-facing commitment. Spot-check anything with financial or compliance weight.
Create access can create wrong data. This is the bigger one. If the custom role you set up includes create or edit permissions, Claude can genuinely create or modify records in NetSuite, not just read them. A misinterpreted instruction (“create a credit memo for this customer”) could result in a real record, in a real system, that someone now has to find and clean up.
Practical mitigations:
- Start with a read-only role. Add write permissions only when there’s a specific, tested workflow that needs them.
- Use NetSuite’s Execution Log (available per integration record, under the AI Connector Service subtab) to monitor exactly what was requested, by whom, and what the outcome was.
- Review any create/edit action Claude proposes before it’s confirmed, especially early in rollout.
- Keep the role’s permission set as narrow as the actual use case; don’t grant “All” access because it’s convenient.
None of this is a reason to avoid the integration. It’s a reason to configure it like you would any other system with write access to your books: deliberately, and with logging turned on.
Managed NetSuite MCP Option for Teams
Oracle’s Claude connector path is the right route when a NetSuite admin wants to configure Oracle’s official AI Connector Service directly.
Kipper is a different option for teams that want governed finance answers without asking every business user to understand NetSuite roles, SuiteApps, tool calls, and prompt design. Kipper is positioned as a managed NetSuite answer layer with read-only product behavior, permission sets, and audit logging for questions and answers.
| Need | Oracle Claude connector | Kipper managed NetSuite connector |
|---|---|---|
| Primary user | NetSuite admin or technical user | Finance and operations teams |
| Setup owner | NetSuite admin and Claude workspace owner | Kipper onboarding plus customer admin |
| Permission model | NetSuite role and Claude connector controls | Kipper permission sets over approved finance data |
| Best for | Direct official Claude-to-NetSuite access | Team-wide finance Q&A in work tools |
The operating model is the other half of the decision. Oracle’s route authenticates each person as a NetSuite user, with a role to design and review. Kipper is built for the larger group that does not work in NetSuite directly: NetSuite plans start at $1,000/month with up to 20 active users included, and additional active users are $25/month (pricing as of August 2026).
For the Claude route, see the NetSuite Claude connector; for the hosted option more broadly, Kipper’s NetSuite MCP connector. Compare the options in the NetSuite MCP guide, see pricing, or book a demo.
Next Steps
Connecting Claude to NetSuite through the official AI Connector Service turns your ERP from something people have to go dig through into something they can just ask. The setup takes a bit of deliberate configuration on the NetSuite side (a scoped custom role, the SuiteApp, an integration record), but once it’s live, the day-to-day experience is as simple as typing a question into Claude.
Set it up in sandbox first, scope the role carefully, then review the integration record and logs before widening access.
Related Reading
- NetSuite MCP Permissions Explained
- NetSuite MCP Troubleshooting
- How to Connect NetSuite to ChatGPT Using the NetSuite App
- 6 Ways to Connect AI to Your NetSuite Books
- 30 Questions You Can Ask AI About Your NetSuite Data
- How to Connect NetSuite to Codex Using the NetSuite Plugin
- NetSuite MCP SuiteQL Access Explained
- Kipper’s NetSuite MCP Connector
FAQ
Do I need Administrator access to use the NetSuite AI Connector Service?
You need Administrator access for the one-time setup, but the AI connection itself cannot run under the Administrator role. NetSuite blocks the AI Connector Service from the Administrator role or any role with full, unrestricted permissions, so you create a dedicated, scoped custom role for day-to-day use.
Can Claude change or delete data in NetSuite?
Only if you grant it. Oracle’s ns_createRecord and ns_updateRecord tools require the REST Web Services permission on the connected role, on top of create or edit permissions for the record type itself. Leave that permission off and the role is read-only in practice. Use NetSuite’s Execution Log to monitor exactly what was requested, by whom, and what the outcome was.
Can the NetSuite AI Connector Service run NetSuite’s standard reports?
Yes, subject to the role. The Standard Tools include ns_listAllReports and ns_runReport, covering both standard and custom reports. What varies is which reports the connected role can access and whether a given report’s shape returns identically through MCP, so test the specific reports your team depends on.
What’s the difference between the MCP Standard Tools SuiteApp and custom tools?
The MCP Standard Tools SuiteApp is Oracle’s pre-built set of tools (records, reports, saved searches, SuiteQL) with minimal setup, and its integration record is created automatically on first connection. Custom tools are built by your own developers for bespoke workflows, and their integration record must be set up manually.
My new custom role isn’t showing up when I authorize the connection. Why?
It’s usually a stale NetSuite session rather than a misconfiguration. Log all the way out of NetSuite (not just switch roles) and log back in before retrying the connection from Claude. This resolves the missing-role issue more often than any actual permission fix.